
In this tutorial, you will create a reactive web service using Spring Boot and Spring Webflux. The web service will demonstrate how to use feature flags in a reactive environment using Split’s Java SDK. You’ll use the Spring Initializr project to bootstrap your application with the necessary configuration parameters quickly. The simple application you’ll build will expose a resource that streams words once a second from a paragraph from James Baldwin’s “A Letter to my Nephew.”
As I mentioned, this project will be reactive. That certainly sounds exciting, but what does it mean? This is honestly a big topic that can’t be explained in full detail here. I’m just going to give an overview.
Deploy Continuously with Confidence – Sign up for a Split demo!

Speed up development cycles, reduce release risk, and focus your team on DevOps best practices that create maximum impact. Get a personalized demo today!
Reactive Programming in Java
Reactive programming is a programming paradigm that is built around stream processing. Data is handled as a stream of data points passing through a pipeline of functions or operators. Each operator can transform and manipulate the data before it is passed on to the next operator. You may be familiar with operators like map, collect, and reduce. These operations are chained until the transformed data is returned. Reactive is in contrast to imperative code where a program state is maintained, and functions or methods operate on the state, mutating it.
Reactive programming is also non-blocking and asynchronous. This means that it is designed to work with single-threaded, non-blocking servers like Netty, Undertow, and Node.js. Non-blocking code is another HUGE topic but stated simply, it is code that never stops and waits for something to finish–such as reading from a disk or making a network call–“blocking” the thread. Instead, callbacks and promises are used to defer code execution until the input data is ready, allowing the thread to continue processing other work.
Ideally, this allows for super high performance because the server can do all of its work on a single thread and doesn’t waste time and resources managing a rotating stack of worker threads that the processor has to constantly switch between. As with all things, however, there are trade-offs.
For example, non-blocking code has historically been harder to implement, maintain, and debug (search the internet for “callback hell”). This has changed to some degree as the technology has matured. The world, however, is rarely ideal. Not all non-blocking code is non-blocking, and one piece of poorly written code in a dependency can start blocking your entire web service, cratering your performance. But when done right, reactive non-blocking code can be a great tool. One use case in which non-blocking, reactive code excels is handling streams.
Spring Webflux is Spring Boot’s reactive, non-blocking web application implementation. It uses Project Reactor for its reactive Java implementation and, by default, Netty for its non-blocking web server implementation. Webflux actually supports other web server implementations, such as Tomcat, Jetty, Undertow, and Servlet 3.1+ containers. Why anyone would use Tomcat or Jetty with Webflux (using a blocking servlet container with a reactive, asynchronous framework) is a great and open question, but you have that option.
Spring Webflux is implicitly in contrast to Spring MVC. Spring MVC is the good, old-fashioned servlet-based Java server. It’s a multi-threaded, concurrent system that allows blocking, synchronous code. Instead of using callbacks and promises to handle concurrency, it assumes that each request will happen in its own thread (and may potentially launch extra worker threads as needed). There is, in fact, absolutely nothing wrong with this paradigm or technology. For every benchmark article claiming non-blocking is faster than blocking, you can find another one claiming the opposite. Well written blocking code can be just as fast as non-blocking code, generally speaking. A well-designed and properly administered system is going to beat a poorly thought out system that isn’t being maintained or administered correctly.
Get Started with Feature Flags in Java
The last topic before you dive into the code is feature flags. In a traditional development environment, if you want to make updates or changes to your deployed application, you change the code, package it, deploy it, and make a release. This is slow. Feature flags are a way to make the release process far more dynamic. In essence, they are dynamic state variables checked at runtime to determine how the code behaves while deployed. The flag’s state lives on a server, and the state can be updated in real-time. You write your code in logical chunks whose state is determined by the flags.
Using this system, you could, for example, roll out a new feature to a small portion of your user base as an alpha test. Once that is passed, you could roll it out to a larger portion as a beta. If the beta fails, you could roll all the users back. If it passes, you could finish the roll out to all of your users.
Another idea would be to use them for A/B testing. That is, dynamically segment users and roll out one set of features to one set of users and another set of features to a different group.
In this tutorial, you will use Split as the feature flag service provider. Split offers a free account that will allow you to create feature flags and integrate them into the Spring Boot application using Split’s Java SDK.
Since this tutorial focuses on reactive programming with Spring Boot and Spring Webflux, I want to point you to a couple of general resources on using feature flags with Spring Boot. This post gives a general overview of using feature flags with Spring Boot. This one demonstrates how to integrate the Split SDK into the more traditional Spring MVC web server configuration.
Dependencies
Java: I used Java 12 for this tutorial. You can download and install Java by going to the AdaptOpenJdk website. Or you can use a version manager like SDKMAN or even Homebrew.
Split: Sign up for a free Split account if you don’t already have one. This is how you’ll implement the feature flags.
HTTPie: This is a powerful command-line HTTP request utility you’ll use to test the reactive server. Install it according to the docs on their site.
Use Spring Initializr to Create Your Demo App
Spring has a project that helps create applications called the Spring Initializr. You’re going to use it to download a pre-configured starter project.
Open this link, which will load the correct configuration.
For the curious, you can accomplish the same thing as the link above from the command line:
http https://start.spring.io/starter.tgz \
type==gradle-project \
language==java \
platformVersion==2.4.0.RELEASE \
packaging==jar \
javaVersion==11 \
groupId==com.example \
artifactId==demo \
name==demo \
description==Demo%20project%20for%20Spring%20Boot \
packageName==com.example.demo \
dependencies==devtools,webflux \
| tar -xzvf -Code language: SQL (Structured Query Language) (sql)The most important thing is it’s configuring the webflux dependency. You can look at the Spring Initializr GitHub page if you want to learn more about the configuration options.
One cool feature I’ll point out is the EXPLORE button at the bottom of the page. Click that, and you can dig through a preview of the project online.
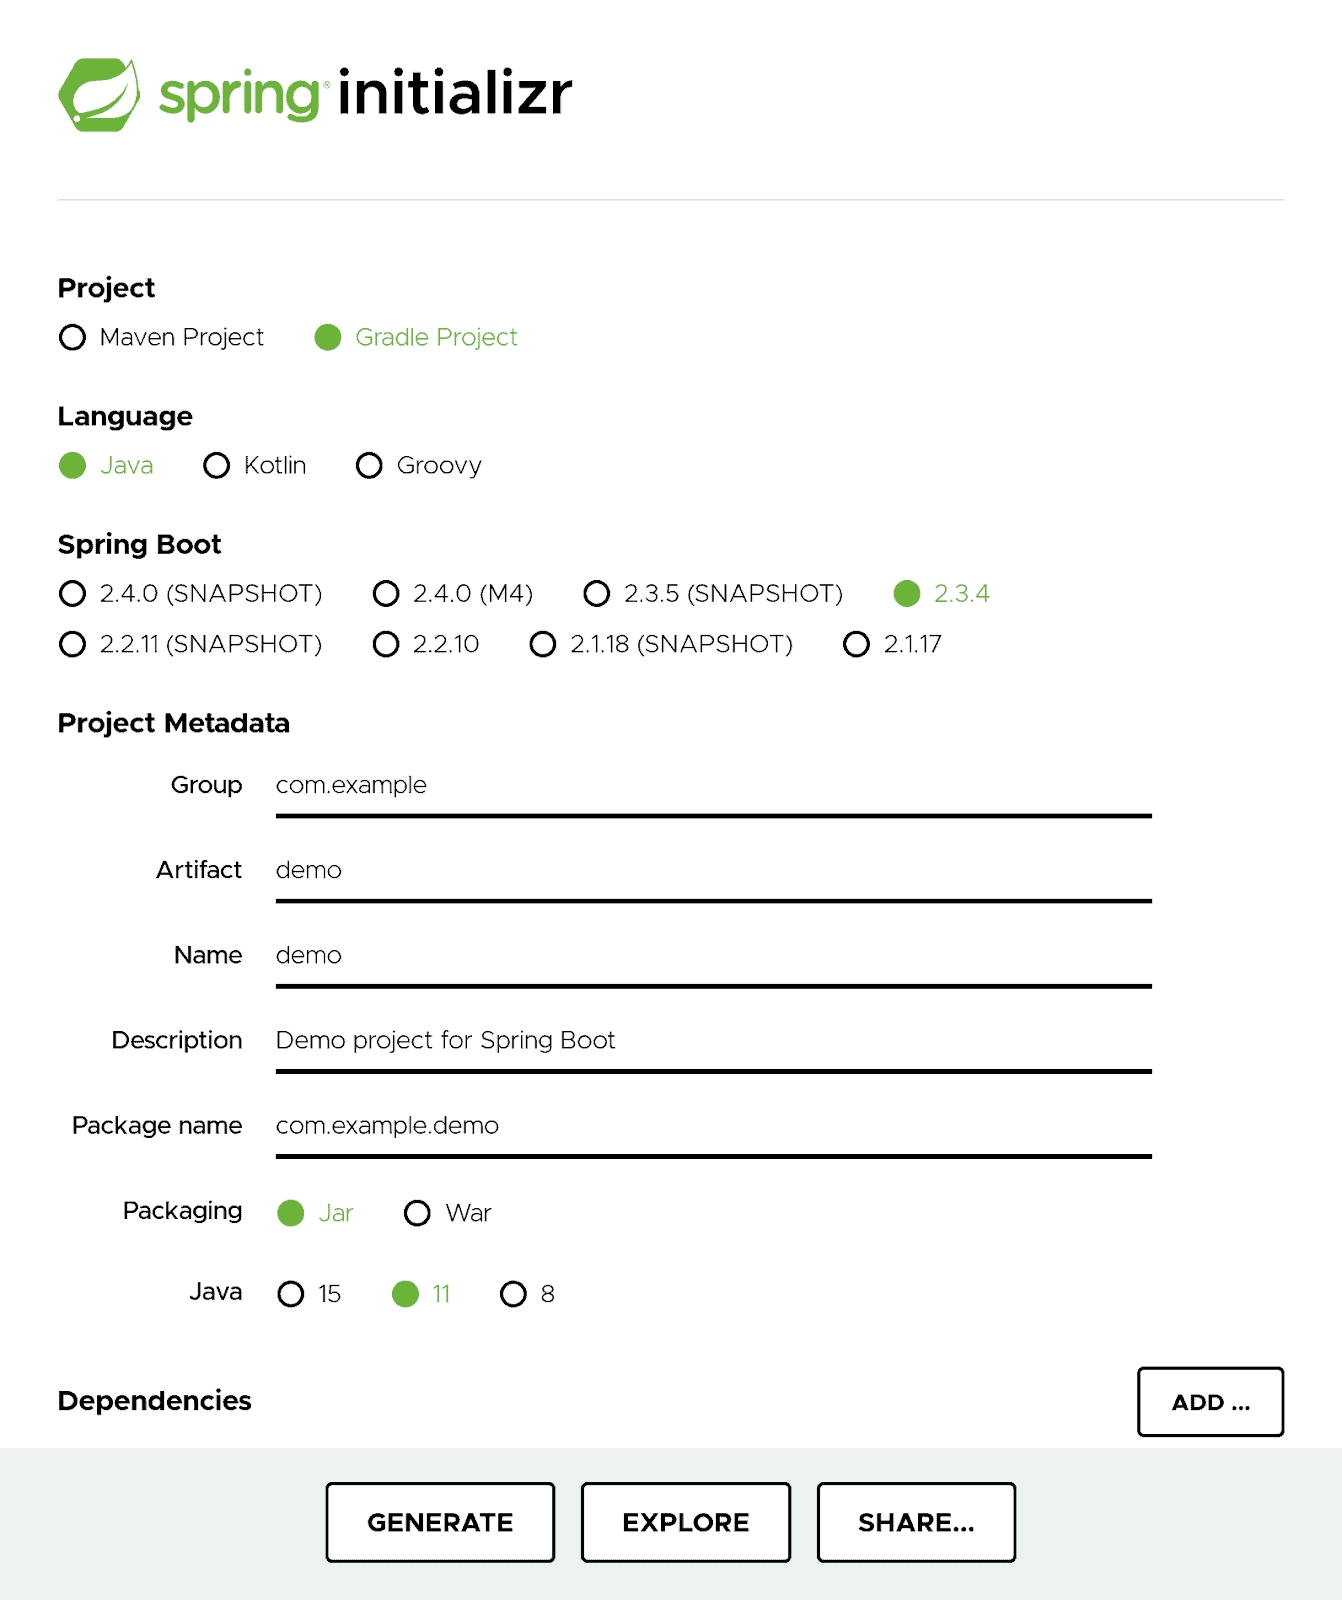
Click the GENERATE button. Download the demo.zip file and unzip it somewhere appropriate.
Create a Reactive Streaming Server
At this point, you have a fully functional reactive Spring Boot application that does absolutely nothing. If you examine the project at this point, you’ll see that there’s not much to it. There’s basically a DemoApplication.java file.
src/main/java/com/example/demo/DemoApplication.java:
@SpringBootApplication
public class DemoApplication {

    public static void main(String[] args) {
        SpringApplication.run(DemoApplication.class, args);
    }

}Code language: Java (java)
Of course, this simplicity hides a ton of complexity on the back end. Spring has configured an application for you that uses Netty (this is the default – there are other options, like Undertow) as the webserver engine and supports the Java Reactor framework for reactive Java programming. And all of this has been folded into the Spring programming framework to be highly configurable and extensible.
To make life more exciting, you should probably have the demo application do something. In this case, you’re going to have it live stream a speech, emitting a new word every second.
Create a new Java file called DemoResource.java.
src/main/java/com/example/demo/DemoResource.java:
package com.example.demo;

import org.springframework.http.MediaType;
import org.springframework.web.bind.annotation.GetMapping;
import org.springframework.web.bind.annotation.RestController;
import reactor.core.publisher.Flux;

import java.time.Duration;

@RestController
public class DemoResource {

    // Excerpt of James Baldwin "A Letter to my Nephew"
    private String[] speech = {
            "Well,","you","were","born;","here","you","came,","something","like","fifteen","years","ago,","and","though",
            "your","father","and","mother","and","grandmother,","looking","about","the","streets","through","which","they",
            "were","carrying","you,","staring","at","the","walls","into","which","they","brought","you,","had","every",
            "reason","to","be","heavy-hearted,","yet","they","were","not,","for","here","you","were,","big","James,",
            "named","for","me.","You","were","a","big","baby.","I","was","not.","Here","you","were","to","be","loved.",
            "To","be","loved,","baby,","hard","at","once","and","forever","to","strengthen","you","against","the",
            "loveless","world.","Remember","that.","I","know","how","black","it","looks","today","for","you.","It","looked",
            "black","that","day","too.","Yes,","we","were","trembling.","We","have","not","stopped","trembling","yet,",
            "but","if","we","had","not","loved","each","other,","none","of","us","would","have","survived,","and","now",
            "you","must","survive","because","we","love","you","and","for","the","sake","of","your","children","and",
            "your","children's","children.",
    };

    @GetMapping(value="/speech", produces = MediaType.TEXT_EVENT_STREAM_VALUE)
    public Flux<String> getSpeech() {
        return Flux
                .fromArray(speech)
                .delayElements(Duration.ofSeconds(1))
                .repeat()
                .log();
    }
}Code language: Swift (swift)
From a shell, start the Spring Boot app.
./gradlew bootRunOnce the app has finished loading from a second shell, use HTTPie to test the endpoint. Notice the --stream parameter. Pretty sweet that HTTPie supports streaming endpoints.
http :8080/speech --streamCode language: SQL (Structured Query Language) (sql)You should see something like the following, with a word from James Baldwin’s “A Letter to my Nephew” streamed each second.
HTTP/1.1 200 OK
Content-Type: text/event-stream;charset=UTF-8
transfer-encoding: chunked

data:Well,

data:you

data:wereCode language: PowerShell (powershell)
Create a Feature Flag Treatment
Before you change the code to use the Java Split SDK to react to treatments, you need to create a treatment in your Split account. If splits and treatments are new to you, I’d suggest reading through the getting started information on Split’s website.
Briefly stated, a split is a decision point in code that can be used to modify the code in real-time without rebuilding and redeploying the code. It’s a flag that you define in your code that allows you to change how your code works through the Split dashboard instead of pushing updates to the app. A treatment is the specific state of these real-time flags. The SplitClient retrieves the treatment when you call the getTreatment(String key, String splitName) method, based on the key and the split’s name. The key could be any arbitrary, unique string. But most often might be the username of the current user.
Pro Tip: There’s an optional third getTreatment parameter (which we won’t use here), which is an attribute map object containing user attributes in name-value pairs. Even sensitive user data can be passed in this map because none of it is sent to Split’s cloud. Instead, the attribute map is compared in local memory to targeting rules you have entered in the Split UI. More in the Split SDK docs: custom targeting with attribute maps. |
Using Split and feature flags, you could, for example, dynamically test a set of new features on different subsets of users, and depending on how the testing went, you could move the features to a full roll-out or roll them back, all without having to redeploy the app.
I glossed over a simplification above. I said that the SplitClient.getTreatment() method retrieves the treatment. When the client is created, the possible treatment values are cached, and a socket connected to Split is opened. If the treatment is updated on the Split servers, the socket is used to update the cached values. In this way, the getTreatment() method is much more performant than if it had to make an actual network request to the Split servers and updates to the treatments can be pushed in real-time (theoretically real-time, in practice I noticed a lag of about 10-20 seconds between updates on the dashboard and those updates being reflected locally).
You’re going to create a split named speech. The split’s treatment will have three possible values: a, b, and off. A user’s name will determine which treatment is returned (passed in as a query param to the resources server, for simplicity).
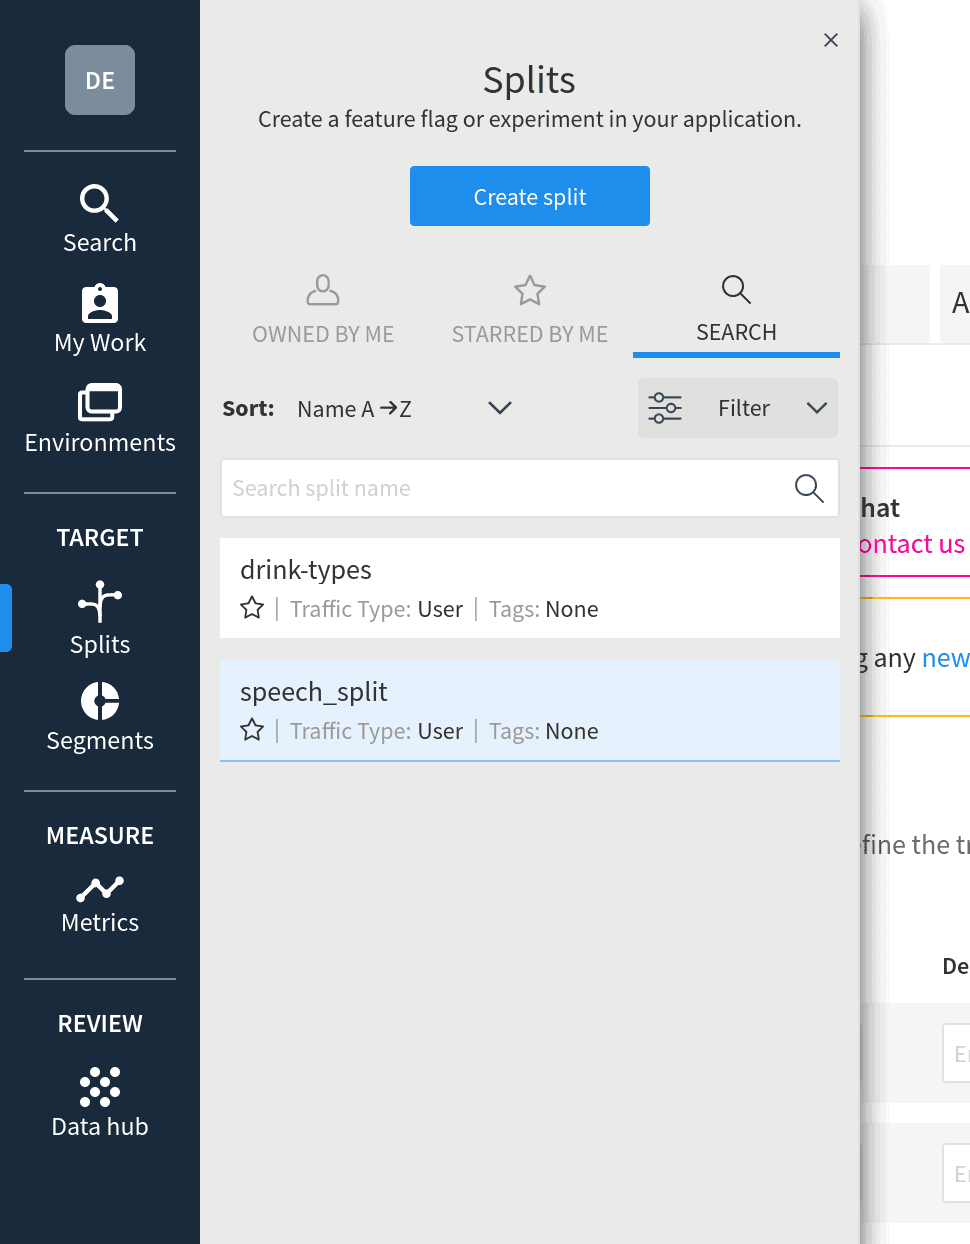
Open the Split dashboard. You should be in the Default workspace.
Click on the blue Create Split button.
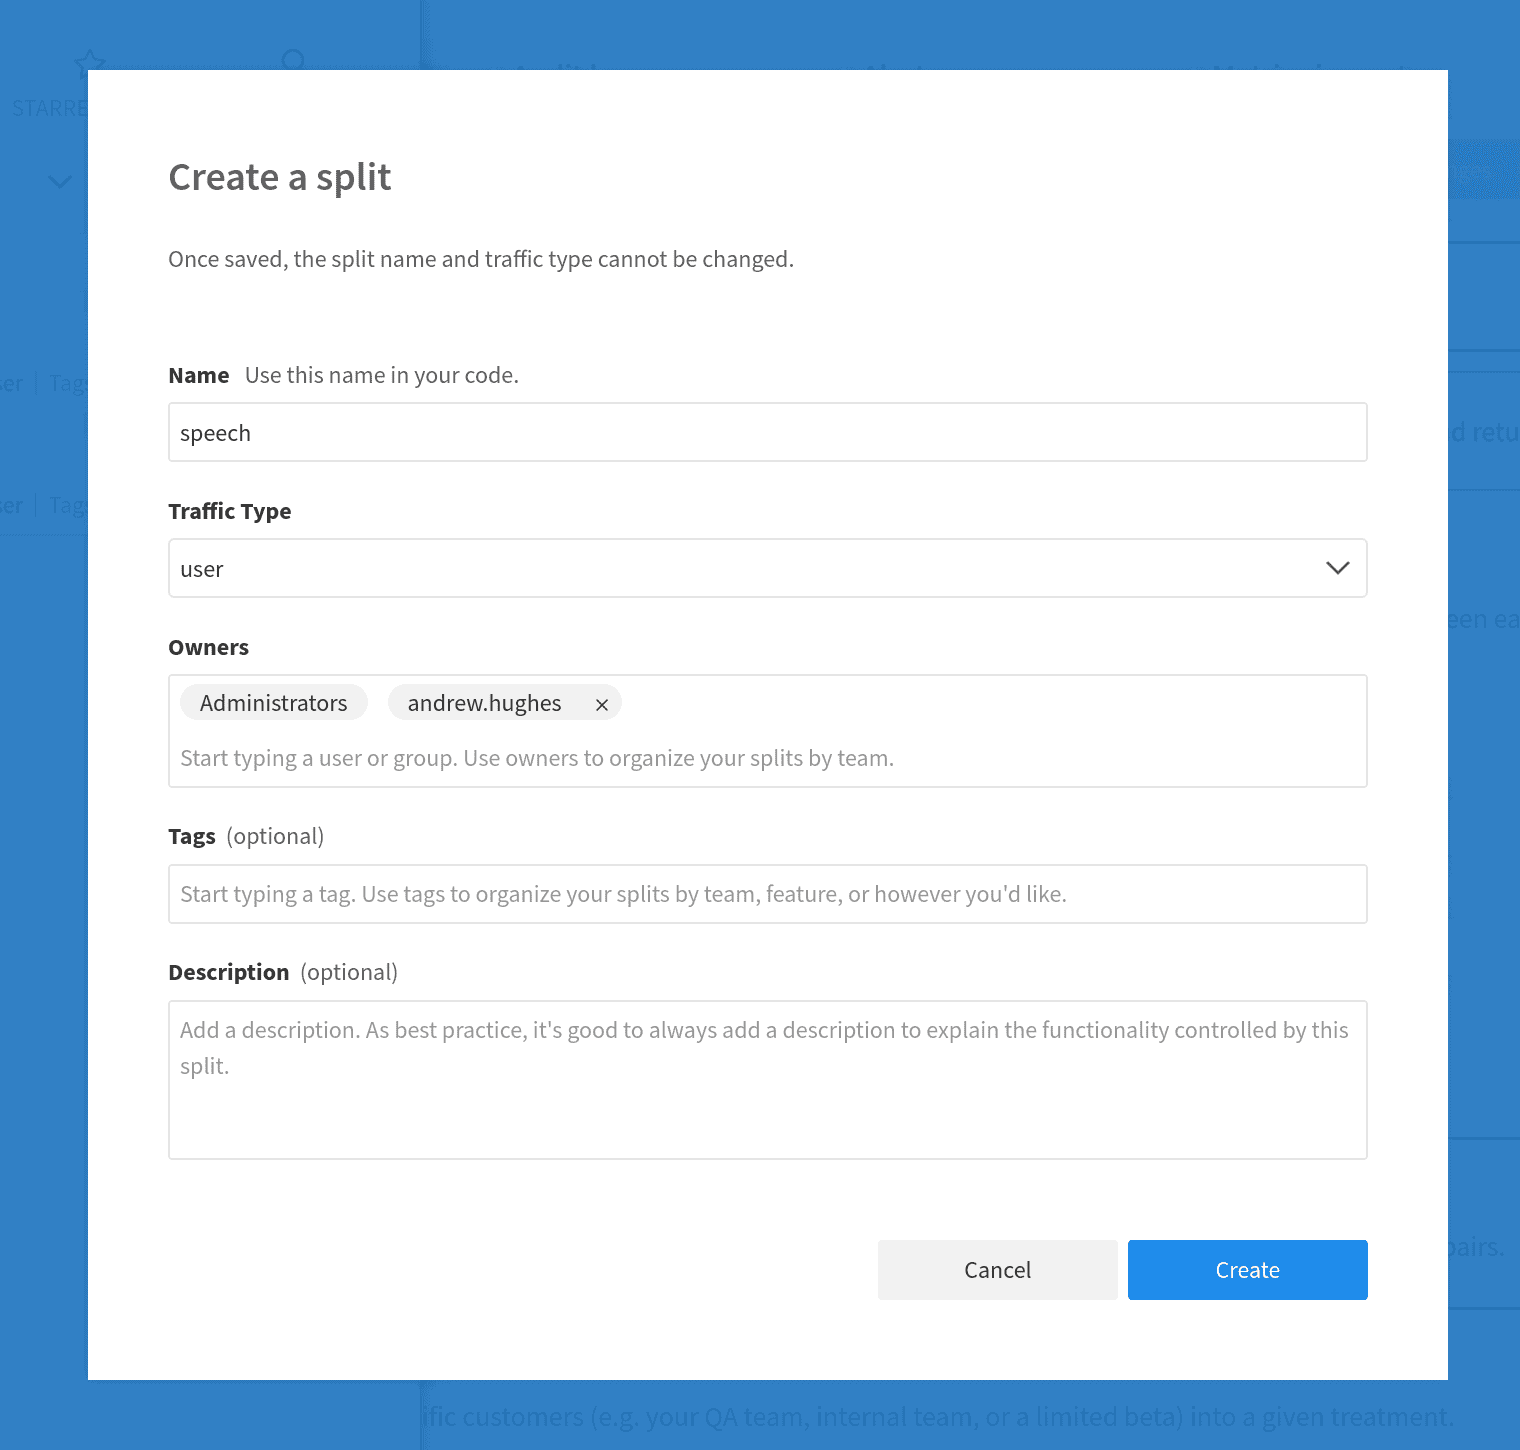
Give the split a name: speech. You can leave the rest blank.
Click Create.
You should be in the staging-default environment for the new split.
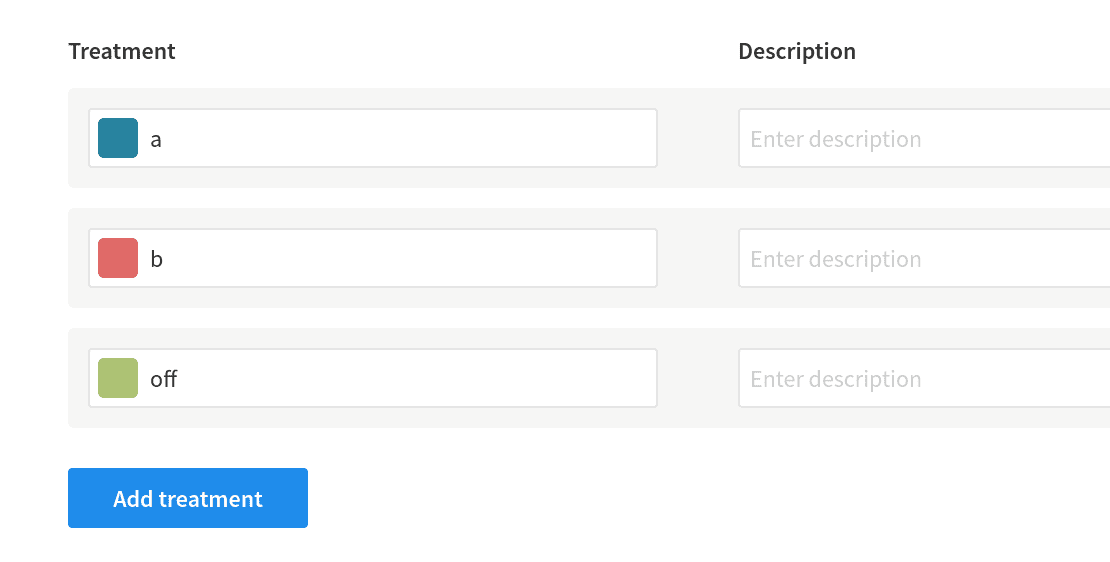
Click the Add Rules button. Split adds on and off by default. Click the Add Treatment button to add a new value. Change the labels for the three treatment values to a, b, and off.
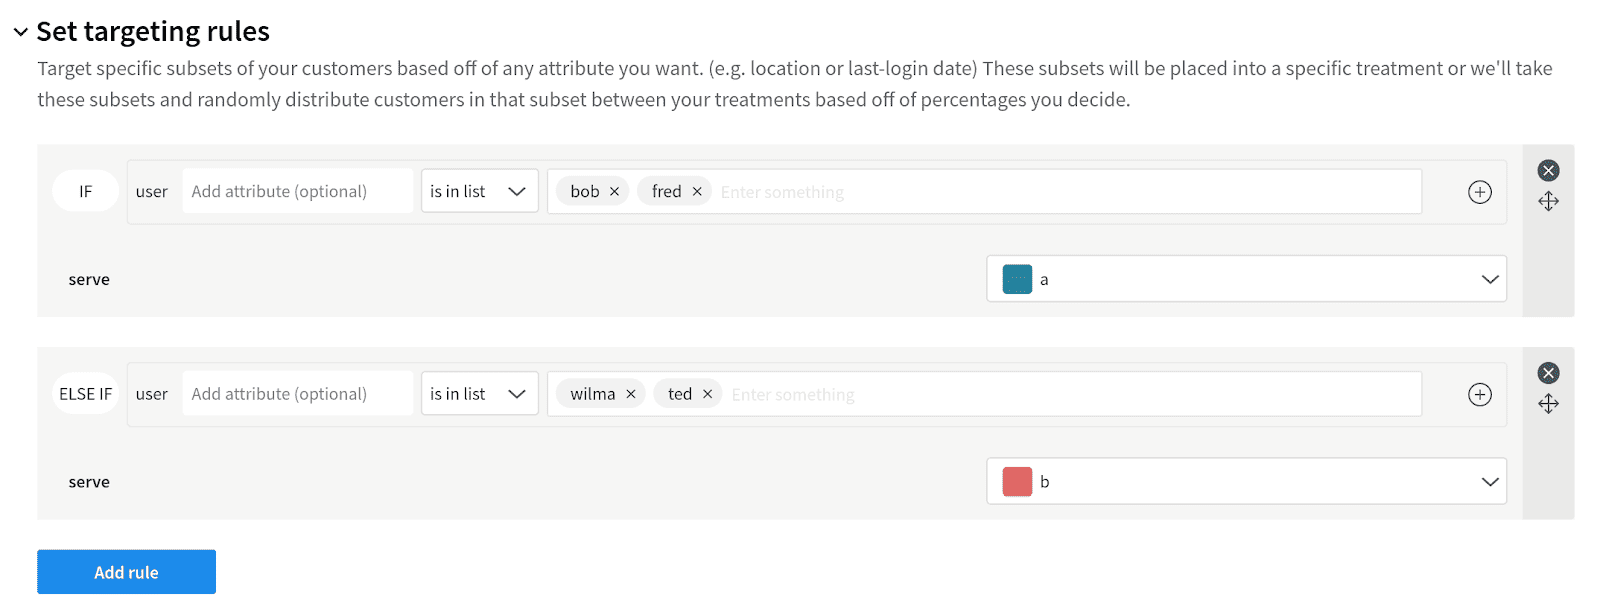
Now you want to define two targeting rules. The first rule will tell Split that if the user’s name is bob or fred, it should serve treatment a.
Scroll down until you see the Set targeting rules section. Click Add rule. Click the drop drown that says is in segment, hover on string, and click on is in list. In the text box to the right, enter two names: bob and fred. Ensure the serve drop down (bottom right of the gray box for the rule) shows the a treatment.
The second rule will tell Split that if the user’s name is wilma or ted, it should serve treatment b.
Click Add rule. Click the drop drown that says is in segment, hover on string, and click on is in list. In the text box to the right, enter two names: wilma and ted. Make sure the serve drop-down shows the b treatment.
Below that, you want to make the default behavior for any other users to be off. Under the next section, Set the default rule, change the serve drop-down to off. Likewise, in the following section, Set the default treatment, select the off treatment.

Click the blue Save changes button at the top of the screen. Scroll down and click Confirm.
That’s it on the Split dashboard. To summarize, you created a single split with three treatments. You created a couple of rules that assign treatment a to users named either bob or fred and treatment b to users named wilma or ted. All other users get the off treatment, which is also the default if there is a network problem or if the client is unable to retrieve a treatment for some other reason.
Configure the Reactive Streaming Server to Use Feature Flag Treatments
Open the build.gradle file and add the Split SDK dependency.
dependencies {
...
    compile 'io.split.client:java-client:4.1.0'
}Code language: Bash (bash)
Create a SplitConfig file that handles configuring the SplitClient bean, which will be injected into the DemoResource.
src/main/java/com/example/demo/SplitConfig.java
@Configuration
public class SplitConfig {

    @Value("#{ @environment['split.api-key'] }")
    private String splitApiKey;

    @Bean
    public SplitClient splitClient() throws Exception {
        SplitClientConfig config = SplitClientConfig.builder()
                .setBlockUntilReadyTimeout(1000)
                .enableDebug()
                .build();

        SplitFactory splitFactory = SplitFactoryBuilder.build(splitApiKey, config);
        SplitClient client = splitFactory.client();
        client.blockUntilReady();

        return client;
    }

}Code language: Java (java)
You need your Split API key. From the Split dashboard, go to the square workspace icon in the top-left of the dashboard (which probably says DE for default) and click on it. Click on Admin Settings. Click on API keys in the panel on the left side, under Workspace settings.
There will be four API keys, two for production and two for staging. There are also different keys for server-side and client-side use. Copy the SDK and staging-default key.
Add it to your application.properties.
split.api-key={yourSplitApiKey}Code language: Swift (swift)Finally, update DemoResource.java to use the SplitClient to get the treatment and use it.
@RestController
public class DemoResource {

    // Excerpt of James Baldwin "A Letter to my Nephew"
    private String[] speech = {
            "Well,","you","were","born;","here","you","came,","something","like","fifteen","years","ago,","and","though",
            "your","father","and","mother","and","grandmother,","looking","about","the","streets","through","which","they",
            "were","carrying","you,","staring","at","the","walls","into","which","they","brought","you,","had","every",
            "reason","to","be","heavy-hearted,","yet","they","were","not,","for","here","you","were,","big","James,",
            "named","for","me.","You","were","a","big","baby.","I","was","not.","Here","you","were","to","be","loved.",
            "To","be","loved,","baby,","hard","at","once","and","forever","to","strengthen","you","against","the",
            "loveless","world.","Remember","that.","I","know","how","black","it","looks","today","for","you.","It","looked",
            "black","that","day","too.","Yes,","we","were","trembling.","We","have","not","stopped","trembling","yet,",
            "but","if","we","had","not","loved","each","other,","none","of","us","would","have","survived,","and","now",
            "you","must","survive","because","we","love","you","and","for","the","sake","of","your","children","and",
            "your","children's","children.",
    };

    SplitClient splitClient;

    public DemoResource(SplitClient splitClient) {
        this.splitClient = splitClient;
    }

    @GetMapping(value="/speech", produces = MediaType.TEXT_EVENT_STREAM_VALUE)
    public Flux<List<String>> getSpeech(@RequestParam String user) {
        return Flux
                .fromArray(speech)
                .publishOn(Schedulers.boundedElastic())
                .map(word -> {
                    String treatment = splitClient.getTreatment(user,"speech");
                    String treatedWord = word;
                    if (treatment.equals("a")) {
                        treatedWord = word.toUpperCase();
                    }
                    else if (treatment.equals("b")) {
                        treatedWord = word.toLowerCase();
                    }
                    return Arrays.asList(treatedWord, treatment);

                })
                .delayElements(Duration.ofSeconds(1))
                .repeat()
                .log();
    }
}Code language: Arduino (arduino)
Notice that the getSpeech() method now returns a list of strings. It returns the current word and the treatment. This is just for testing or demo purposes so that you can explicitly see what treatment is active.
Also, notice that you’re using Spring’s dependency injection to pass the SplitClient bean configured in the SplitConfig class to the DemoResource constructor.
SplitClient splitClient;

public DemoResource(SplitClient splitClient) {
    this.splitClient = splitClient;
}Code language: Arduino (arduino)
Pay attention to the following line in the code from the getSpeech() method. It’s important.
.publishOn(Schedulers.boundedElastic())Code language: CSS (css)You have to use the publishOn operator because the SplitClient.getTreatment() method is blocking or synchronous. The publishOn operator pushes the execution thread to a new thread so that it doesn’t block one of the main threads used by the Netty server.
Remember that non-blocking, and asynchronous servers work using a single main thread (or a very small number of them). Blocking that thread blocks the entire web server. Don’t ever do this. If you block the main thread, your coworkers will hate you, your enemies will taunt you, and your friends will laugh at you. The high performance that non-blocking servers like Netty and Node.js can potentially achieve is largely a product of their not having to perform a lot of context switching between threads. However, this is contingent on code in the main thread behaving by never blocking the thread but instead deferring execution using callbacks and promises.
When you want to use a blocking API in a non-blocking context, the only way to handle it is to push it off onto a worker thread. There’s a trade-off here because once you start pushing work off from the main thread onto other threads you start to reduce the efficiency of the non-blocking model. The more you do this, the more you start to look like a traditional web server. At some point, you would likely be better served by simply using a server like Tomcat (used by default in Spring MVC), which is highly optimized to handle a multi-threaded web environment. For a discussion of this, and more on handling blocking code in WebFlux, take a look at this Spring blog post.
Finally, take a look at the section of the getSpeech() method that has been added to retrieve and use the treatment.
.map(word -> {
    String treatment = splitClient.getTreatment(user, "speech");
    String treatedWord = word;
    if (treatment.equals("a")) {
        treatedWord = word.toUpperCase();
    }
    else if (treatment.equals("b")) {
        treatedWord = word.toLowerCase();
    }
    return Arrays.asList(treatedWord, treatment);

})Code language: Arduino (arduino)
You see the getTreatment() call to the SplitClient. This is the blocking call that retrieves the treatment value. The treatment will be a string value, either a, b, or off.
After that, there is a pretty straightforward if / else if sequence that modifies the returned word based on the treatment and also returns the treatment itself.
Test the Treatment
Try it out. Run the server from a shell.
./gradlew bootRunOnce that’s ready, make the streaming GET request.
http :8080/speech user==bob --streamCode language: SQL (Structured Query Language) (sql)You’ll see a stream with the words in all caps and a treatment value of a.
HTTP/1.1 200 OK
Content-Type: text/event-stream;charset=UTF-8
transfer-encoding: chunked

data:["WELL,","a"]

data:["YOU","a"]

data:["WERE","a"]

data:["BORN;","a"]Code language: PowerShell (powershell)
Leave the Java server running but control-c to stop the HTTPie client. Rerun the client, passing in a new value for the user name.
http :8080/speech user==wilma --streamCode language: SQL (Structured Query Language) (sql)This time you’ll see treatment b and all lowercase.
HTTP/1.1 200 OK
Content-Type: text/event-stream;charset=UTF-8
transfer-encoding: chunked

data:["well,","b"]

data:["you","b"]

data:["were","b"]

data:["born;","b"]Code language: PowerShell (powershell)
To see how these treatments can be manipulated in real-time, leave this running and go back to your Split dashboard. Open the speech split and scroll down to the Set targeting rules panel. In the second rule (the one with wilma and ted), switch the serve drop-down from b to a. At this point, nothing has changed. You have to click the Save changes button at the top of the screen. Confirm the changes.
Now watch the shell window with the streaming values. In a few seconds, it will change to reflect this update.
data:["at","b"]

data:["once","b"]

data:["and","b"]

data:["FOREVER","a"]

data:["TO","a"]

data:["STRENGTHEN","a"]Code language: CSS (css)
Pretty cool. Real-time updates. Obviously, these examples are somewhat trivial, but once you understand the power of dynamic feature flags embedded in your code, there are all kinds of great things you can do with them.
What You Learned: Spring Initializr, Reactive Java, Spring WebFlux, and Feature Flags
In this tutorial, you used the Spring Initializr to create a Reactive Java application using Spring Boot and Spring Webflux. The Java application generated a stream of words using reactive, non-blocking code. You used HTTPie to test this reactive, streaming server from the command line. You used Split to implement a feature flag in your code. You saw how to create a split, define treatments, and define targeting rules based on user attributes. Next, you used the Split Java SDK to integrate this feature flag into your reactive Java web application. You saw how to use the publishOn operator to integrate blocking code into a non-blocking web environment correctly. Finally, you saw how the treatment values and targeting rules could be updated in real-time on the Split dashboard.
You can find the completed source for the example from this post on this GitHub repo.
Learn More About Spring and Reactive Java
- Spring’s Reactive Docs
- Flux 3 Threads and Schedulers
- Notes on Reactive Programming
- Project Reactor Docs
Learn More About Feature Flags in Java
- Get Started with Spring Boot and Vue.js
- Testing a Feature-flagged Change
- Leverage Spring Security to Test in Production
- Build a CRUD App with Spring Boot and React in 20 Minutes
- Monitor Your Java App with New Relic
And as always, we’d love to have you follow along as we build new content! You can find Split on Twitter, LinkedIn, and YouTube!
Get Split Certified
Split Arcade includes product explainer videos, clickable product tutorials, manipulatable code examples, and interactive challenges.
Deliver Features That Matter, Faster. And Exhale.
Split is a feature management platform that attributes insightful data to everything you release. Whether your team is looking to test in production, perform gradual rollouts, or experiment with new features–Split ensures your efforts are safe, visible, and highly impactful. What a Release. Get going with a free account, schedule a demo to learn more, or contact us for further questions and support.