
Spring Security is the “gold standard” in the Java world for integrating authentication and authorization into web applications. It supports standards, like SAML, OpenID Connect, and OAuth. It supports database backends and in-memory storage for user identity data.
Split is the “gold standard” for testing and measuring different experiences in web applications. And, Split enables you to test in production, with a small group of users, without having to redeploy your code. When the test is complete and the new functionality is ready to go live, you flip a switch in Split and – boom – there it is for everyone. Again, without having to redeploy. That is a massive time saver for your development and DevOps teams. (And it’ll make your PM pretty happy too!)
The marriage of Split and Spring Security is so easy that it just might blow your mind!
In this post, I’m going to walk you through building an application that demonstrates how to:
- Create a test using Split (called a treatment)
- Create an app with Spring Boot and Spring Security that leverages the treatment
- Set up the app in such a way that only a “beta test” group has access to new functionality
- Update the treatment so that all users get the new functionality
- NOT deploy the code more than once
Imagine a web app that’s in production. You want to add some new functionality that’s only available to a “beta test” group of users. When the beta test group gives you the thumbs up that the new functionality is good, you want to enable it for all users. And, you only want to deploy this app once. As a bonus, you want to be able to add new functionality in the future and beta test it in the same way, without having to update the part of the code responsible for managing the test. All of this is possible with Split and is what I am going to show you right now!
Get Started with Spring Boot
The Spring Initializr project makes getting started with Spring Boot a snap. For the example app, I’ll use the web, thymeleaf and spring security dependencies. You can customize things like package name and artifact ID. Then, you can download an archive of the complete project scaffolding, ready to be imported into the IDE of your choice.
If you’re a denizen of the terminal like me, you don’t even need the website. You can run the following:
mkdir split-spring-security-beta-test-example && cd split-spring-security-beta-test-example
curl https://start.spring.io/starter.tgz \
-d dependencies=web,thymeleaf,security \
-d groupId=io.split.examples \
-d artifactId=split-spring-security-beta-test-example \
-d packageName=io.split.examples.betatestexample \
-d description="Leverage Spring Security to Beta Test new Features" \
| tar -xvf -The important bit is the: dependencies=web,thymeleaf,security which tells Spring Initializr what dependencies to include in the pom.xml file.
NOTE: By default, Spring Boot now uses Java 11. Make sure you have the appropriate JDK installed on your machine. On Mac, I like to use sdkman to manage multiple JDKs.
Import the project into your IDE. I use IntelliJ. You can also find the completed project on GitHub.
At this point, you can actually fire up the project with:
mvn spring-boot:runSpring Security has a “deny all unless otherwise specified” approach, which is a security best practice. You’ll notice in the output a default generated password for accessing this bare-bones application.
Something like:
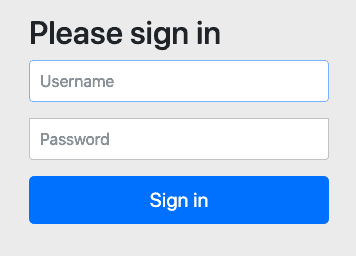
Using generated security password: fe23b3bf-fa77-4c60-9c28-4bf97e1c3300If you browse to http://localhost:8080, you’ll see a default login form:
The default username is: user. Using this and the password above, you can login. You’ll immediately see an error on successful login because we haven’t actually created an application yet. But, you can see that authentication is working out of the box.
Set up Some In-Memory Users and Groups
For the purposes of the demonstration, I am going to use a simple, in-memory database of users and groups. In real life, you’d connect Spring Security to an auth service or database for user identities.
I’ll add a SecurityConfig.java file to the project:
@Configuration
public class SecurityConfig extends WebSecurityConfigurerAdapter {

    @Bean
    @Override
    public UserDetailsService userDetailsService() {

        InMemoryUserDetailsManager userManager = new InMemoryUserDetailsManager(
            newUser("linda", "12345678", "USER"),
            newUser("bob", "12345678", "USER"),
            newUser("tina", "12345678", "USER", "BETA_TESTER"),
            newUser("gene", "12345678", "USER", "BETA_TESTER"),
            newUser("louise", "12345678", "USER", "BETA_TESTER")
        );

        return userManager;
    }

    private UserDetails newUser(String username, String password, String... roles) {
        return User
            .withUsername(username)
            .passwordEncoder(
                PasswordEncoderFactories.createDelegatingPasswordEncoder()::encode
            )
            .password(password).roles(roles).build();
    }
}The private newUser method uses Spring Security’s builder for creating users. It also uses Spring Security’s PasswordEncoderFactories, which defaults to bcrypt hashed passwords, which is a security best practice.
If you restart the application, you can now log in with these five users. Note: you’ll still get an error after login, as we’ve still not set up the application.
Notice that tina, gene, and louise all have the BETA_TESTER role. We’ll use this later to ensure that only they see the new functionality, while bob and linda still see the old functionality.
Add Authenticated Pages
We’re using the Thymeleaf templating engine in our project. This makes it easy for us to set up some pages while keeping the application small and simple.
First, we need a controller to direct incoming traffic to our application. Here’s HomeController.java:
@Controller
public class HomeController {

    @GetMapping("/")
    public String home(@AuthenticationPrincipal UserDetails user, Model model) {
        model.addAttribute("username", user.getUsername());
        model.addAttribute("roles", user.getAuthorities());
        return "home";
    }
}Spring Security automatically passes in the UserDetails object because of the @AuthenticationPrincipal annotation. Spring Web passes in a Model object automatically.
The code adds username and roles to the model and then directs Thymleaf to render the home template by returning it as a String.
Thymeleaf looks for templates by default in src/main/resources/templates. Here’s home.html:
<html xmlns:th="http://www.w3.org/1999/xhtml">
    <head></head>
    <body>
        <h2>
            <span th:inline="text">Hello, [[${username}]]!</span>
        </h2>
        <p/>
        Here are your roles:
        <br/>
        <ul th:each="role : ${roles}">
            <li th:inline="text">[[${role}]]</li>
        </ul>
        <hr/>
        <a href="/logout">Logout</a>
    </body>
</html>This template displays the username found in the model on line 5. And, it iterates over the list of roles using th:each on lines 10 – 12.
Notice that there’s a link to /logout at the bottom. Spring Security has default logout logic built in.
Fire up the app again and you should see that you can login as before and see the simple landing page. You should also be able to logout and login as someone else.
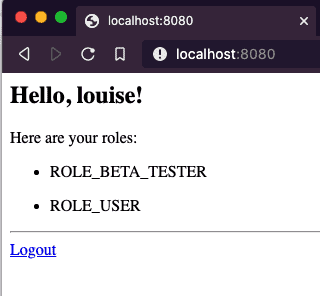
Note: You may notice that although we defined the role as BETA_TESTER, it shows up as ROLE_BETA_TESTER. This is due to Spring Security’s ability to support multiple role types, each with its own prefix. ROLE_ underscore is the default.
At this point, the Spring Boot + Spring Security application is fully functional (such as it is).
Next, I talk about Split and then I bring Spring and Split together.
Get Started with Feature Flags
Getting setup with a free developer account for Split is as easy as 1, 2, 3:
- Go to: https://www.split.io, click: Free Account
- Fill out the registration form and click: SIGN UP
- Follow the link you receive in email and set a password.
Create the Treatment in Split
Treatments allow you to define settings and behaviors for what you want to test. For my example, we want to setup a treatment that will return on or off depending on whether or not you are part of the beta tester group.
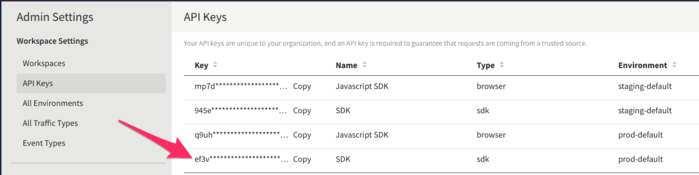
To start, click DE in the upper left. Choose Admin Settings and API Keys. Copy the value for sdk Type in the prod-default Environment. You’ll need this in the Spring Boot app shortly.
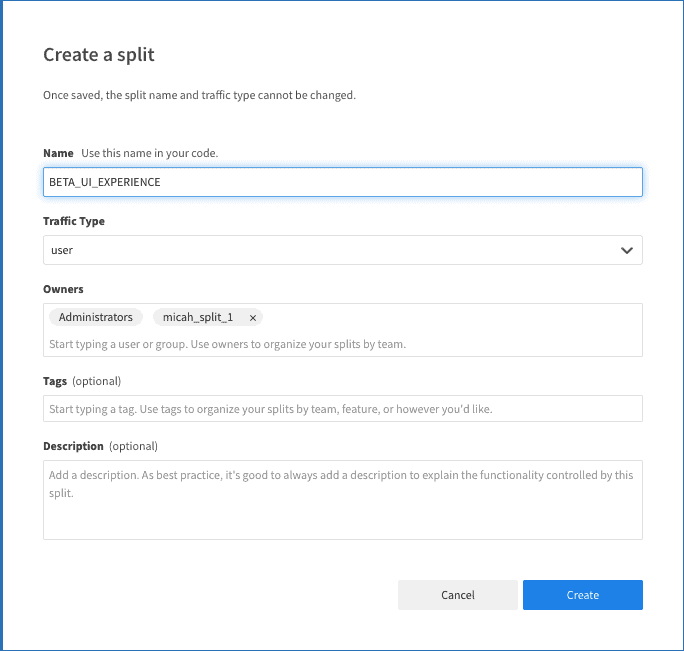
Next, Click Splits on the left-hand side and click Create Split. Give it a Name. Leave the other defaults and click Create.
Next, click Add Rules on the Targeting Rules tab. Split automatically adds on and off treatment definitions and sets off as the default.
For the use-case in this example, we want to add a group for which the treatment will return a value of on.
Click Add Rule in the Set Targeting Rules section. Here, we want to have the treatment return “on” if the user is in the group of beta testers. To accomplish this, enter groups in the Add attribute field. From the Select matcher dropdown, choose Set > has any of and enter ROLE_BETA_TESTER in the field. Change the serve dropdown to on.
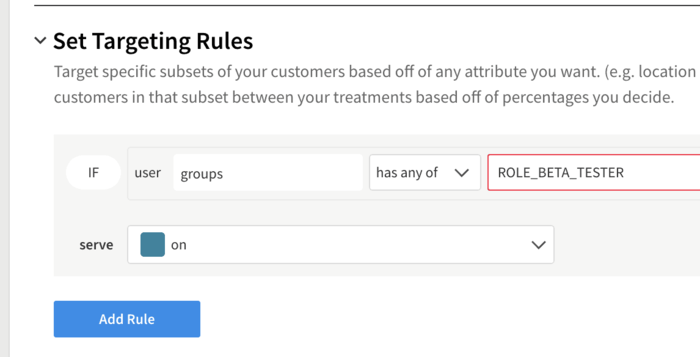
This now makes it read like an english sentence: “If the user has an attribute called groups and the groups list contains the value ROLE_BETA_TESTER, then serve ‘on’ for the treatment”
Click Save Changes
Click Confirm on the summary screen.
Integrate the Treatment with Spring Security
Edit the pom.xml file in the project. Add the following dependency:
<dependency>
    <groupId>io.split.client</groupId>
    <artifactId>java-client</artifactId>
    <version>4.0.1</version>
</dependency>This brings the Split Java SDK into scope for the project.
Next, add a configuration to the project to make the Split Java Client available to the application. Here’s SplitConfig.java:
@Configuration
public class SplitConfig {

    @Value("#{ @environment['split.api-key'] }")
    private String splitApiKey;

    @Bean
    public SplitClient splitClient() throws Exception {
        SplitClientConfig config = SplitClientConfig.builder()
                .setBlockUntilReadyTimeout(1000)
                .enableDebug()
                .build();

        SplitFactory splitFactory = SplitFactoryBuilder.build(splitApiKey, config);
        SplitClient client = splitFactory.client();
        client.blockUntilReady();

        return client;
    }
}Create a file under src/main/resources called application.yml and place the following in it:
split:
api-key: <your Split API Key>This is the key line that sets up the Split Client for use elsewhere in the code:
SplitFactory splitFactory = SplitFactoryBuilder.build(splitApiKey, config);Let’s set up a new template called home-beta.html (It’s mostly copypasta from the original template and should be located in: src/main/resources/templates):