So, you want to learn to build web apps with Spring Boot and React? Great choice! Both Spring Boot and React are powerful tools for building interactive web apps.
Spring Boot is an opinionated web framework that enables you to build more quickly by hiding configuration and customization options at the outset. The developers of Spring Boot have strong opinions about the correct ways to build and configure web applications, and they’ve codified those opinions into their framework.
Those decisions mean that, as a dev, you only need to think about the logic your application uses. Some developers (myself among them) love this speed of development. Others prioritize flexibility and prefer to make those decisions on a case-by-case basis.
Deploy Continuously with Confidence – Sign up for a Split demo!

Speed up development cycles, reduce release risk, and focus your team on DevOps best practices that create maximum impact. Get a personalized demo today!
Build an App with Spring Boot and React
The app you’re going to build today is a simple real-time chat application. First, you’ll set up your server in Spring Boot and then connect to it with a client written in React. You’ll use Spring Boot and React to send messages to the server, and anyone who connects will see those messages in their browser in real-time.
That might not seem like much, but for a first pass, it makes sense to keep things simple. I’ve published the final version of this project on GitHub. If you want to skip to the end, you can clone that repo and run the Spring Boot and React app right on your local machine. This post walks through it file by file to talk about the important things the app does. There are a few dependencies you’ll need to get started if you want to follow along yourself These include Gradle, npm, and the Split UI libraries for working with feature flags.
In the first part of this post where you build the basic React app, you’ll work off of the main branch. Later, when it’s time to layer in feature flag functionality using Split’s React SDK, you’ll work from the feature-flags branch.
If you’re into spoilers, you could check out the diff between the two branches by following this GitHub link.
Optional: Start from Scratch with Spring Initializr and React
To build the GitHub repo referenced in this post, you’ll start with Spring Initializr to create the basic backend project. Select Java 8 with Gradle (or Maven if that’s your jam) and add the WebSocket dependency. Then download the .zip file and decompress it on your local system.
To get the frontend setup, you’ll create this app using a similar tool to Spring Initializr but for React called create-react-app. To try out create-react-app for yourself, you’ll need to install npx, which is a part of npm. This is a tool provided directly by Facebook. It provides everything you need for a modern React app in one easy install. Like Spring Initializr, this is a tool that takes hours off of setting up a new app. Use it to your advantage!
From the project’s root folder, execute the following
cd src
npx create-react-app clientCode language: SQL (Structured Query Language) (sql)Running your client is as simple as navigating to the src/client folder and running npm start inside that folder; npm will start your React app and open a browser tab that points you to localhost:3000, which is where your application is running.
Examine the Gradle Dependencies File
There’s one small thing you should notice in this initial commit. It’s a line in the build.gradle file that does a lot of heavy lifting for you. The code tells Gradle that it wants to use an implementation requirement of org.springframework.boot:spring-boot-starter-websocket. That dependency describes dozens of independent dependencies that the code needs to set up your server to process websocket and HTTP requests. When you install the dependencies, you’ll see that specific dependency defines a number of libraries to include in your project.
Create the Spring Boot Backend
In case it wasn’t obvious to this point, you’re building a full-stack app with a Spring Boot backend and a React frontend. The backend is defined by your Spring Boot code, but there are really three important parts.
The first is a Message object that is passed around using websockets.
public class Message {
    private final String userName;
    private final String messageContent;

    public Message(String userName, String messageContent) {
        this.userName = userName;
        this.messageContent = messageContent;
    }

    public String getMessageContent() {
        return messageContent;
    }

    public String getUserName() {
        return userName;
    }
}Code language: Arduino (arduino)
The message object is a POJO, a simple Java object that defines the shape of a message traveling between the back end and the front end. Next is the controller, where the app handles messages that come from the front end.
The MessageController is actually very simple:
@RestController
@CrossOrigin("http://localhost:3000")
public class MessageController {
    ConnectedUserList userList = new ConnectedUserList();

    @MessageMapping("/chat")
    @SendTo("/chat")
    public Message index(Message message) {
        return message;
    }

    @MessageMapping("/chat/connected_users")
    @SendTo("/chat/connected_users")
    public ConnectedUserList connectedUsers(ConnectedUser user) {
        userList.handleUser(user);
        return userList;
    }
}Code language: Java (java)
This is the beauty of Spring Boot. The @RestController annotation indicates to Spring that this is a controller class. Then, the code defines an endpoint that receives messages on a URL containing /chat and broadcasts results on a channel named /chat. It also defines an endpoint that listens on /chat/connected_users for a list of users connected to the chatroom.
Later, you’ll control who sees the results of this endpoint using feature flags. The controller listens for messages to come in over a websocket and then rebroadcasts those messages to every connected client.
Finally, the app needs to do a bit of configuration to wire your messages to your MessageController.
That’s where the WebSocketConfig class comes in. It, too, is quite simple:
@Configuration
@EnableWebSocketMessageBroker
public class WebSocketConfig implements WebSocketMessageBrokerConfigurer {
    public void registerStompEndpoints(StompEndpointRegistry registry) {
        registry.addEndpoint("/chatroom").setAllowedOrigins("*").withSockJS();
    }

    public void configureMessageBroker(MessageBrokerRegistry registry) {
        registry.enableSimpleBroker("/chat");
        registry.setApplicationDestinationPrefixes("/api");
    }
}Code language: Java (java)
This configures your server to work with STOMP, the Simple Text Oriented Message Protocol. It allows connections to an endpoint called /chatroom. Combined with the annotations on our MessageController class, the server is now listening for connections.
To start up the server, use the ./gradlew.bat bootRun command. When you do, the server will start listening on localhost:8080.
Create the React Frontend Client
The second/frontend part of your app lives in the src/client folder. This is the React application.
There are four main parts of your frontend structure. The first is client/src/App.js, which is the main landing page for your React client. It looks like this (leaving out the imports at the top):
/* Begin Setup */
const socket = new SockJs("http://localhost:8080/chatroom", {}, {CheckOrigin: () => false});
socket.onopen = () => {
  console.log('Connected to server');
};
socket.onclose = () => {
  console.log('Disconnected from server');
};

const stompClient = Stomp.over(socket);
stompClient.connect({}, () => {
  console.log('Connected to chat server');
});
/* End Setup */

function App() {
  const [userName, updateUsername] = useState("");
  const [chatMessages, updateChatMessages] = useState([]);
  const [currentMessageId, updateMessageId] = useState(0);
  const [connectedUsers, updateConnectedUsers] = useState([]);

  /* Being Handlers */
  const changeConnectedUsers = (connectedUserList) => {
    console.log('connected user list', connectedUserList);
    const names = Object.entries(connectedUserList.connectedUsers).map((kvp) => kvp[1].displayName);
    const connectedUsers = [...names];
    updateConnectedUsers(connectedUsers);
  }

  const sendConnectedUser = (connectedUser) => {
    const userConnectionInfo = {oldUserName: userName, currentUserName: connectedUser};
    console.log('user connection info', userConnectionInfo);
    stompClient.publish({destination: '/api/chat/connected_users', body: JSON.stringify(userConnectionInfo)});
    updateUsername(connectedUser);
  };

  const addNewChatMessage = (newMessage) => {
    const messagesWithNew = [...chatMessages, newMessage];
    updateChatMessages(messagesWithNew);
  };

  const sendChatMessage = (newMessage) => {
    const messageObj = {userName, messageContent: newMessage, messageId: currentMessageId};
    stompClient.publish({destination: '/api/chat', body: JSON.stringify(messageObj)});
    updateMessageId(currentMessageId + 1);
  };

  if(stompClient.connected) {
    stompClient.subscribe('/chat', (message) => {
      console.log('message received', message);
      addNewChatMessage(JSON.parse(message.body));
    });

    stompClient.subscribe('/chat/connected_users', (connectedUserList) => {
      console.log('connected users received', connectedUserList);
      changeConnectedUsers(JSON.parse(connectedUserList.body));
    });
  }
  /* End Handlers */

  return (
    <Pane width="100%"  display="flex" alignItems="center" justifyContent="center" className="margin-top">
      <div>
        <PageHeader/>
        <UsernameComponent currentUsername={userName} updateUsername={sendConnectedUser}/>
        <ConnectedUserList users={connectedUsers}/>
        <MessageList messages={chatMessages}/>
        <MessageBox sendMessage={sendChatMessage}/>
      </div>
    </Pane>
  );
}

export default App;Code language: JavaScript (javascript)
There’s a lot to unpack here, so let’s look at each of the sections of the code.
The Setup section creates a Socket connection to your Spring Boot backend as well as setting up the STOMP websocket client.
The Handlers section within the App sets up functions to handle the transmission of messages as well as connected users. Once the STOMP client is connected, it is used to subscribe to your two endpoints: /chat for messages and /chat/connected_users for connected users. Each of the subscribe function calls take an endpoint and one of the handler functions defined above it.
Finally, the React template is returned, which includes components to manage and display the user name, the list of connected users, the list of received messages, and a message box to send new messages.
Our central application component controls your application state and then sends each child component a function (like updateUsername) that tells that component how to handle changes and update the state. This is a style of application state management that’s very effective for small or self-contained components. As your applications grow, you may find it useful to integrate a state management library for React like Redux or MobX.
Examine the React App Components
The next important part of your client is the UsernameComponent. This one is a lot simpler than App.js.
export default (props) => {
  const {updateUsername, currentUsername} = props;
  return (
    <div>
      <Text size={500} className="margin-right">What's your user name?</Text>
      <TextInput type="text" name="username" onChange={e => updateUsername(e.target.value)} defaultValue={currentUsername}/>
    </div>
    )
}Code language: JavaScript (javascript)
The username component is just a simple text label with a text input. In this case, the code uses Text and TextInput components from EvergreenUI, a gorgeous React component styling library. When the text input in your component recognizes a change event, it updates the value of the user name using the updateUsername function defined by your hook in App.js.
The MessageList component is even simpler. It accepts a list of messages and renders them.
export default (props) => {
  const messages = props.messages;
  return(
    <div className="margin-top margin-bottom">
      <Heading size={800}>Messages:</Heading>
      <span>
        {messages.length ?
          messages.map(message => <ChatMessage key={message.messageId} userName={message.userName} message={message.messageContent}/>)
        : <Text>No messages currently posted. Try posting one to start out!</Text>}
      </span>
    </div>
  )
}Code language: JavaScript (javascript)
It does have a little logic that displays a nice message about not yet having seen any messages if the list of messages is empty. Otherwise, it renders a list of messages to the browser. You’ll notice that your message structure is exactly the same as the one defined in the message POJO on the backend. By keeping the structure of the messages identical between the frontend and the backend, it’s easier for the developer to understand which properties map to which parameters as the message works its way through the system.
Finally, there is the MessageBox. This is where users compose messages. Just like all the other pieces of the client, there’s very little code to write.
export default (props) => {
  const sendMessage = props.sendMessage;
  const [messageContent, updateContent] = useState("");
  const sendNewMessage = (newMessage) => {
    sendMessage(newMessage);
    updateContent("");
  };
  return(
    <div>
      <Text size={500} className="margin-right">Send a Message:</Text>
      <TextInput className="margin-right" type="textbox" name="newMessage" placeholder="Enter a new message here..." value={messageContent} onChange={e => updateContent(e.target.value)}/>
      <Button appearance="primary" onClick={() => sendNewMessage(messageContent)}>Send Message</Button>
    </div>
  )
}Code language: JavaScript (javascript)
The MessageBox is a basic text box. The code adds some styles from Evergreen UI and a button that finalizes the message and sends it to the server. After sending the message to the server, it clears the chat box (no double-posting messages!).
Assemble Your Spring Boot + React App
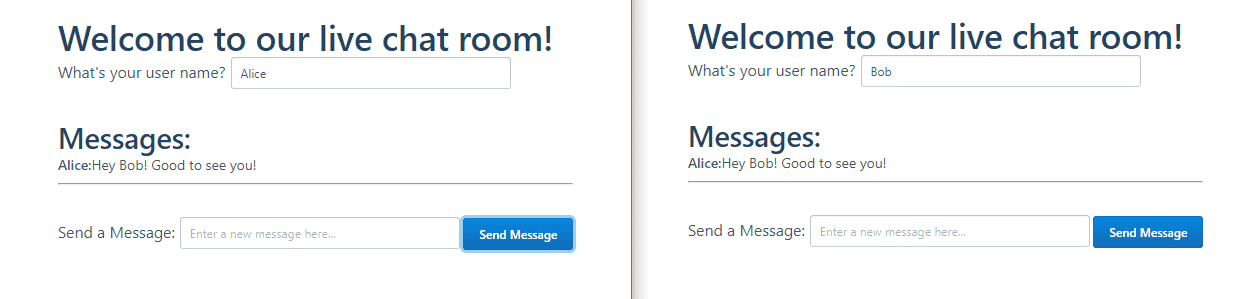
If you’ve got everything working correctly, you should be able to open a pair of browser windows to see things working. Point them both at localhost:3000 to see your app in action. Post a message in one window, and it’ll appear for both users instantly.
This is step one of the application. Now that you’ve built an app and connected Spring Boot and React, let’s dig a little deeper and figure out how to add some feature flags to this application.
Implement Feature Flags
Feature flags are little bits of code logic that tell an application how to behave after the developer publishes it. In many environments, deploying a code change is not a trivial process. Other times, the logic controlling certain features is difficult to codify. Finally, there may be some features you want to test but not ship to every one of your customers immediately.
All of these situations are perfect use cases for feature flags. You can use feature flags as a way to control how code behaves in real time, without needing to re-deploy that code to change the behavior. Instead, the feature flags live in a centralized repository, like Split, and you switch them on or off as needed.
Set Up the React Client
The client is where the interesting bits happen. Before you can get started on the client, you need to get signed up for Split. Creating a new account there only takes a moment, and it’s free forever. Once you’re signed in, you’ll need to set up the SDK, using the dashboard.
You want to click the button that asks us to set up the SDK. This process involves a couple steps but only takes a moment. Just follow the on-screen instructions; they’re very thorough.
When I set up my SDK, I created a Split treatment, which I named display_connected_users. You’ll need to do the same if you want to control your connected user list using the same setup as you see in the example repository.
Wire Up Feature Flags
Switch over to the feature-flags branch of the GitHub repository. Only the client side of the code has changed on this branch.
If you take a look at the package.json file, you’ll notice that the Split dependency has been added: "@splitsoftware/splitio-react": "^1.1.0"
Let’s loop back around to App.js. Notice this bit of code here:
const splitConfig = {
  core: {
    authorizationKey: process.env.REACT_APP_AUTH_KEY,
    key: 'CUSTOMER_ID'
  }
};Code language: C# (cs)
splitConfig uses an environment variable called REACT_APP_AUTH_KEY. This should be set to your staging API key. You can find this by clicking the button in the upper left of your Split console. Then, navigate to Admin Settings > API Keys. You’ll want to copy the Key value next to the JavaScript SDK for the staging-default environment.
NOTE: If you’re new to using Split and/or on the free tier, the button in the upper left will say DE for default. If you’ve set up multiple workspaces, then the button will be labeled with the first two letters of the workspace name. |
When ready, re-launch the client with:
REACT_APP_AUTH_KEY=<your api key> npm startCode language: Django (django)Focusing on the main application component, you can now use that data from Split to show or hide your list of connected users.
const featureName = 'display_connected_users';
  return (
    <SplitFactory config={splitConfig}>
      <SplitTreatments names={[featureName]}>
        {({treatments, isReady}) => {
          const showConnectedUsers = treatments[featureName];
          return isReady ?
            <Pane width="100%" display="flex" alignItems="center" justifyContent="center" className="margin-top">
              <div>
                <PageHeader/>
                <UsernameComponent currentUsername={userName} updateUsername={sendConnectedUser}/>
                {showConnectedUsers && showConnectedUsers.treatment === 'on' ? <ConnectedUserList users={connectedUsers}/> : null }
                <MessageList messages={chatMessages}/>
                <MessageBox sendMessage={sendChatMessage}/>
              </div>
            </Pane> : null
        }}

      </SplitTreatments>
    </SplitFactory>
  );
Code language: JavaScript (javascript)
The featureName value indicates the name of the treatment the code reads from Split. It also captures an isReady boolean, which tells us when the data from Split has loaded. By waiting for this variable, you ensure that features don’t appear on the screen and then disappear later.
The treatments object from Split is just a simple JavaScript object. The code reads out that object from Split and looks at the treatment property to determine if the connected user list is on. If it is, it displays the ConnectedUserList component. If it isn’t, it displays nothing.
Change Values in Split
Log in to your dashboard, and you’ll see a list of your treatments.
Click on that treatment name, and it’ll take you to a page where you can change the behavior of the treatment. The setting that we’re looking for is down at the bottom: the Default Rule.
By default, your treatment will be off. The ConnectedUserList won’t show up.
If you want to change that, just change the setting to “on,” and save changes up at the top of the screen.
Now refresh your app. You should see the connected user list. Enter the name of the person you’re chatting as into the window, and you’ll see the names in the list update in real time as you type.
That’s it. That’s everything it takes to add a feature behind a feature flag to your application. Now, you can update values in Split. If you’ve correctly set up your key, you can modify its behavior and see it reflected in your application. You’re now able to control the way your app works directly from Split. No need to modify code and redeploy.
Learn More About Spring Boot, React, and A/B Testing Like an Expert
Interested in digging deeper on Spring Boot and React, or A/B testing and experimentation? We’ve got you covered:
- Leverage Spring Security to test in production
- Implement controlled rollouts with React Native
- Get started testing styled components in your React apps
- Learn about more about A/B testing and A/B/n testing
- Dig deeper into multivariate testing
As always, if you’re looking for more great content like this, we’d love to have you follow us on Twitter @splitsoftware and subscribe to our YouTube channel.
Get Split Certified
Split Arcade includes product explainer videos, clickable product tutorials, manipulatable code examples, and interactive challenges.
Deliver Features That Matter, Faster. And Exhale.
Split is a feature management platform that attributes insightful data to everything you release. Whether your team is looking to test in production, perform gradual rollouts, or experiment with new features–Split ensures your efforts are safe, visible, and highly impactful. What a Release. Get going with a free account, schedule a demo to learn more, or contact us for further questions and support.