
In this tutorial you’re going to create a CoffeeBot app. The app acts like a controller for a robotic coffee machine. It won’t, sadly, actually serve you coffee, but it will demonstrate oodles of useful programming techniques. The app will have a Vue.js client and a Spring Boot resource server. It will be bootstrapped using JHipster, saving a whole lot of time and demonstrating some best practices, including automatically configuring end-to-end JWT authentication in both the client and the server. You’ll also use Split to show how feature flags can be used to dynamically, at runtime, manage feature sets, both on the front end and on the back end, using Split’s Javascript SDK and Java SDK, respectively.
The app itself serves drinks. The server maintains a list of drinks, mostly coffee, with sizes, prices, and names. For simplicity, the drink list will be saved using an in-memory, development database–but this could easily be re-configured for persistence if one desired. The client requests the drink list from the server, passing along any authentication data if a user is authenticated.
The first split, or decision point, happens when the server retrieves the list of drinks to return to the client. Imagine several new drinks have been added, but the formula is experimental. Marketing wants to conduct some user surveys before they bet their brand on the new drinks. Thus the new drinks are restricted to a small group of users so that they can be surveyed before releasing it more widely. Thus the server passes the username to Split and requests a treatment, or conditional state based on the specific split and username. Based on this value, a simple boolean in our case, the server either returns all the drinks–including the experimental drinks–or a subset of drinks.
The client receives this list and displays the list of drinks as a list of buttons. The second split is purely related to the client. A new feature has been added: the ability to add cream to drinks. As you can imagine, considering how attached people are to cream in coffee, virtual riots have been started requesting this feature. People are clamoring. But the managers want to make sure the cream function is working properly before it’s widely released (the CoffeeBot, has, on occasion, misfired). Thus, based on the authenticated user, the ability to add cream is toggled.
Java + Vue.js Tutorial Dependencies
Java: I used Java 12 for this tutorial. You can download and install Java by going to the AdaptOpenJdk website. Or you can use a version manager like SDKMAN or even Homebrew.
Node: Install Node by following the instructions on their website. This tutorial was written using Node 12.14.0.
JHipster: Once you have both Java and Node installed, you can install JHipster. Follow the instructions on their website (good for troubleshooting if something doesn’t work) or simply run this command: npm install -g generator-jhipster@6.9.0 to install it globally with npm.
Split: Sign up for a free Split account, if you don’t already have one. This is how you’ll implement the feature flags.
Bootstrap Your Spring Boot App with JHipster
To create the example CoffeBot app, you’re going to use JHipster. As it is described on their website, “JHipster is a development platform to quickly generate, develop, & deploy modern web applications & microservice architectures.” It allows you to quickly bootstrap a Java-based project with a variety of front-ends and server configurations. This tutorial is going to use Vue.js.
One of the nice things about JHipster is that it creates a combined project for you with both the Java server application and the Vue.js front-end application. It also includes generators that will create data model entities and web service controllers. It does quite a lot and creates a lot of files. If you’re relatively new to these platforms, the project structure might seem a little overwhelming, but they do a nice job of documenting everything on their website. The project they lay out follows current best practices, so it’s a great learning tool.
Open a shell and create a root directory for your project, something like CoffeeBotApp. Navigate into this directory. This is where you’ll generate the project files.
Normally when you run JHipster it will ask you a lot of questions about the project you are bootstrapping. However, to simplify things, you’re going to use this .yo-rc.json file which pre-configures the project, bypassing the interrogation.
In your root project directory, create a .yo-rc.json file with the following contents. Some highlights of what this configures are:
- applicationType: a monolithic application: a typical, standard application (essentially not a microservice)
- baseName:
coffeebot– the name of the application - packageName:
com.split.coffeebot– base Java package - authenticationType:
jwt– JSON web token authentication - devDatabaseType:
h2Memory– the development database uses an in-memory H2 database that will not persist across sessions - clientFramework:
vue– use Vue.js as the front-end client framework - skipFakeData:
true– JHipster will by default generate a set of random, fake data for data models, which we want to skip in this tutorial
There are a lot of options. See the docs to dig into this more.
{
"generator-jhipster": {
"promptValues": {
"packageName": "com.split.coffeebot"
},
"jhipsterVersion": "6.9.0",
"applicationType": "monolith",
"baseName": "coffeebot",
"packageName": "com.split.coffeebot",
"packageFolder": "com/split/coffeebot",
"serverPort": "8080",
"authenticationType": "jwt",
"cacheProvider": "ehcache",
"enableHibernateCache": true,
"websocket": false,
"databaseType": "sql",
"devDatabaseType": "h2Memory",
"prodDatabaseType": "mysql",
"searchEngine": false,
"messageBroker": false,
"serviceDiscoveryType": false,
"buildTool": "gradle",
"enableSwaggerCodegen": false,
"jwtSecretKey": "ZDg4ZjkzMDJkNWQ4YWJlMjUxOTY3YjE1MDNjY2ZkMzJjYWQwYjJiOTkyMWQ3YTE5ZTgwNWY3Y2E1ZDg0OWViZjM0Nzg1NDE3MjNlMGY1MDBkNTg4YWU1MmZmNTU1ZGEzOTJiMTVlMWZjZDc5NDUyMTlmZmRmYTU0NDJjMDdiODA=",
"embeddableLaunchScript": false,
"useSass": true,
"clientPackageManager": "npm",
"clientFramework": "vue",
"clientTheme": "none",
"clientThemeVariant": "",
"creationTimestamp": 1601147759112,
"testFrameworks": [],
"jhiPrefix": "jhi",
"entitySuffix": "",
"dtoSuffix": "DTO",
"otherModules": [
{
"name": "generator-jhipster-vuejs",
"version": "1.8.0"
}
],
"enableTranslation": false,
"blueprints": [
{
"name": "generator-jhipster-vuejs",
"version": "1.8.0"
}
],
"skipFakeData": true
}
}Code language: JSON / JSON with Comments (json)Create the starter application by running the following command (in your root project directory with the .yo-rc.json file).
jhipsterYou’ll see a lot of console output as JHipster creates the project. It should end with the following line.
...
...
INFO! Congratulations, JHipster execution is complete!Code language: Swift (swift)
JHipster already created a Git repository and made the initial commit. At this point, you can run the starter application by opening two shells, one for the client and one for the server, and running the following commands.
Spring Boot server:./gradlew
Vue.js client:npm start
Generate the Spring Boot Data Models
Now you want to use JHipster to generate the data models or entities. These define the data structures that will be stored in the database and served by the REST service. JHipster and Spring do a lot of nice, behind-the-scenes work for you when you use it’s generator to create entities. It creates the Java class that represents the data structures, annotated with the JPA annotations that allow the data to be persisted to a database. It also creates a resource file that implements Create, Read, Update, and Delete (CRUD) functions–which is automatically protected by the chosen authentication scheme, in our case, JWT.
On the front end side, the the generator creates the necessary files that allow you to interact with the resource server for the entity, as well as front-end files to create, update, and inspect persisted data entities (to access this you have to be logged in as the admin user).
In your project root directory, create a new file: entities.jdl. This file defines one entity type with four properties, as well as an enum type used in the entity.
enum DrinkSize {
    Small,
    Medium,
    Large,
    XLarge,
    XXLarge
}

entity Drink {
    name String required,
    size DrinkSize required,
    caffeineMilligrams Integer required,
    priceDollars Integer required,
}Code language: Swift (swift)
Generate the entity files by running:
jhipster import-jdl entities.jdlCode language: Swift (swift)When it asks you about overwriting files, just type a to overwrite this and all others.
Now would be a great time to run the starter application and explore the bootstrapped features. Remember, you need to run two different processes.
Spring Boot Java server
./gradlewVue.js client (you may need to wait a minute or so for the server to finish running):
npm startCode language: SQL (Structured Query Language) (sql)The client application should open automatically. If it doesn’t, open http://localhost:9000
Sign as the admin user using the default credentials admin:admin. Check out all of the features under the Administration menu. Also take a look at the Entities menu. This is where you can see, add, and update the entities you created. In our case, this is the Drink entity that has four properties: name, size, caffeine milligrams, and price dollars.
The Vue.js client uses TypeScript and class components and splits the template and the component declaration into two separate files. If you are accustomed to the more traditional .vue single-file structure, this might seem a little strange at first but most of the differences are self-explanatory. Take a look at the official page in the docs on this for more info if you need help.
Add Feature Flags to Your Spring Boot Java Server
You’ll use Split to implement feature flags on both the client and server. You should have already signed up for a free account (if not, do so now). Currently, you’re going to integrate the Java Split SDK into the Spring Boot application. I’ll walk you through this, but if you want more information or run into trouble, take a look at their Java SDK documentation.
First, add the Split dependency to the build.gradle file (in the project root directory). The build.gradle file has a ton of stuff in it. Just add the following line near the end, just above the commented line that starts //jhipster-needle-gradle-dependency.
dependencies {
....
compile 'io.split.client:java-client:4.0.1'
//jhipster-needle-gradle-dependency - JHipster will add additional dependencies here
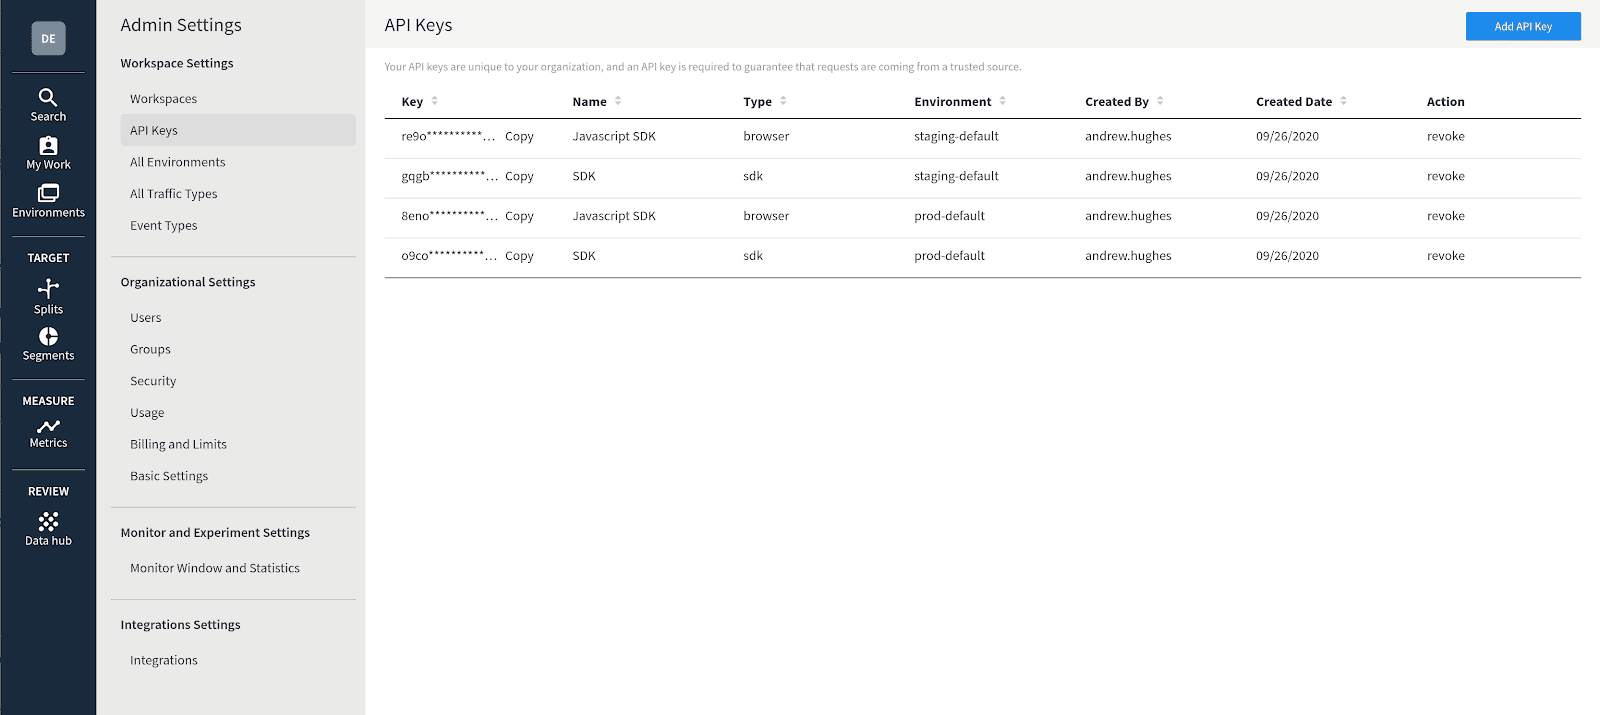
}Code language: C# (cs)You’re going to need your Split API key. Open your Split dashboard. Find the API key by going to the square workspace icon in the top-left of the dashboard (which probably says DE for default), clicking on it, and clicking on Admin Settings. Click on API keys in the panel on the left side, under Workspace settings.
You’ll see that you have four API keys already created, two for production and two for staging. There are different keys for server-side SDK use and client-side Javascript use. The SDK and staging-default key is the one you’re going to need in just a moment.
Add the API key to the end of your application.yml configuration file.
src/main/resources/application.yml
# application:
split:
    api-key: <yourSplitApiKey>Code language: Gherkin (gherkin)
I’ll just point out that here you are adding this to the global configuration file, but in a more realistic use case, you would likely be using two different API keys, one for staging and production, adding them to the application-dev.yml and application-prod.yml files, respectively.
Create a Java file called SplitConfig.java that will configure the Split client within the Spring Boot application. It creates a Spring Bean that will be available to for dependency injection, and because the default behavior for Bean’s is to create a singleton instance, this concurs with Split’s own guidance, suggesting that only one instance of the client is created.
src/main/java/com/split/coffeebot/config/SplitConfig.java
@Configuration
public class SplitConfig {

    @Value("#{ @environment['split.api-key'] }")
    private String splitApiKey;

    @Bean
    public SplitClient splitClient() throws Exception {
        SplitClientConfig config = SplitClientConfig.builder()
                .setBlockUntilReadyTimeout(1000)
                .enableDebug()
                .build();

        SplitFactory splitFactory = SplitFactoryBuilder.build(splitApiKey, config);
        SplitClient client = splitFactory.client();
        client.blockUntilReady();

        return client;
    }

}Code language: Java (java)
You also need to add a custom method to the DrinkRepository. The JPARepository gives you quite a lot of power without any customization, but in this app you’re going to need a custom method that allows you to exclude some drinks from the standard findAll() method. The method findByNameNotIn() is a JPA query method, the syntax and implementation of which is provided by Spring Boot. All you have to do is define the method to make it available for use. Take a look at the docs for Spring Data JPA query methods for more info.
src/main/java/com/split/coffeebot/repository/DrinkRepository.java
@SuppressWarnings("unused")
@Repository
public interface DrinkRepository extends JpaRepository<Drink, Long> {
    List<Drink> findByNameNotIn(Collection<String> names);
}Code language: Java (java)
Now create a CoffeeBotResource.java file that will contain the business logic and REST endpoints for the CoffeeBot application.
src/main/java/com/split/coffeebot/web/rest/CoffeeBotResource.java
package com.split.coffeebot.web.rest;

…

@RestController
@RequestMapping("/api/coffee-bot")
public class CoffeeBotResource {

    private final Logger log = LoggerFactory.getLogger(CoffeeBotResource.class);

    SplitClient splitClient;
    DrinkRepository drinkRepository;

    public CoffeeBotResource(SplitClient splitClient, DrinkRepository drinkRepository) {
        this.splitClient = splitClient;
        this.drinkRepository = drinkRepository;
    }

    private Drink makeDrink(String name, DrinkSize size, Integer caffeineMg, Integer price) {
        Drink drink = new Drink();
        drink.setCaffeineMilligrams(caffeineMg);
        drink.setName(name);
        drink.setSize(size);
        drink.setPriceDollars(price);
        return drink;
    }

    @EventListener
    public void onApplicationEvent(ContextRefreshedEvent event) {
        drinkRepository.save(makeDrink("Water", DrinkSize.Small, 0, 1));
        drinkRepository.save(makeDrink("Soda", DrinkSize.Medium, 30, 3));
        drinkRepository.save(makeDrink("Coffee", DrinkSize.XLarge, 50, 5));
        drinkRepository.save(makeDrink("Coffee", DrinkSize.Small, 30, 3));
        drinkRepository.save(makeDrink("Coffee", DrinkSize.Medium, 40, 3));
        drinkRepository.save(makeDrink("Latte", DrinkSize.Large, 100, 8));
        drinkRepository.save(makeDrink("Latte", DrinkSize.Small, 80, 6));
        drinkRepository.save(makeDrink("Latte", DrinkSize.Medium, 60, 5));
    }

    @GetMapping("/list-drinks")
    public List<Drink> listDrinks() {
        Optional<String> userName = SecurityUtils.getCurrentUserLogin();

        String treatment = splitClient.getTreatment(userName.get(),"drink-types");

        if (treatment.equals("on")) {
            return drinkRepository.findAll();
        }
        else {
            return drinkRepository.findByNameNotIn(Arrays.asList("Latte", "Soda"));
        }
    }
}Code language: Arduino (arduino)
The makeDrink() and onApplicationEvent() methods are there as helper methods to create some sample data when the application starts (remember that it is using an in-memory database that will not persist any data between sessions).
The class uses Spring’s dependency injection to make two objects available: the DrinkRepository, which is the automatically created interface that defines how the app can manipulate entities (the drinks); and the SplitClient, which is the client responsible for communicating with Split and getting treatments for a given key and treatment name.
You’re going to create this treatment in just a moment. For now, notice that the getTreatment() method takes a minimum of two parameters. One is a text key that is an arbitrary string value and will typically be a username, accountID, or another unique key to differentiate users. The other is the split name, which specifies which treatment is being used to make the split.
Pro tip: The optional third getTreatment parameter (which we won’t use here) is an attribute map object, containing user attributes in name-value pairs. Even sensitive user data can be passed in this map because none of it is sent to Split’s cloud. Instead, the attribute map is compared in local memory to targeting rules you have entered in the Split UI. More in the Split SDK docs: custom targeting with attribute maps. |
If the treatment is on, it returns all of the available drinks. If the treatment is not on (off or control or any other value), it returns all drinks except Latte and Soda. This demonstrates a simple way to bifurcate code based on a split. Far more complex splits and treatment use cases are possible.
Before you move one, one last change. Open the SecurityConfiguration file and allow all traffic on the api/coffee-bot resource path. This will allow anonymous users to get a list of drinks.
You’re adding this line:
.antMatchers("/api/coffee-bot/**").permitAll() Code language: Bash (bash)To the configure(HttpSecurity http) method. The position matters. The line needs to be added before the .antMatchers("/api/**").authenticated() line.
src/main/java/com/split/coffeebot/config/SecurityConfiguration.java
@Override
public void configure(HttpSecurity http) throws Exception {
    // @formatter:off
    http
    ...
    .and()
        .authorizeRequests()
        .antMatchers("/api/authenticate").permitAll()
        .antMatchers("/api/register").permitAll()
        .antMatchers("/api/activate").permitAll()
        .antMatchers("/api/account/reset-password/init").permitAll()
        .antMatchers("/api/account/reset-password/finish").permitAll()
        .antMatchers("/api/coffee-bot/**").permitAll()
        .antMatchers("/api/**").authenticated()
        .antMatchers("/management/health").permitAll()
        .antMatchers("/management/info").permitAll()
        .antMatchers("/management/prometheus").permitAll()
        .antMatchers("/management/**").hasAuthority(AuthoritiesConstants.ADMIN)
    ...
    // @formatter:on
}Code language: Java (java)
Create the Feature Flag Treatment
If you’re new to treatments and splits, you may want to read through the getting started information on Split’s website. Very briefly, a split defines a decision point, a flag, that can be used in code to modify the features presented to a group of users. The key (and optionally the attribute map) are the values that determine, based on rules defined in the split, the state of the flag. This decision is made at runtime by the SplitClient when you call the getTreatment() method.
In our very simple example, you’re going to create a split named drink-types. This split will be a simple on/off split, like a boolean flag (it’s possible to have multiple values beyond on and off). The split will default to off, but will turn on if the admin user is present. This is a very naive example. In production, just as an example, you might define this split based on a segment of your user base, to roll out new features in segments; or you might make features available only to public beta-testers before releasing them to the entire user base.
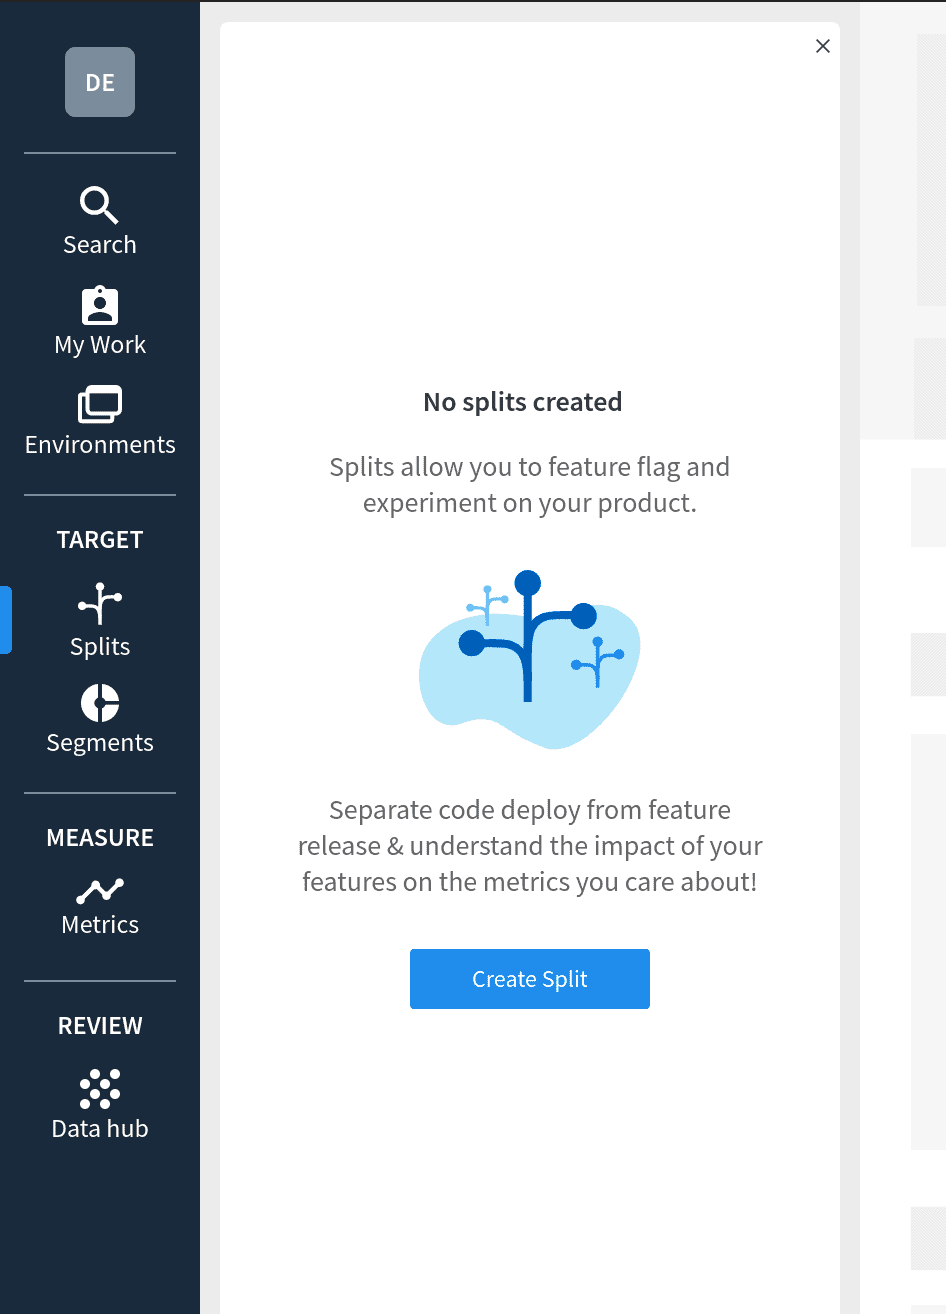
Open the Split dashboard. You should be in the Default workspace.
Click Splits on the left.
Click on the blue Create Split button.
Give the split a name: drink-types. You can leave the rest blank.
Click Create.

Select Staging-Default from the Environment dropdown.
Click the Add Rules button.
Notice under the Define Treatment section, there are two values defined: on and off. For our use case, this is great.
Under Create Individual Targets, click the Add Target button. Add a user with name admin. This means that the user admin will cause the treatment to be on.
Click Save Changes in the top, right-hand corner of the panel.
Click Confirm on the next panel to confirm the changes.
Update the Vue.js Client Application
The client code uses Axios to make requests to the resource server. You also need to install the Split module dependency. From your project root directory, add the dependencies.
npm install --save axios @splitsoftware/splitio@10.14.2Code language: CSS (css)Update the home.component.ts file to create the CoffeeBot application. You need to add your Javascript – staging-default key for the const SPLIT_AUTH_KEY where <yourStagingSplitAuthKey> is in the code below.
src/main/webapp/app/core/home/home.component.ts
import Component from 'vue-class-component';
import { Inject, Vue, Watch } from 'vue-property-decorator';
import LoginService from '@/account/login.service';
import { SplitFactory } from '@splitsoftware/splitio';
import { IClient } from '@splitsoftware/splitio/types/splitio';
import axios from 'axios';

const SPLIT_AUTH_KEY = <yourSplitAuthKey>;

@Component
export default class Home extends Vue {

  @Inject('loginService')
  private loginService: () => LoginService;

  private splitClient: IClient = null;

  // our list of drinks
  private drinks = [];

  // holds the drink that is the current order
  private currentOrder = null;

  // cream or no cream?
  private withCream = false;

  // the current Split.io treatment
  private treatment = null;

  public openLogin(): void {
    this.loginService().openLogin((<any>this).$root);
  }

  public get authenticated(): boolean {
    return this.$store.getters.authenticated;
  }

  public get username(): string {
    return this.$store.getters.account ? this.$store.getters.account.login : '';
  }

  async getTreatment() {

    // create a configured SplitFactory
    const splitFactory = SplitFactory({
      core: {
        authorizationKey: SPLIT_AUTH_KEY,  // your Split.io auth key
        key: this.username,  // identifier for this treatment (username in this case)
        trafficType: 'user'
      },
      startup: {
        readyTimeout: 1.5 // 1.5 sec
      }
    });

    // create the split client (NOT READY TO USE YET)
    this.splitClient = splitFactory.client();

    // block untli the client is ready
    this.splitClient.on(this.splitClient.Event.SDK_READY, function() {
      // client is ready, get the treatment
      this.treatment = this.splitClient.getTreatment('drink-types');
    }.bind(this));

  }

  // triggered when username changes to update list
  // of drinks and Split.io treatment
  @Watch('username')
  async usernameChanged(newVal: string, oldVal: String) {

    // get treatment from split.io
    await this.getTreatment();

    // call the REST service to load drinks
    await this.loadDrinks();

        // clear the current order
        this.currentOrder = null;

  }

  async loadDrinks() {
    const response = await axios.get('http://localhost:8080/api/coffee-bot/list-drinks');
    console.log(response);
    if (response && response.status === 200) {
      this.drinks = response.data;
    }
    else {
      this.drinks = [];
    }
  }

  async mounted() {
    await this.getTreatment();
    await this.loadDrinks();
  }

  beforeDestroy() {
    this.splitClient.destroy();
  }

}Code language: C# (cs)
The authentication portion of this component came for free with the JHipster bootstrap. The data is loaded from the Spring Boot resource server by the loadDrinks() method, which simply stores the drinks in a local array, cleverly called drinks. This is called when the component is mounted and when the user changes (because the available drinks depends on the treatment, which is keyed on the user). You might notice that this method isn’t passed the username. That’s because the username is being passed to the server in the JWT (JSON Web Token) automatically, handled by Spring Security and the authentication code bootstrapped by JHipster.
The other important function is the usernameChanged() method, which is called when the username property changes. Every time you have a new user, you need to create a new Split client and reload the treatment. You also need to reload the drinks from the server. This method handles all of this.
Take note of the general flow here. First, a SplitFactory is configured using the Split auth key and the new username. This SplitFactory instance is used to create a SplitClient instance. However, the client is not necessarily ready at this point. The code blocks until the SDK_READY event is fired (see code below) before it tries to get the treatment from the SplitClient, otherwise it will just return the control treatment.
// block until SDK is ready
this.splitClient.on(this.splitClient.Event.SDK_READY, function () {
  // ready now, so get treatment
  this.treatment = this.splitClient.getTreatment('drink-types');
}.bind(this));Code language: JavaScript (javascript)
Now update the template file, home.vue, that corresponds with this component.
src/main/webapp/app/core/home/home.vue
<template>
    <div class="container">
        <div class="home row justify-content-md-center">
            <div class="col-md-6">
                <div class="title">
                    <h1 class="display-4">CoffeeBot!</h1>
                    <p class="lead">Drink coffee!</p>
                    <p>{{username ? username : "anonymous"}}, treatment: {{treatment}}</p>
                </div>

                <div v-for="drink in drinks">
                    <b-button variant="outline-primary" class="menu-button" @click="currentOrder=drink">{{drink.name}} {{drink.size}} - ${{drink.priceDollars}}</b-button>
                </div>

                <div v-if="currentOrder !== null">

                    <div v-if="treatment==='on'">
                        <b-button v-if="!withCream" variant="success" class="menu-button" @click="withCream=true">Add Cream - FREE</b-button>
                        <b-button v-if="withCream" variant="danger" class="menu-button" @click="withCream=false">Remove Cream</b-button>
                    </div>

                    <div class="card order">
                        <h4>Current order:</h4>
                        <div>
                            {{currentOrder.name}} {{currentOrder.size}} {{withCream ? "(w/ cream)" : ""}} - ${{currentOrder.priceDollars}}
                        </div>
                    </div>
                </div>

            </div>
        </div>
    </div>
</template>

<script lang="ts" src="./home.component.ts"></script>

<style>
    .menu-button {
        margin-bottom: 10px;
        width: 100%;
    }
    .order {
        text-align: center;
        padding:20px;
    }
    .title h1, .title p {
        text-align: center;
    }
</style>Code language: Django (django)
Notice that the file uses Vue’s conditional syntax to conditionally render the add and remove cream buttons based on the treatment state. In this case, even though there is some code not switched in the component that relates to the add and remove cream feature, this is all we need to do to manage the feature state.
<div v-if="treatment==='on'">
    <b-button v-if="!withCream" variant="success" class="menu-button" @click="withCream=true">Add Cream - FREE</b-button>
    <b-button v-if="withCream" variant="danger" class="menu-button" @click="withCream=false">Remove Cream</b-button>
</div>Code language: Django (django)
Try the Finished Spring Boot + Vue.js Tutorial App
You can now try the finished application. Start, or re-start, the server and client. You may want to let the server finish starting before you start the client.
Spring Boot Java server:
./gradlewVue.js client:
npm startCode language: SQL (Structured Query Language) (sql)The client application should open automatically. If it doesn’t, open http://localhost:9000
When you first load the app, you’ll see that the user is anonymous and the treatment is the control treatment.

Log in using the default admin credentials (admin:admin) and you’ll see an expanded list of drinks. Add a drink and you’ll see the Add Cream button that is controlled by the split treatment.
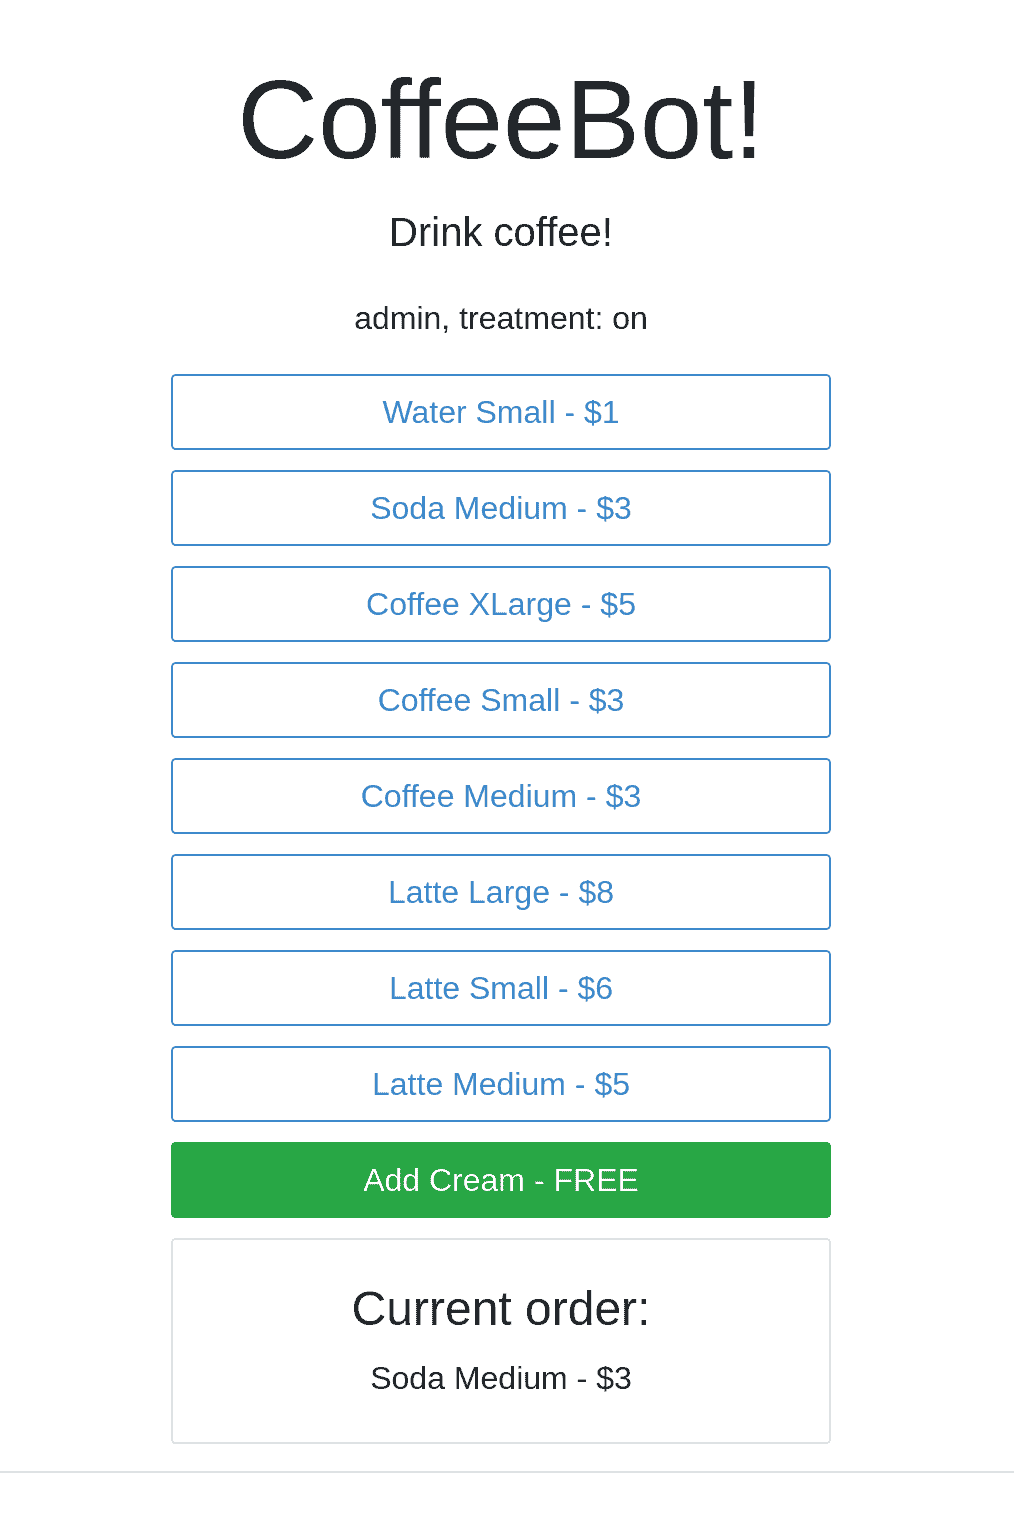
Sign out and log in as the default user (user:user) and you’ll see that the treatment is off and you get the same list of drinks as the anonymous user. Further, you are not given the option of adding cream.
Learn More About Spring Boot, Feature Flags, and Testing in Production
In this tutorial you created a full-stack application that included a Vue.js client and a Spring Boot resource server. The Vue.js client used TypeScript for more modern, error-free development (because type-checking can go a long way toward reducing runtime errors when used properly). The Spring Boot server used technologies like Spring Security and Spring JPA to quickly and easily define a data model (or an entity), persist instances of that entity to a database, and serve that data in a REST interface.
Both the client and the server were secured using JWT authentication. Split was used to implement feature flags, using the Java SDK to implement splits on the server side and the Javascript SDK to implement splits on the client side.
All of this was bootstrapped using JHipster, which made it super easy to start a new full-stack project using modern best practices and technologies.
You can find the full source with JHipster all set up on Split’s Examples GitHub.
If you’d like to learn more about modern development with Spring Boot or how feature flags can drive efficiency and innovation in your organizations, check out these other resources:
- 7 Ways We Use Feature Flags Every Day at Split
- Build a Continuous Deployment Pipeline in Java with Travis CI
- Leverage Spring Security to Test in Production
- A Simple Guide to A/B Testing
- How to Implement Testing in Production
Looking for even more? Check out our YouTube channel!
Get Split Certified
Split Arcade includes product explainer videos, clickable product tutorials, manipulatable code examples, and interactive challenges.
Deliver Features That Matter, Faster. And Exhale.
Split is a feature management platform that attributes insightful data to everything you release. Whether your team is looking to test in production, perform gradual rollouts, or experiment with new features–Split ensures your efforts are safe, visible, and highly impactful. What a Release. Get going with a free account, schedule a demo to learn more, or contact us for further questions and support.