
Let’s talk about continuous deployment in Java. In this CI/CD tutorial you’ll learn the basics and benefits of continuous integration and continuous deployment.
Then you’ll dive into the practical part of the post. I’ll show you how to set up a CI/CD pipeline for a Spring Boot app in a simple and quick way, and using only free resources.
Before wrapping up, I’ll even give you a bonus—a quick guide on how to add a Split feature flag to your app—so you can toggle a feature in real time in your production environment without having to rewrite your code or redeploy.
Let’s get started!
What Is CI/CD?
CI/CD automates the otherwise laggy software release cycle and seamlessly deploys feature improvements to end users at the optimized speed that users expect from modern software products.
In continuous integration (CI), developers integrate their work into their codebase as often as makes sense, even many times a day, creating short feedback cycles. They do this by submitting their code changes to a shared central source code repository (often hosted on GitHub, GitLab, or another collaborative repository management platform), where an integrated CI server builds their code and runs automated testing and measurements for quality assurance.
CD stand for continuous delivery or continuous deployment. This is the automated process (using GitHub Actions, GitLab features, Jenkins, or other CD tools) that builds and packages the code for delivery to the end user (continuous delivery) or automatically deploys the software directly to the end user (continuous deployment).
The CI/CD pipeline is an automated workflow that is triggered by a developer making a pull request or performing a merge into a source code repository branch. The CI/CD workflow runs tests and quality checks on the source code, validates metrics, and deploys software to a docker container or a web server. All this typically happens with no human intervention.
Diving in
With the basics out of the way, it’s time for you to roll up your sleeves and get to work. I’ll walk you through setting up continuous deployment in Java using free, easily accessible resources. By the end of this tutorial for beginners, you’ll know how to leverage those resources to configure CI/CD for your applications and reap all the benefits that those practices provide.
Requirements for CI/CD in Java
Let’s begin by reviewing the prerequisites you’ll need to follow along with me in this step-by-step tutorial. I’ll use Java 8 and IntelliJ IDEA. It’ll be easier to follow if you can match me, though you can certainly use any IDE. I’ll also use Maven as my build system, but feel free to use Gradle if you prefer. You’ll also need an account for the following platforms:
Travis CLI is a gem, which means you’ll need Ruby and Gems installed.
For the feature flag part of the tutorial, you’ll also need a Split account. Getting set up with Split is easy and free, and I’ll show you how to do it later in this post.
To get started, go to the OpenWeather API website, create an account or log in, and retrieve your free API key. Click on your account name in the upper right, choose My API Keys, copy your API key and store it somewhere safe. You’re going to need that key in order to make the sample app work.
Load Up the Spring Boot Sample App
For brevity’s sake, I won’t walk you through creating an application from scratch. Instead, you’ll start by downloading a pre-built application and then do your work on top of that. The application is mostly the same as the one you built in a past post. Reading that post isn’t required to understand this one though.
The application is a simple app that shows the current time in Detroit, Michigan. After you’re done setting up a continuous deployment pipeline for the app, you’ll add a new feature to allow users to specify the city and country for which they want to see the current weather. We will put that feature behind a Split feature flag to selectively expose it to our users.
You can find the app in this GitHub repo. Clone the repository, or download it as a .zip file and place the contents of the repository in an easily accessible folder.
NOTE: There are two tags in the git repository: weather-app tag is the application’s original state – without feature flags and without CI/CD integration. To run this version, all you need is the OpenWeather API key. The weather-app-with-feature-flags tag is the finished tutorial example, for which you’ll need to provide a Split API key as well as the encrypted Heroku API key for the Travis CI configuration. I’ll walk you through all of that below.
Run the Spring Boot Sample App
The next step is to run the app. Using IntelliJ IDEA, or your IDE of choice, open the pom.xml file for the project. You’ll be asked whether to open it as a regular file or as a project. Choose to open as a project.
At this stage, trying to run the application won’t work. That’s because it makes use of the @Value Spring Boot annotation, and the value has not yet been passed to the application.
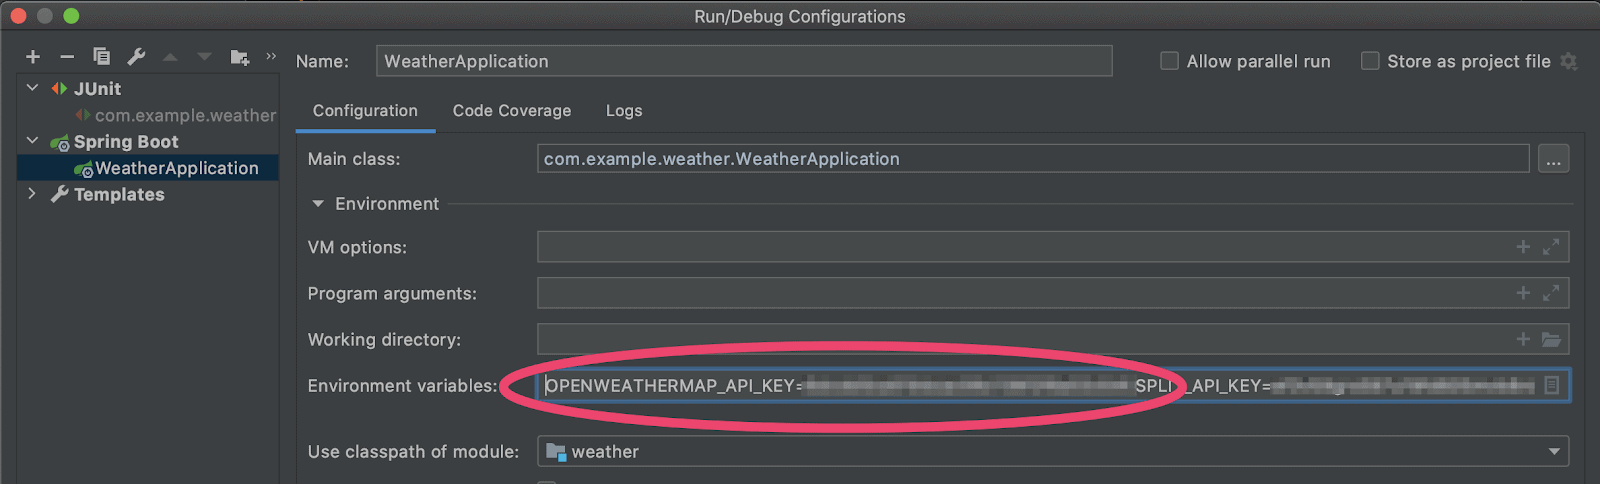
You’ll do that by adding an environment variable to IntelliJ IDEA. Go to Run, then Edit Configurations.
You should have a configuration named after the project. On the Configuration tab, locate the Environment Variables field, and fill it with OPENWEATHERMAP_API_KEY=<YOUR-API-KEY>, replacing <YOUR-API-KEY> with your actual OpenWeather API key:
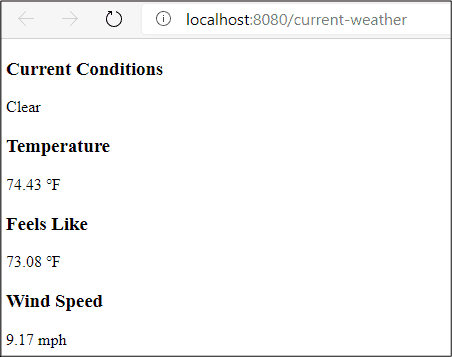
Then you can click OK and run the app. Go to http://localhost:8080/current-weather, and you’ll see the app working:
For the next step, you’ll get your repo ready. The way you’ll do that depends on whether you’ve cloned or downloaded the app as a .zip.
If you’ve cloned the repo, you’ll need to remove the existing remote that points to the original repository. Do that by opening a terminal, navigating to the root of the project’s folder, and running this command:
git remote remove originIf, on the other hand, you’ve downloaded the app’s code as a .zip file, you’ll have to initialize a git repository by running git init inside the project’s folder.
The next steps will be the same for both scenarios. First, create a new repository on GitHub. Then, go to the repo’s main page and copy the link used for cloning. Go back to your terminal, and run the following commands, making sure to use your actual GitHub username and repository name instead of the placeholders below:
git remote add origin https://github.com/your-user-name/your-repo-name.git
git push -u origin master
This sets the GitHub repository hosted under your account as the remote for your local repo, allowing you to push up your local changes and trigger your CI/CD workflow. We will set up the workflow next.
Get Started With Travis CI
Now that you have a simple working Spring Boot application, you’re ready to start implementing CI/CD using Travis CI.
To start, create the YAML configuration file that will teach Travis how to build your app. Name the YAML file .travis.yml, and place it in the root of your project. Then add the following code to it:
language: java
jdk: openjdk8
before_install:
  - chmod +x mvnw
Commit this file, and push this to your GitHub repo.
The next step is to enable Travis for this GitHub repository. Go to the Travis CI site, and sign up or sign in using your GitHub account. After you’re logged in to Travis CI, you’ll see on the left side of the screen the list of your current repositories configured with Travis. Click on the + to add a new repo. You’ll see a list of all your repos. Locate the repo for the Weather app, and enable Travis CI for this repo by clicking the slider switch.
Then click on the GitHub repository’s name. You’ll be taken to the config page in Travis CI for the GitHub repository. You have one step left before you can build your project using Travis CI. Remember the OpenWeather API key? That’s right, you need a way to securely store that value in Travis CI. You’ll do that by creating an environment variable.
Click on More options and then on Settings, as in the image below. Then go to the Environment Variables section, which should look like this:

Add the OpenWeather API key as follows:
- Type
OPENWEATHERMAP_API_KEYin the Name field. - Paste the OpenWeather API key in the Value field.
- Leave the Branch field with the default ‘All branches’ value.
- Do not toggle the slider that would display the key value in your build logs.
- Click Add.
With that out of the way, you’re ready to trigger your first build.
Go back to the Travis CI project’s page; click More options and then click Trigger build:
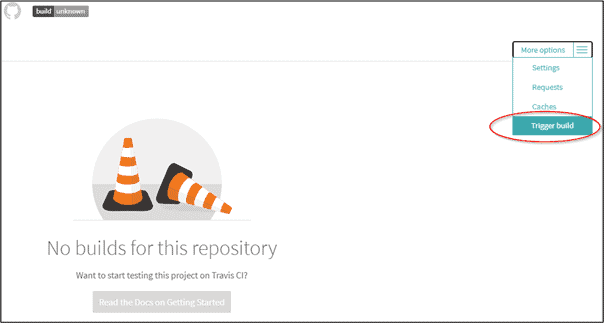
Then, click on Trigger custom build, and wait while Travis CI builds your project.
Congratulations! You’ve successfully set up continuous integration for your project! Let’s now see how you can use Travis CI to deploy your app.
Continuous Deployment to Heroku
Travis CI allows you to deploy to many different platforms. The list of supported providers includes the usual suspects, such as AWS, Azure, and Google Cloud, but goes way beyond them. For example, Travis CI builds can also run and build Docker images and deploy the images to Docker Hub.
For this tutorial, we’ll show you how to deploy to Heroku. As soon as this option is correctly configured, Travis CI will automatically deploy your app after each successful build on the main branch.
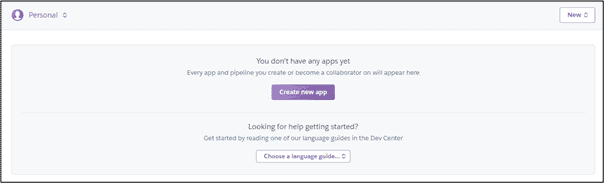
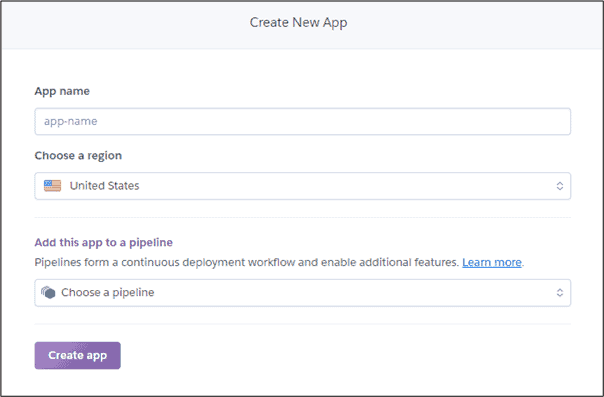
First, go to Heroku, and sign up for a free account if you don’t already have one. Then log in to your account, and create a new app:
On the new page, choose a name for your app, pick a deployment region, and click Create app:
For the next step, you’ll need to retrieve your Heroku API key. Go to the Manage Account page, scroll down to the API key, and click Reveal:

Copy the key’s value. The only step left is to add the Heroku configuration to your .travis.yml file:
deploy:
  provider: heroku
  api_key:
    secure: YOUR-ENCRYPTED-API-KEY
You will replace YOUR-ENCRYPTED-API-KEY with the value of your actual Heroku API key, but first you will encrypt it using the Travis CLI.
Start by opening a terminal and installing the Travis gem:
gem install travis
After the installation is complete, navigate to your project’s directory, and run the following command:
travis encrypt <your-heroku-api-key> -- add deploy.api_key --org
This might take a while, but you’ll eventually see a message with the resulting encrypted data. Copy the encrypted key and place it in the .travis.yml file. Your complete file should now look like this:
language: java
jdk: openjdk8
before_install:
- chmod +x mvnw
deploy:
  provider: heroku
  api_key:
    secure: <encrypted value>
NOTE: By default, Travis CI will try to deploy to Heroku using an application name that matches the GitHub repository name. If you’ve named your Heroku application something different, you’ll need to add an app: <app name> element in the deploy: section, as shown above.
After you save, commit, and push your .travis.yml file, your app will be deployed to Heroku.
Access Your Deployed App
You can now access your app. On the app’s page, click Open app.
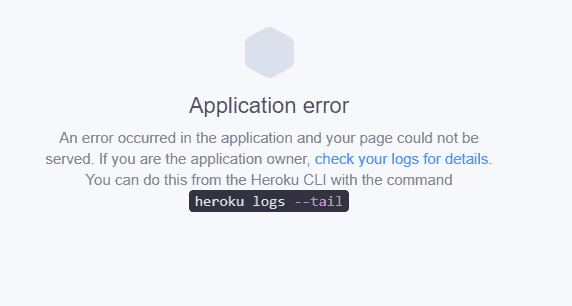
Wait, why did you get an error? If you said, “OpenWeather API,” then you’re right. You had to provide that value to the application, both locally and also when configuring Travis CI. Heroku is no different, so let’s configure an environment variable in Heroku.
On the app’s page, click Settings, and then scroll the page until you see the Config Vars section. Click Reveal Config Vars. This is what you’ll see:
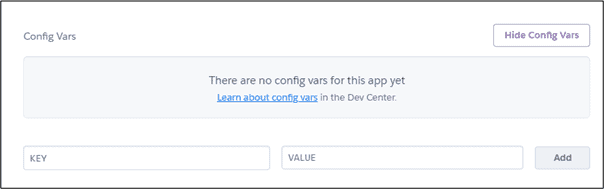
Type API_OPENWEATHERMAP_KEY into the KEY field, and paste your OpenWeather API key into the VALUE field. Click Add and you’re done!
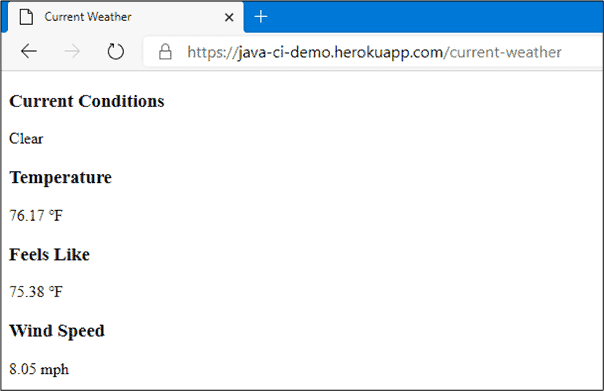
Now, click again on Open app. A new tab will open with an error message. Don’t worry, though. This time, it’s an expected error. Go to the address bar, and add /current-weather to the address. Load that page, and you’ll see your shiny new app:
Add Feature Flags to Your Java App
Now that you have a working app with a CD process set up, imagine you want to add a new feature, but only deploy it to a small set of internal testers (for testing in production!) or maybe you’re ready to release it as a canary to a subset of your users. Enter feature flags!
Get Your Split API Key
You’ll use Split to manage your feature flag. Start by signing up for a forever-free account. (You can also click the login link at the top-right of this page.)
Once you’re signed in, get your API key by clicking the Workspace button—the one with DE on the top left corner—and then selecting Admin Settings.
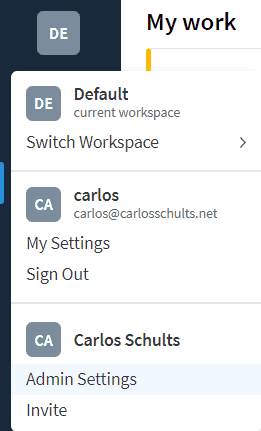
NOTE: If you’re new to using Split and/or on the free tier, the button in the upper left will say DE for Default. This is labeled with the first two letters of the workspace name.
On this new page, you’ll see several keys already created on the SDK API Keys tab. For this tutorial, you’ll use the Server-side type key for the Prod-Default environment.
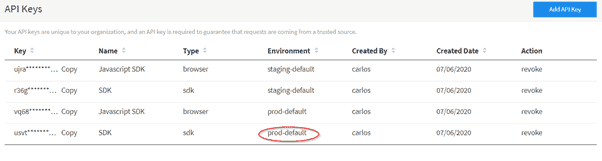
Copy the key, and store it somewhere safe.
Obtain the Split Java SDK
The next step is adding the Java Split SDK to your code, and it’s incredibly easy to do. It’s just another dependency to add to your .pom.xml file:
<dependency>
    <groupId>io.split.client</groupId>
    <artifactId>java-client</artifactId>
    <version>3.3.4</version>
</dependency>
Add Feature Flags to Your Java Code
Making the feature flag work will require some changes to your code. First of all, you’ll need to change the template for the application to show the name of the city and the country. Open the src/main/resources/templates/current-weather.html file, and update its contents to this (I’m omitting the basic HTML tags):
<div>
<h3>City</h3>
<p th:text="${currentWeather.city}">City</p>
<h3>Current Country</h3>
<p th:text="${currentWeather.country}">Country</p>
<h3>Current Conditions</h3>
<p th:text="${currentWeather.description}">Description</p>
<h3>Temperature</h3>
<p th:text="${currentWeather.temperature} + ' ℉'">Temperature</p>
<h3>Feels Like</h3>
<p th:text="${currentWeather.feelsLike} + ' ℉'">Feels Like</p>
<h3>Wind Speed</h3>
<p th:text="${currentWeather.windSpeed} + ' mph'"></p>
</div>
Also, open the CurrentWeather class (the model) and add two parameters, for the city and country, to the constructor:
public CurrentWeather(
    String city, String country, String description,
    BigDecimal temperature, BigDecimal feelsLike,
    BigDecimal windSpeed
) {
    this.city = city;
    this.country = country;
    this.description = description;
    this.temperature = temperature;
    this.feelsLike = feelsLike;
    this.windSpeed = windSpeed;
}
As you can see, there’s a ‘split.api-key’ environmental variable used here. Use the IntelliJ options to create this environment variable and set it to the value of your Split API key.
Next, go to the CurrentWeatherController, and replace all of its contents with this:
@Value("#{ @environment['split.api-key'] }")
private String splitApiKey;

@Bean
public SplitClient splitClient() throws Exception {

    SplitClientConfig config = SplitClientConfig.builder()
        .setBlockUntilReadyTimeout(10000)
        .enableDebug()
        .build();

    SplitFactory splitFactory =
        SplitFactoryBuilder.build(splitApiKey, config);

    SplitClient client = splitFactory.client();

    client.blockUntilReady();

    return client;
}
As you can see, there’s a ‘split.api-key’ environmental variable used here. Use the IntelliJ options to create this environment variable and set it to the value of your Split API key.
Next, go to the CurrentWeatherController, and replace all of its contents with this:
@Controller
public class CurrentWeatherController {

    private final WeatherService weatherService;
    private final SplitClient splitClient;

    public CurrentWeatherController(
        WeatherService weatherService,
        SplitClient splitClient
    ) {
        this.weatherService = weatherService;
        this.splitClient = splitClient;
    }

    @GetMapping(value =
        {"/current-weather", "/current-weather/{location}"}
    )
    public String getCurrentWeather(
        @PathVariable(name="location") Optional<String> location,
        Model model
    ) {

        String city;
        String country;

        // Evaluate the Split feature flag.
        // We generate a random user ID key. This allows us to use Split's
        // percentage targeting rules in the future.
        String treatment =
            splitClient.getTreatment(
                String.valueOf((int)(Math.random() * 10000)),
                "CUSTOM_LOCATION"    // the Split feature flag's name
            );

        if ("on".equals(treatment) && location.isPresent()) {
            city = location.get().split(",")[0];
            country = location.get().split(",")[1];
        } else {
            city = "Detroit";
            country = "US";
        }

        model.addAttribute(
            "currentWeather",
            weatherService.getCurrentWeather(city, country)
        );
        return "current-weather";
    }
}
You’ll see that we’ve made some important changes. First of all, we’ve added a new private field of type SplitClient and a corresponding constructor parameter.
The most important change lies in the getCurrentWeather method though. Now it can retrieve an optional location path variable. That location should consist of a city and country separated by a comma. The city and country are passed to the WeatherControl when the feature flag is “on”. Otherwise, the controller defaults to “Detroit, US” as the default location.
Finally, update WeatherService to accommodate the new city and country fields. Those values are extracted from the response. Replace the convert method with the following:
private CurrentWeather convert(ResponseEntity<String> response) {
     try {
        JsonNode root = objectMapper.readTree(response.getBody());
        return new CurrentWeather(
            root.path("name").asText(),
            root.path("sys").path("country").asText(),
            root.path("weather").get(0).path("main").asText(),
            BigDecimal.valueOf(
                root.path("main").path("temp").asDouble()
            ),
            BigDecimal.valueOf(
                root.path("main").path("feels_like").asDouble()
            ),
            BigDecimal.valueOf(
                root.path("wind").path("speed").asDouble()
            )
        );
    } catch (JsonProcessingException e) {
        throw new RuntimeException("Error parsing JSON", e);
    }
}
Here I’ve added the two new fields for city and country for the CurrentWeather object, as extracted from the OpenWeather API response.
You can git commit your local changes, then push to the remote GitHub repo to trigger a new build and deploy.
Are we done yet? Not really. There’s one last crucial step: activating the feature flag in Split.
Activate Your Split
Go to app.split.io again. On the left panel, click Feature flags and then click Create feature flag.
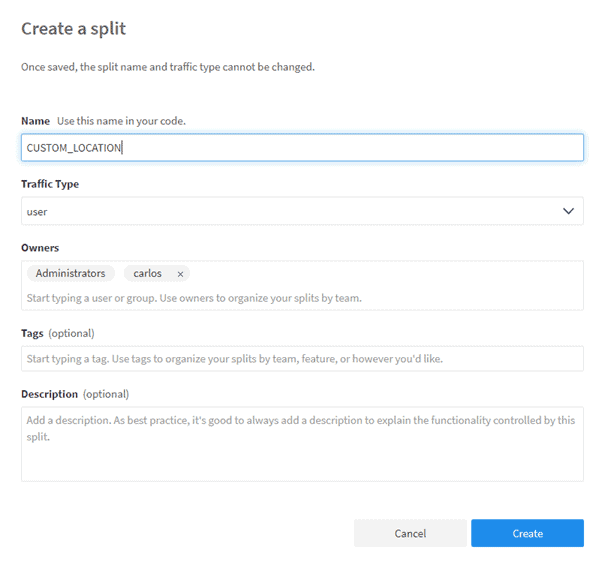
Give your split a name, and then click Create. Then select the Prod-Default environment (this is the Split environment for which you copied your Split SDK API key) and click Initiate Environment:
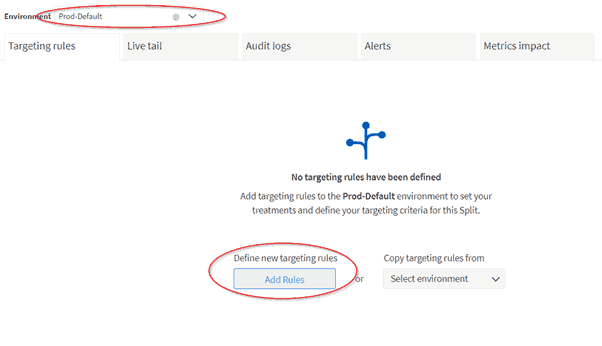
On the next screen, click Review Changes and then Save.
Go to the public URL for your deployed app, and try to specify different cities after the base URL. You’ll see that, no matter what you try, the app will just show the climate for Detroit. That’s because your feature flag is “off” and your code is following the “off” execution path.
Go back to your feature flag definition in Split. In the Targeting rules, set the feature flag to serve on. Review and then save your changes. Now go back to your app, refresh the page, and you’ll see that now you can successfully specify the location.
Without altering any source code, you just enabled the location feature in your Weather app! You did this in real time from the Split UI, just by editing the targeting rule in your Split feature flag definition. This Split functionality also allows you to rollback any feature instantly.
You can investigate how, even on the free tier, Split empowers you to safely perform feature rollouts gradually, using traffic percentage targeting rules. With Split you’ll be taking your continuous deployment journey to the next level!
Learn More About Continuous Deployment and Modern Feature Delivery in Java
Automation is a leap forward in software project management and a DevOps engineer’s bread and butter. Modern version control and CD processes make the software development lifecycle more traceable and efficient, with recent dramatic advances in DevOps tools and solutions like Jenkins, an open source CI/CD tool written in Java; GitLab, a software delivery automation tool with seamless support for managing kubernetes clusters and docker images; and GitHub Actions and Larger Runners workflow automation capabilities.
Sure, programmers have been employing automation scripts to speed up tasks like unit testing and code packaging, since the dawn of programming time. However, in recent years, DevOps engineers have explored automation to extents we’ve never done before. The resulting transformation of the software development process is seen in the combined practices of continuous integration (CI) and continuous deployment (CD).
This post was written by Carlos Schults. Carlos is a .NET software developer with experience in both desktop and web development, and he’s now trying his hand at mobile. He has a passion for writing clean and concise code, and he’s interested in practices that help you improve app health, such as code review, automated testing, and continuous build.
Switch It On With Split
The Split Feature Data Platform™ gives you the confidence to move fast without breaking things. Set up feature flags and safely deploy to production, controlling who sees which features and when. Connect every flag to contextual data, so you can know if your features are making things better or worse and act without hesitation. Effortlessly conduct feature experiments like A/B tests without slowing down. Whether you’re looking to increase your releases, to decrease your MTTR, or to ignite your dev team without burning them out–Split is both a feature management platform and partnership to revolutionize the way the work gets done. Schedule a demo to learn more.
Get Split Certified
Split Arcade includes product explainer videos, clickable product tutorials, manipulatable code examples, and interactive challenges.