
Controlled rollouts is a term for selectively enabling features for a subset (or segment) of users before enabling the feature for the entire target audience. You can use it to “pre-release” new features for a subset of users, perhaps as a premium perk or to bug test and performance test experimental features in a controlled fashion before they are pushed to an entire user base.
A controlled rollout is a feature rollout with highly granular user targeting. It allows you to release new features gradually, ensuring a good user experience for smaller groups of users before releasing them to larger groups.
From the Split Glossary
When implementing controlled rollouts with feature flags and Split, you perform these rollouts in real time, without publishing any new code. The features to be tested are packaged into the code. Feature flags used to turn them on and off. The feature flags can be dynamically activated and deactivated through the Split dashboard. These changes are propagated in near real-time to applications.
In this example, you’ll simulate a new feature that turns out to perform poorly and causes a significant degradation in performance. You’ll see how you can use Split’s implementation of feature flags to: (1) enable the feature, (2) track its performance, and (3) when you realize that it’s performing poorly, disable it–all in real-time without having to publish any new code.
For those not familiar with Split and feature flags, I’m going to quickly explain some terms you’ll see in the tutorial below. A feature flag is a decision point in code. A feature flag is also called a split. Each split has two or more treatments. Treatments are simply predefined values that a split can have. By default treatments are boolean, with on and off values. Think old-school boolean flags hard coded into code but in this case linked to Split’s servers so that they are dynamic.
Split’s treatments, however, are string values. A “boolean” feature flag is really a split with two possible treatments: “on” and “off,” represented by string literals. This means that treatments (a split’s state) can really have any arbitrary value represented by a string. What that string value signifies and controls in your code is up to you. Further, splits are not limited to only two possible values. They can be multivariate. That is, each split can have any number of different treatments. Thus while we are using a simple boolean value system in this tutorial, Split is not limited to this.
The treatment that the split returns for a given user or client is highly configurable in the Split dashboard and can be controlled and updated in real-time. Users can be targeted based on a huge variety of configurable parameters.
A segment is a subset of users. Segments can be created based on static lists of users or based on user name or user property filtering. A frequent use case is to define a segment of users and to dynamically enable a feature for a particular segment, track the features performance, and either enable the feature for the rest of the users or roll the feature back, depending on how the feature performs.
In this tutorial, you will use Spring Boot to create a simple, secure Java application. You will use Split to implement a feature flag and see some best practices on how to integrate the Split SDK in a Spring Boot application. You will dynamically enable a feature for a segment of users and use metrics tracking to monitor how the feature performs. Finally, you will define an alert that triggers when the feature performance degrades below a defined, statistically significant threshold.
Install Requirements for Controlled Rollout in Java
Before you get started, you need to complete a few requirements.
Split: Sign up for a free Split account, if you do not already have one. To use the metrics and alerts features toward the end of the tutorial, you will need to be within the initial trial period or have an upgraded subscription.
HTTPie: A simple command-line utility for making HTTP requests. Follow the instructions on their website to install.
Java 11: I used Java 11 for this tutorial. You can download and install Java by going to the AdaptOpenJdk website. Or you can use a version manager like SDKMAN or Homebrew.
Create a Feature Flag
You should have signed up for a free developer account with Split. The first step is to open the developer dashboard and create a new split.

Fill in the values for new split.
- Name:
pithy_test_feature - Traffic Type: user
- Description: not required, but can add whatever you like to identify this split
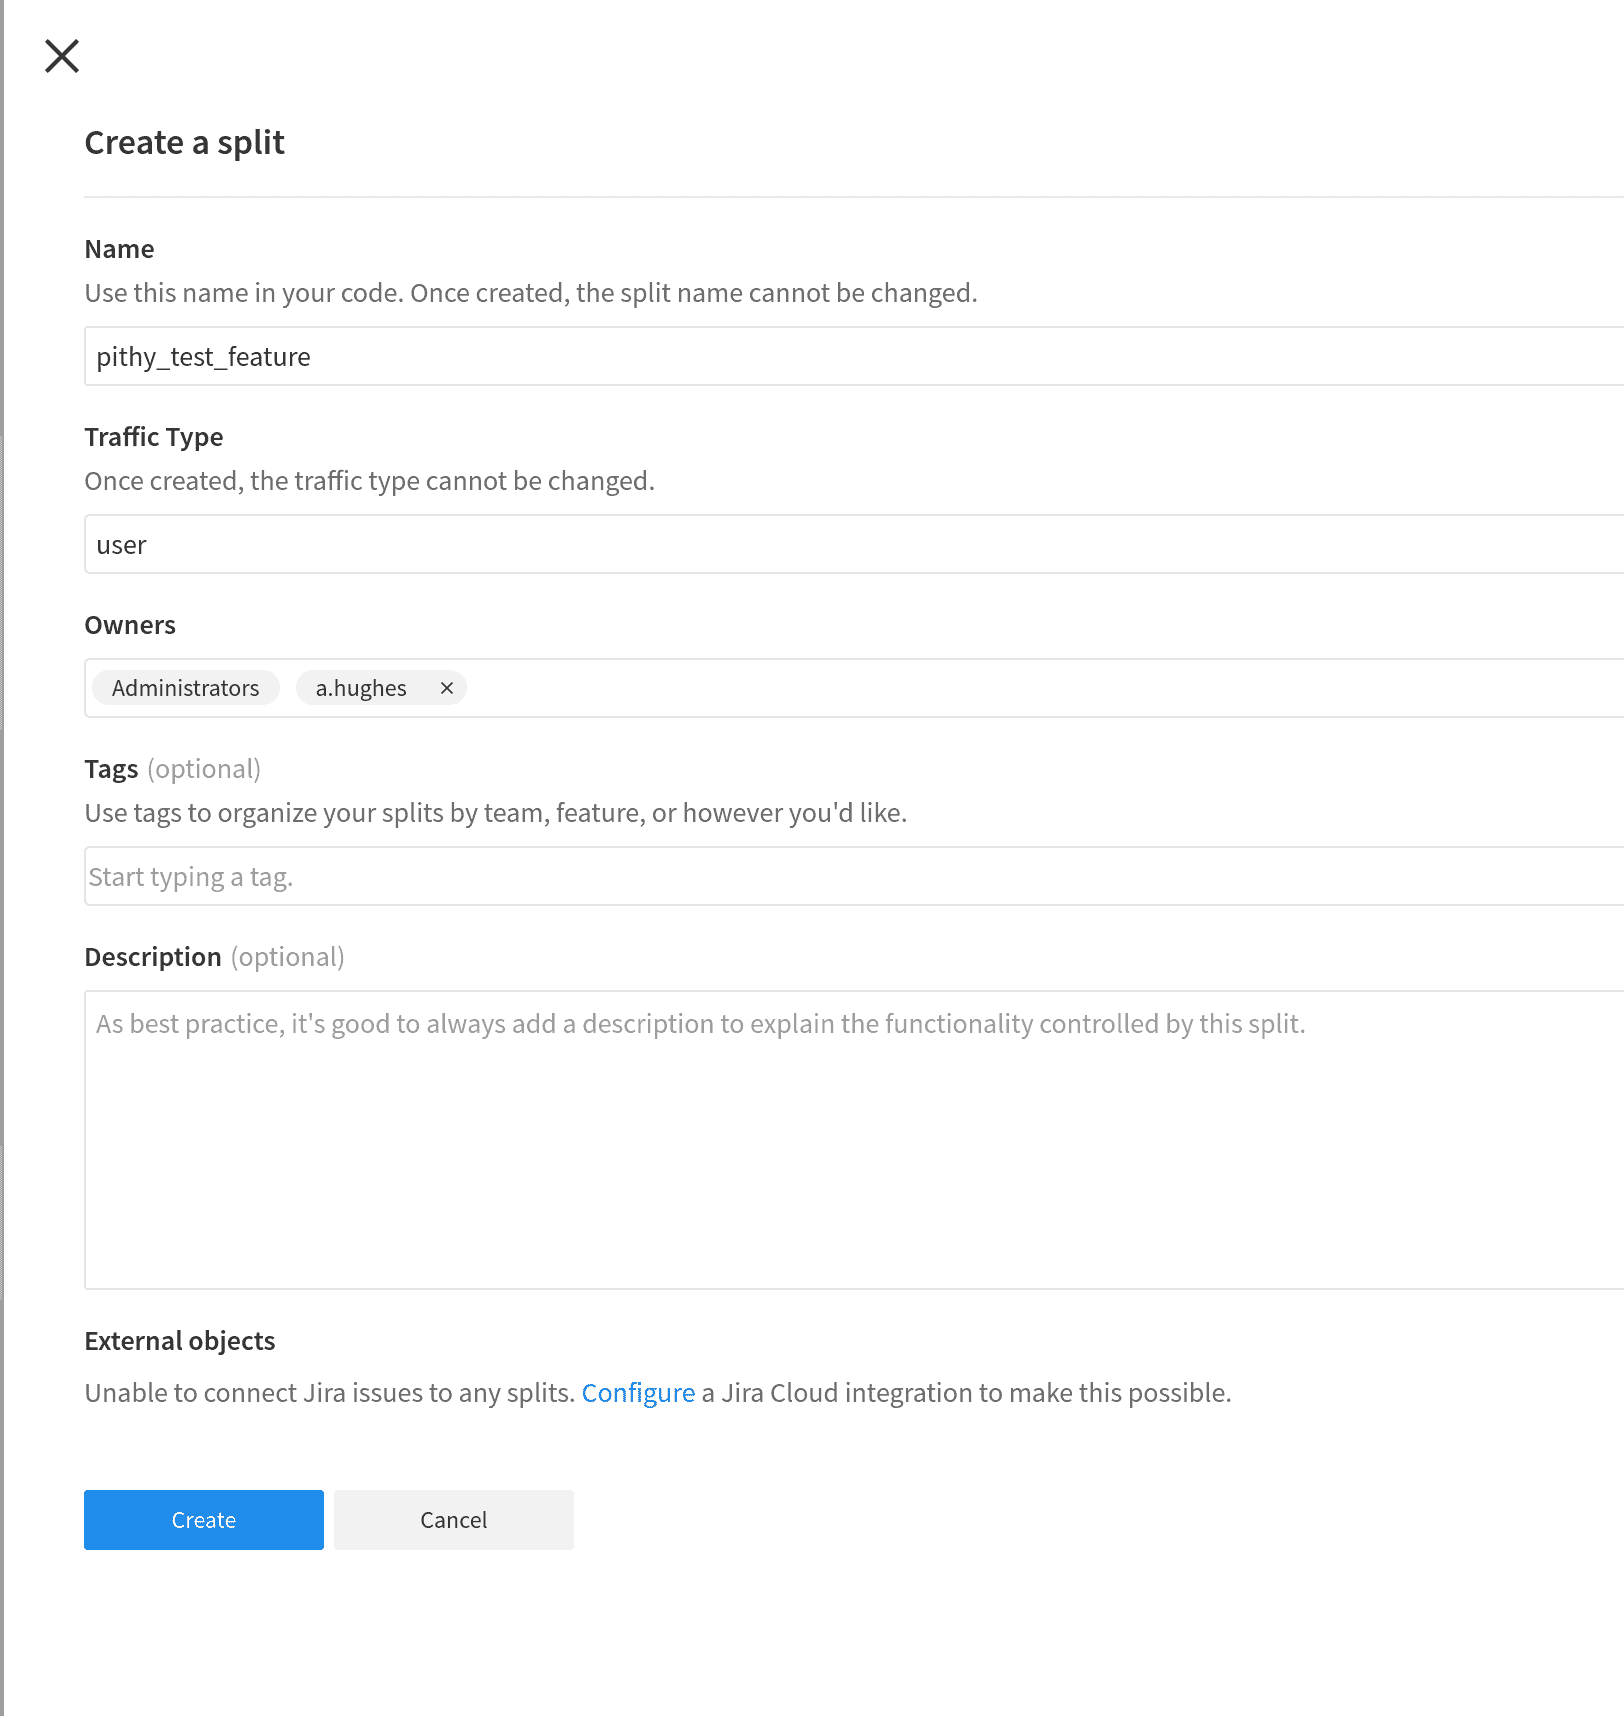
Click blue Create button at bottom of form.
The split is created, but you still need to add targeting rules to define the behavior of the split.
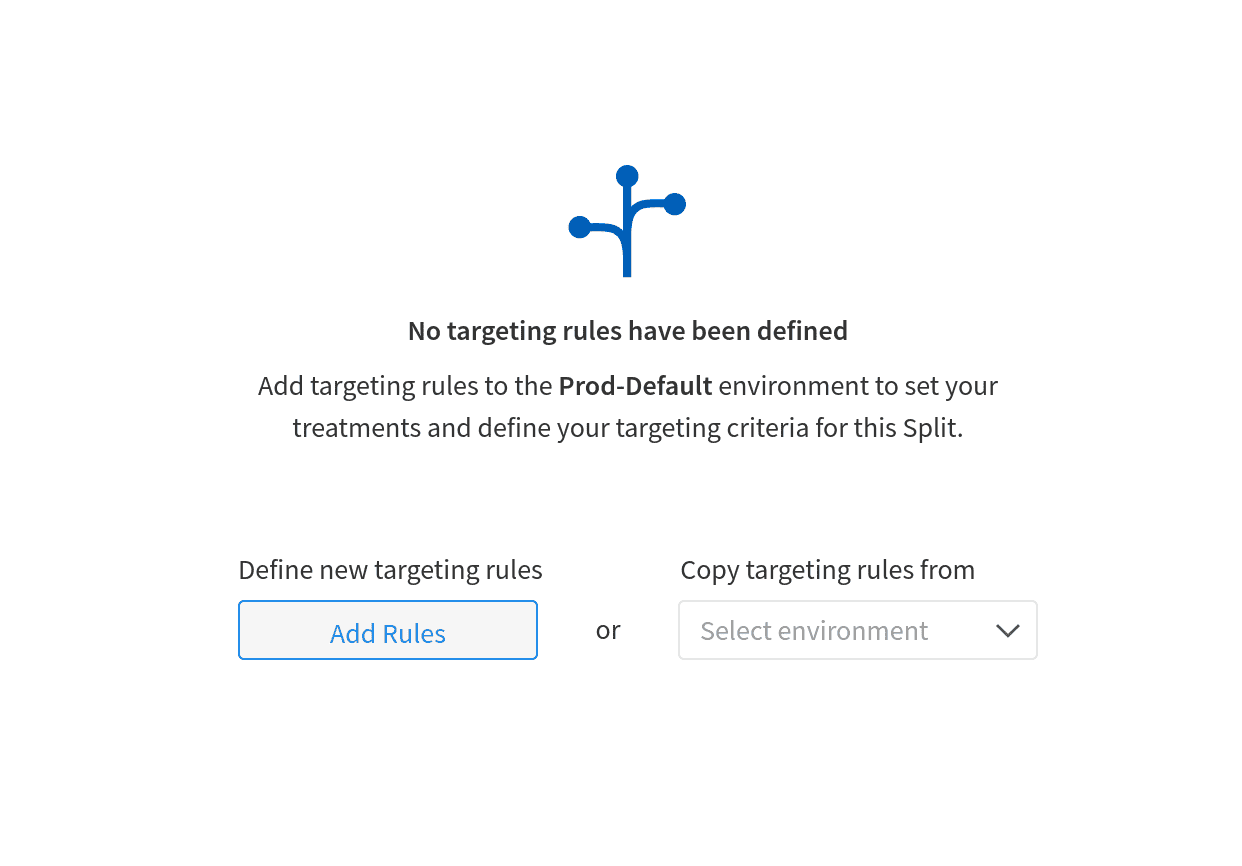
Click Add Rules
There’s a lot going on on the Targeting rules page. Remember that a split defines a decision point in the code. A treatment is a specific value that the decision point can take. This example will use the default on or off boolean values for the treatments. However, these values are simply strings passed to the Split Client in your application and can be anything. You can also have more than two treatments. A split can have three treatments, or five, or however many different states fit your needs!
Notice the drop down at the top labeled Environment. It should say Prod-Default. This means that the split you are configuring lives in the default production environment. You will also have a Staging-Default environment automatically created in your account. For our purposes, make sure this value says Prod-Default, but just remember that these environments are separate. They are also configurable: you can create whatever environments you need for your development, testing, and deployment (look at the Environments button on the far left of the Split developer’s dashboard or take a look at the docs on the Split website).
There’s also a neat feature where you can attach configurations to your treatments. It’s under the heading titles Attach configuration to your treatments. This feature allows you to attach JSON or key-value pairs to the split treatments that allow you to configure your application based on the treatment. In this tutorial you’re going to use this in a somewhat contrived manner to simulate a time delay.
Click the Attach configuration to your treatments header. For the on treatment, add a key/value pair timedelay=5000 and for the off treatment add timedelay=0.
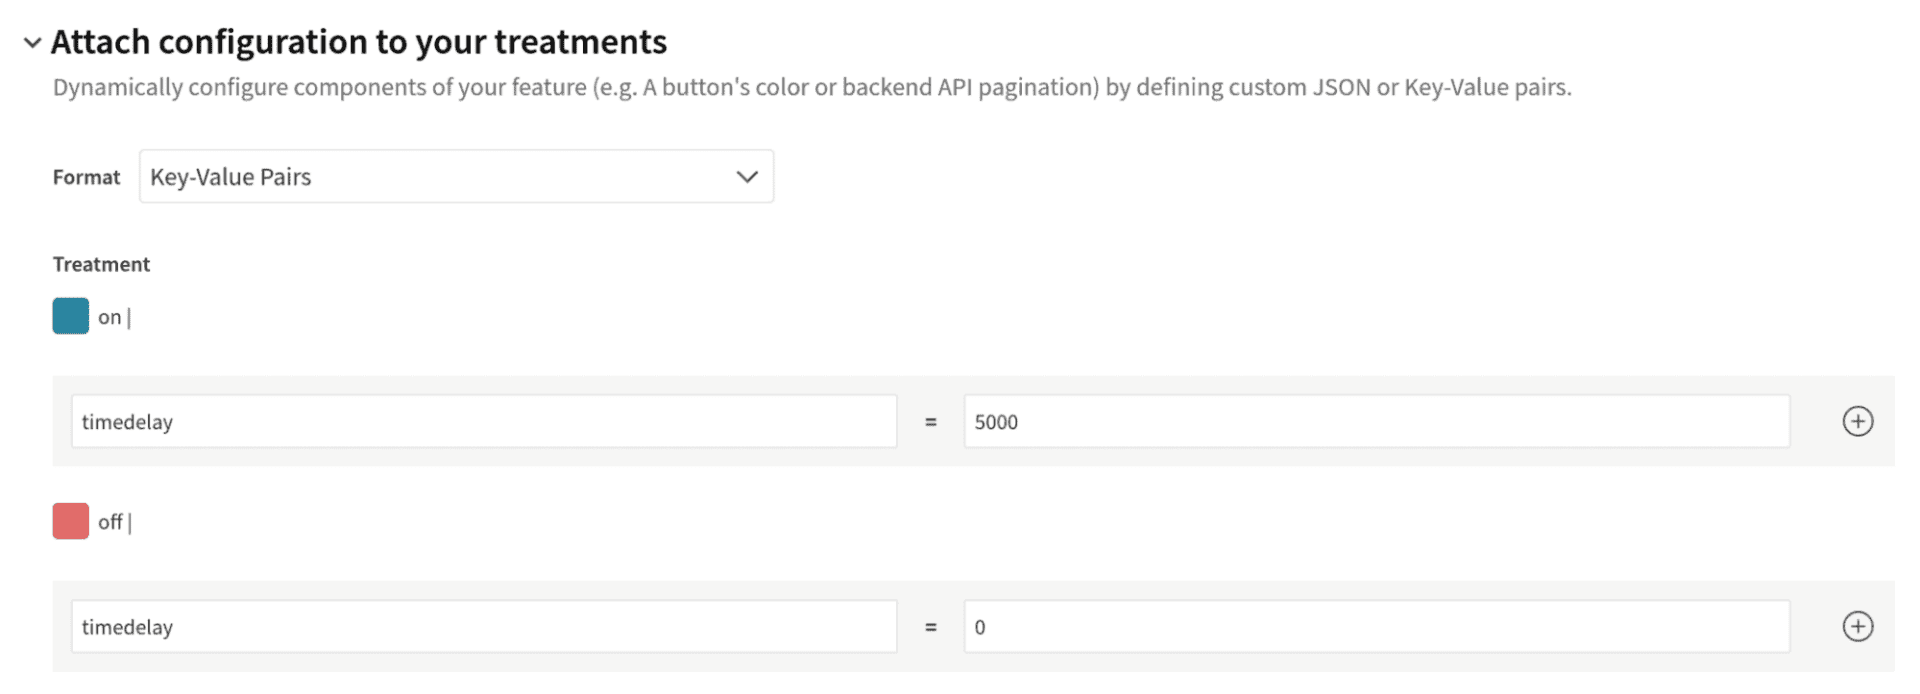
This will be used to simulate our slowly performing feature that we are going to enable and disable using the split.
The next step is to create a segment and a targeting rule. The goal is to define a list of users for which the treatment state is on and for it otherwise to default to off. It’s possible to directly define lists of users in the treatment rule itself, but it’s more flexible to create a segment, which is an abstracted and reusable list of users, and define the treatment based on the segment such that if a user is in the segment the treatment is on and if the user is not in the segment the treatment is off.
Save the treatment that you’ve defined so far by clicking the blue Save changes button at the top of the form.
You’ll see a page that shows you a summary of the changes. In a live scenario, this would be a great place to add a coworker or a boss as an approver and have them check over any changes that are going to affect a production application. Adding approvers is easily done toward the bottom of the confirmation page. Notice that changes are logged and tracked to provide easy rollback in case of a problem as well as accountability tracking.
Click Confirm to finalize the changes.
Remember that the whole point of these splits are that these treatment changes affect live code in real time. Depending on how you have configured things in your application, clicking Confirm is like pushing an update to your application. This is the power of splits.
Click Segments from the left menu.
Click Create Segment.
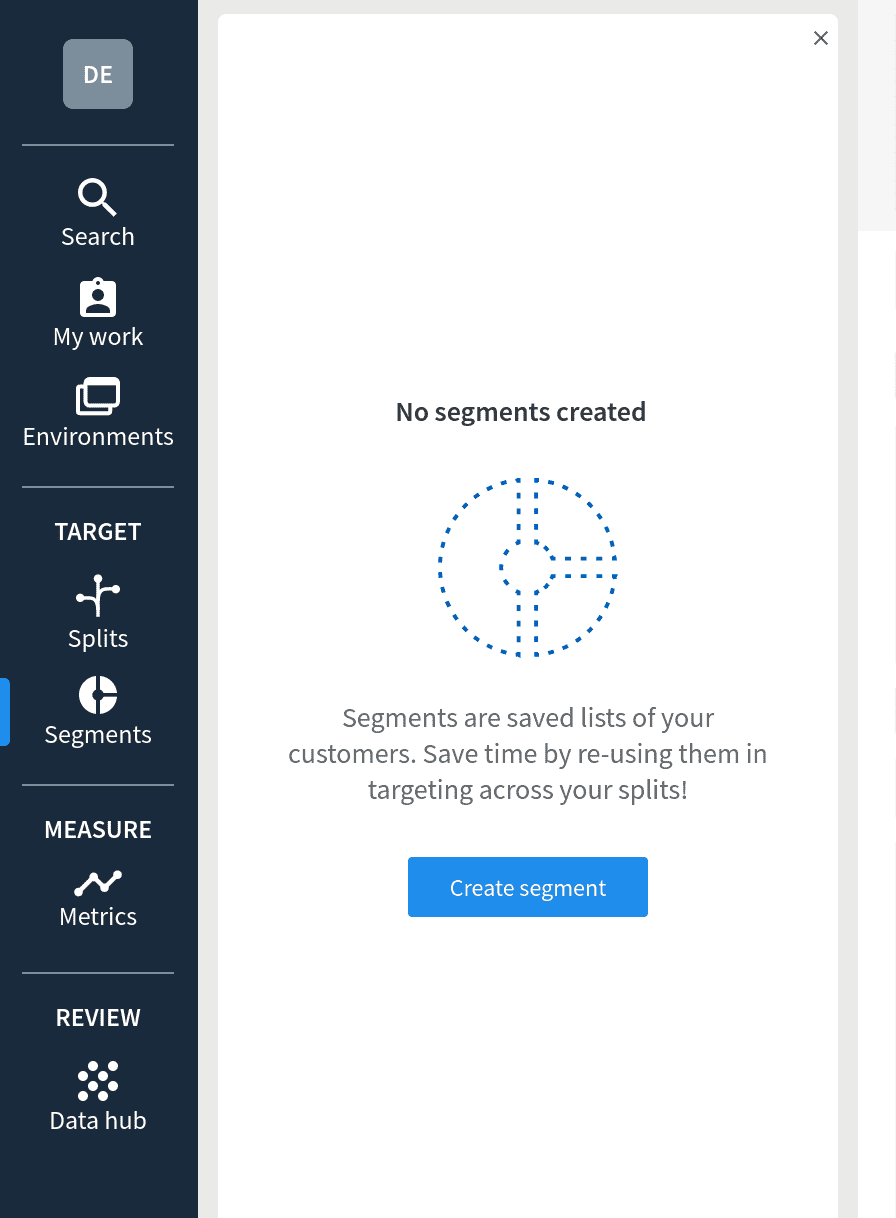
Give the segment the name pithy_test_feature_on.
Click Create.
Click Add Definition. The definition is where you create the list of users defined by the segment.
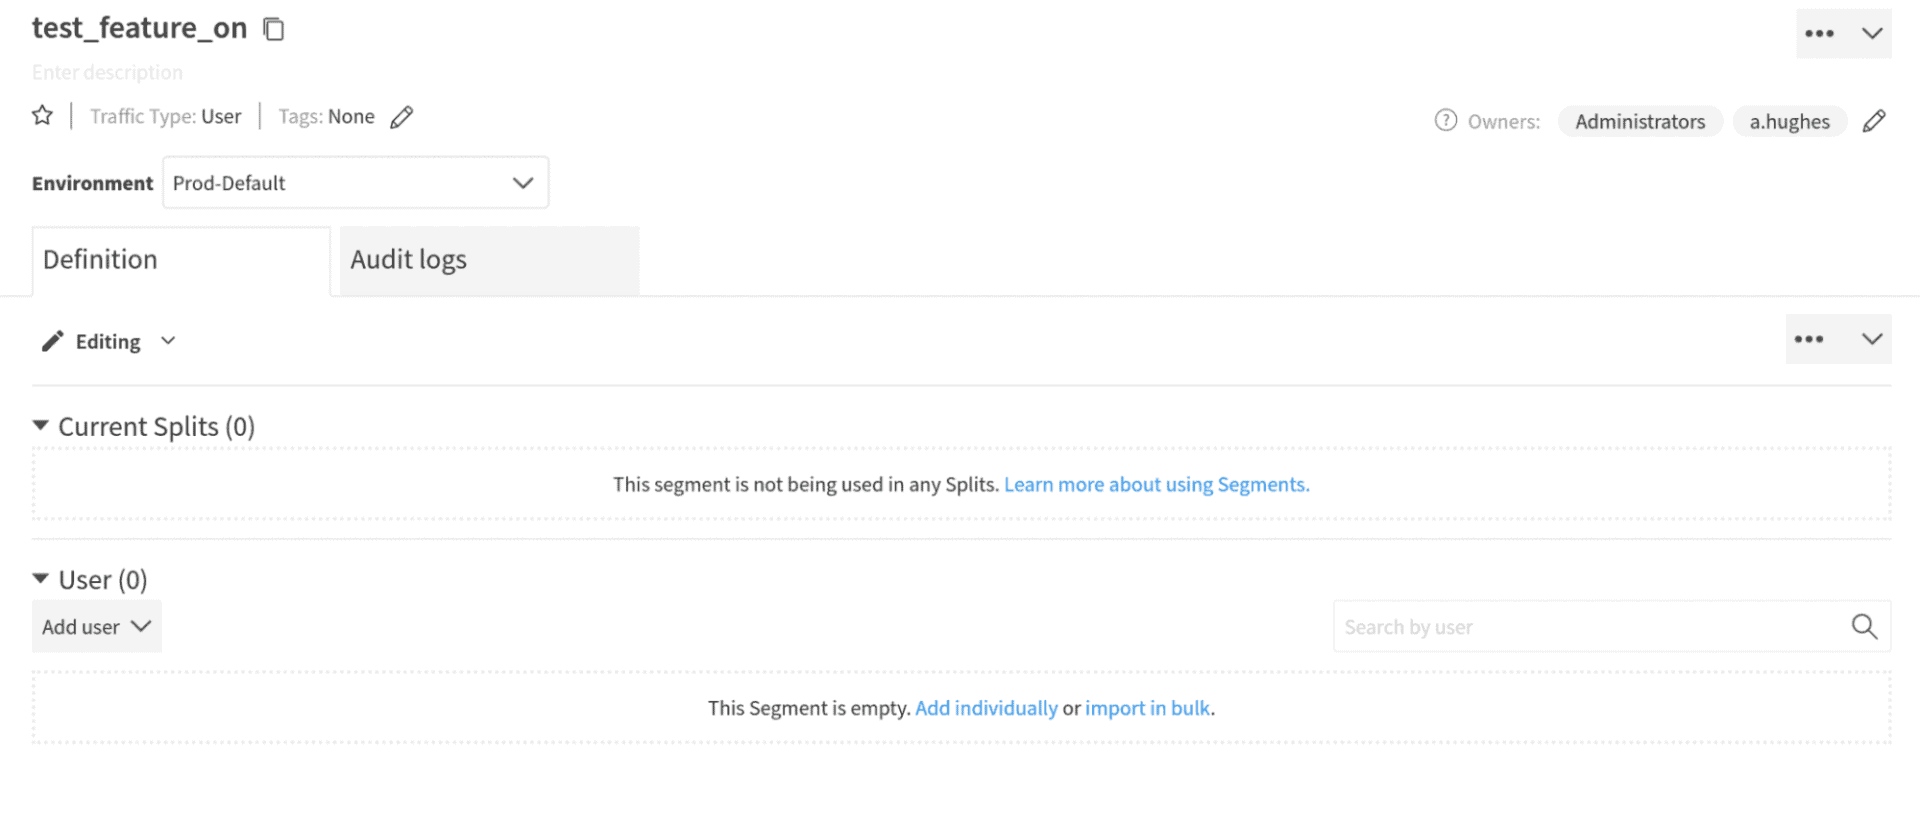
Click the Add User drop down and select Add Individually.
In the Add Individually text box, type demo (our user’s username). Click add new User: demo to both create the user and add that user to this segment.

Click Confirm.
In a production or real test situation, this would likely be a list of users. The list of users can be bulk imported and does not have to be typed in manually. The power of segments is that this list is abstracted away from the treatments themselves and can be used and reused across multiple splits or treatments. Thus you can, for example, have a segment of users for which you want to enable a cluster of test features that are controlled by multiple splits.
Now you need to create the return to your treatment and create a targeting rule that uses the segment.
Click Splits in the left menu. Select the pithy_test_feature split.
Scroll down to the middle of the form and under Set targeting rules, click Add rule.

The default rule is defined by saying “If user is in segment …, serve off.” What you want is for it to read “If user is in segment pithy_test_feature_on, serve on.” Select pithy_test_feature_on from the segment dropdown. Select ‘on’ in the serve dropdown.

Save the split and the new targeting rules by clicking the blue Save changes button at the top.
Click Confirm.
Create the Spring Boot Java Project
Now it’s time to create the Spring Boot client project. You are going to use the Spring Initializr to create your starter project. The Spring Initializr is a great way to quickly bootstrap pre-configured Spring Boot projects. It has a web interface and a REST interface. You can define the build system (Gradle or Maven), language (Java, Kotlin or Groovy), Spring Boot version, dependencies, and various aspects of the project metadata, such as artifact ID or package name. Here you are going to follow a pre-configured link that will open the web interface to a bootstrapped project configured with the dependencies needed for this project. Follow this link.
You can also download the completed application from this GitHub repo.
In this case you are creating a project with the following parameters
- Maven project
- Java 11
- Spring Boot 2.5.3
- Jar packaging
- Dependencies: Spring Web, OAuth2 Resource Server, Spring Reactive Web
The Spring Web dependency allows Spring Boot to respond to web requests (in our case, build a simple REST controller). The OAuth2 Resource Server adds the ability for us to secure our application. The last dependency, Spring Reactive Web, might seem a little strange to some people since reactive web is actually something of a competing paradigm with Spring Web.
Spring Reactive Web is generally used to build non-blocking, reactive web services. However, in this case, you need it to use Spring’s WebClient, which is the preferred way to make HTTP requests in Spring, replacing the now deprecated RestTemplate.
Follow the link and click the GENERATE button. Save the file wherever you want the parent directory for this project to be located.
The goal of the project you’re going to create is to demonstrate how you can use Split to deploy and test a new feature for a select group of users and if the feature turns out to need more work (as it will in our example), you can quickly turn off the feature without having to alter any code or deploy a new application.
Open the pom.xml file and add the Split Java SDK dependency in the dependencies block.
<dependencies>
...
<dependency>
<groupId>io.split.client</groupId>
<artifactId>java-client</artifactId>
<version>4.2.1</version>
</dependency>
...
<dependencies>Code language: Django (django)Replace the DemoApplication.java file with the following.
src/main/java/com/example/demo/DemoApplication.java
@SpringBootApplication
public class DemoApplication {

    public static void main(String[] args) {
        SpringApplication.run(DemoApplication.class, args);
    }

    @Configuration
    public class SecurityConfiguration extends WebSecurityConfigurerAdapter {

        @Autowired
        public void configureGlobal(AuthenticationManagerBuilder auth) throws Exception {
            auth.inMemoryAuthentication()
                    .withUser("demo").password("{noop}demo").roles("USER").and()
                    .withUser("demo2").password("{noop}demo").roles("USER");
        }

        @Override
        protected void configure(HttpSecurity http) throws Exception {
            http
                    .httpBasic()
                    .and()
                    .authorizeRequests()
                    .anyRequest().authenticated()
                    .and().csrf().disable();
        }

    }

    @Configuration
    public class SplitConfig {

        @Value("#{ @environment['split.api.key'] }")
        private String apiKey;

        @Bean
        public SplitClient splitClient() throws Exception {
            SplitClientConfig config = SplitClientConfig.builder()
                    .setBlockUntilReadyTimeout(20000)
                    .enableDebug()
                    .build();

            SplitFactory splitFactory = SplitFactoryBuilder.build(apiKey, config);
            SplitClient client = splitFactory.client();
            client.blockUntilReady();

            return client;
        }
    }

}Code language: Java (java)
This new DemoApplication class has two inner classes. The first inner class, SecurityConfiguration, defines the Spring Boot security configuration. It does two things:
1) it configures HTTP basic authentication for all requests, and
2) it defines two in-memory test users.
This authentication configuration is handy for the purposes of this tutorial because it is quick and simple, but it is obviously totally inappropriate for production use.
The second inner class, SplitConfig, configures the SplitClient and makes it available as a bean, which will be used in your controller. This code is take straight from the Split Java SDK documentation, which is a great place to read more on using Split with Java and Spring Boot. Notice that you’re pulling the Split API key from an environment variable that will be defined in the application.properties file.
Next you need to add a DemoController.java file with the following content.
src/main/java/com/example/demo/DemoController.java
@RestController
public class DemoController {

    Logger logger = LoggerFactory.getLogger(DemoController.class);

    SplitClient splitClient;
    ObjectMapper mapper;

    public DemoController(SplitClient splitClient, ObjectMapper mapper) {
        this.splitClient = splitClient;
        this.mapper = mapper;
    }

    // treatment name pulled from application.properties
    @Value("#{ @environment['split.api.treatement-name'] }")
    private String treatmentName;

    @GetMapping("/")
    public String home(Principal principal) throws InterruptedException, JsonProcessingException {

        // get the user name (you use this to retrieve the split treatment)
        String userName = principal.getName();
        logger.info("Authenticated user " + userName + " : " + principal.toString());

        // get the split treatment for the given authenticated user
        SplitResult result = splitClient.getTreatmentWithConfig(userName, treatmentName);

        // get the millis delay value from the treatment configuration
        long timeDelay = getTimeDelay(result);

        // does the configuration specify a delay?
        if (timeDelay > 0) {
            logger.info("Threat.sleeping for " + timeDelay + " milliseconds");
            Thread.sleep(timeDelay);
        }

        // build the response based on the treatment values
        String response = getResponse(result, userName);

        return response;
    }

    private long getTimeDelay(SplitResult result) throws JsonProcessingException {
        long timeDelay = 0;
        if (null != result.config()) {
            TimeDelayConfig config = mapper.readValue(result.config(), TimeDelayConfig.class);
            logger.info("timeDelay = " + config.timedelay);
            timeDelay = config.timedelay;
        }
        return timeDelay;
    }

    private String getResponse(SplitResult result, String userName) {
        String treatment = result.treatment();
        String response = "Hey, " + userName;
        if ("on".equals(treatment)) {
            logger.info("Treatment " + treatmentName + " is ON");
            String responseBody = WebClient
                    .create("https://api.github.com/zen")
                    .get()
                    .retrieve()
                    .bodyToMono(String.class)
                    .block();

            response = "Hey, " + userName + ", GitHub says: " + responseBody;
        } else if ("off".equals(treatment)) {
            logger.info("Treatment " + treatmentName + " is OFF");
        } else {
            logger.debug("Unexpected treatment result: " + treatment);
        }
        return response;
    }

    // simple inner class for unpacking our treatment config
    static class TimeDelayConfig {
        private int timedelay;

        public int getTimedelay() {
            return timedelay;
        }

        public void setTimedelay(int timedelay) {
            this.timedelay = timedelay;
        }
    }

}Code language: Java (java)
The controller has one endpoint, mapped to the root context. It passes in the SplitClient as a bean using the controller constructor (this is the preferred method). The treatment name is being pulled from the application.properties file.
There are a number of things going on in the home() controller method. The username (or principal name) is the unique key being used to identify users. The method can make the assumption that all users will have a username because all requests must be authenticated.
Once the method has the username, it can use the SplitClient to request the treatment. This method request is very fast, near real time, because the SplitClient uses an advanced caching and data push system to avoid having to call out to Split every time this method is called. From Split, the method wants both the treatment and the configuration associated with the treatment state. The treatment is used to determine the controller response, based on its value (via the getResponse method) and the treatment configuration is used to determine how long execution will be paused (via the getTimeDelay method).
Execution is being paused to simulate a slow or poorly performing feature. Obviously this particular use of treatment configuration is for demonstration purposes only. The real power in treatment configurations is being able to attach arbitrary JSON data to treatment states that can be used to do things like update view components.
If the flag is on, the method gets a pithy saying from GitHub and constructs a response using the result. If the flag is off, a simple response is built using the username.
Next, the method pauses for the amount of time specified in the treatment configuration. This is the way that the program is simulating a poorly performing feature.
Finally, the method returns the string response.
The last file you need to update is the application.properties file. Open it and paste the following.
src/main/resources/application.properties
split.api.key={{yourSplitApiKey}}
split.api.treatement-name=pithy_test_featureCode language: Properties (properties)
You need to add your Split API key in the appropriate place (replacing {{yourSplitApiKey}} with your actual API key). You can find your Split API key in the Split developer dashboard by clicking on the workspace icon at the top of the left menu (the rounded square that says DE, which stands for Default).
Click on Admin settings. Select API keys under Workspace settings in the Admin settings panel.
You want the API key for Type: Server-side and Environment:Prod-Default.
Click the Copy button under the Key column.
Go back to the application.properties file and paste in place of {{yourSplitApiKey}}.
Notice that there are separate keys for each environment and for server-side and client-side applications. Spring Boot is a server-side application. These are separate because client-side credentials are exposed in the user’s browser and cannot be assumed to be secure.
Test Your Feature Flag in Java
Time to test the code. Remember you have two users. The first user, demo, is defined in the Split segment and will return a treatment state of on, so it will have the poorly performing new feature turned on. The second user, demo2, will return a treatment state of off.
You’re going to run the Spring Boot project and make a few test calls with each user. After which, you’re going to head over to the Split dashboard and take a look at the metrics for each user.
You’re using individual users here, but in a real scenario, these would more likely be lists (or segments) of users. These segments could be internal test users or they could be subgroups pulled from your production clients.
Run the Spring Boot application by opening a shell from the project root directory and executing the following command.
./mvnw spring-boot:runCode language: Shell Session (shell)You should see a bunch of console output that ends with the following.
2021-07-14 10:00:59.070  INFO 223219 --- [           main] o.s.b.w.embedded.tomcat.TomcatWebServer  : Tomcat started on port(s): 8080 (http) with context path ''
2021-07-14 10:00:59.077  INFO 223219 --- [           main] com.example.demo.DemoApplication      : Started DemoApplication in 2.304 seconds (JVM running for 2.588)
2021-07-14 10:01:00.526  INFO 223219 --- [StatusMonitor-0] io.split.engine.common.SyncManager       : Streaming up and running.Code language: Shell Session (shell)
Use HTTPie to make a GET request with HTTP basic authentication using our first user, demo, who should have the feature enabled.
http :8080 --auth demo:demoCode language: Shell Session (shell)You’ll get a response like:
Hey, demo, GitHub says: Mind your words, they are important.Code language: Shell Session (shell)The feature flag is on because the application is returning quotes from the GitHub public endpoint.
Now try another request with demo2.
http :8080 --auth demo2:demoCode language: Shell Session (shell)It should return the following.
Hey, demo2Code language: Shell Session (shell)You can see that the targeting rules and the user segment is working. For demo2, who is not in the segment, and thus is not targeted by the targeting rules for the split, the feature is off because when SplitClient.getTreatment() is called, the default value is being returned, which is off.
However, for demo, who is in the segment and is targeted by the splits targeting rules, the treatment is on and thus the feature is enabled.
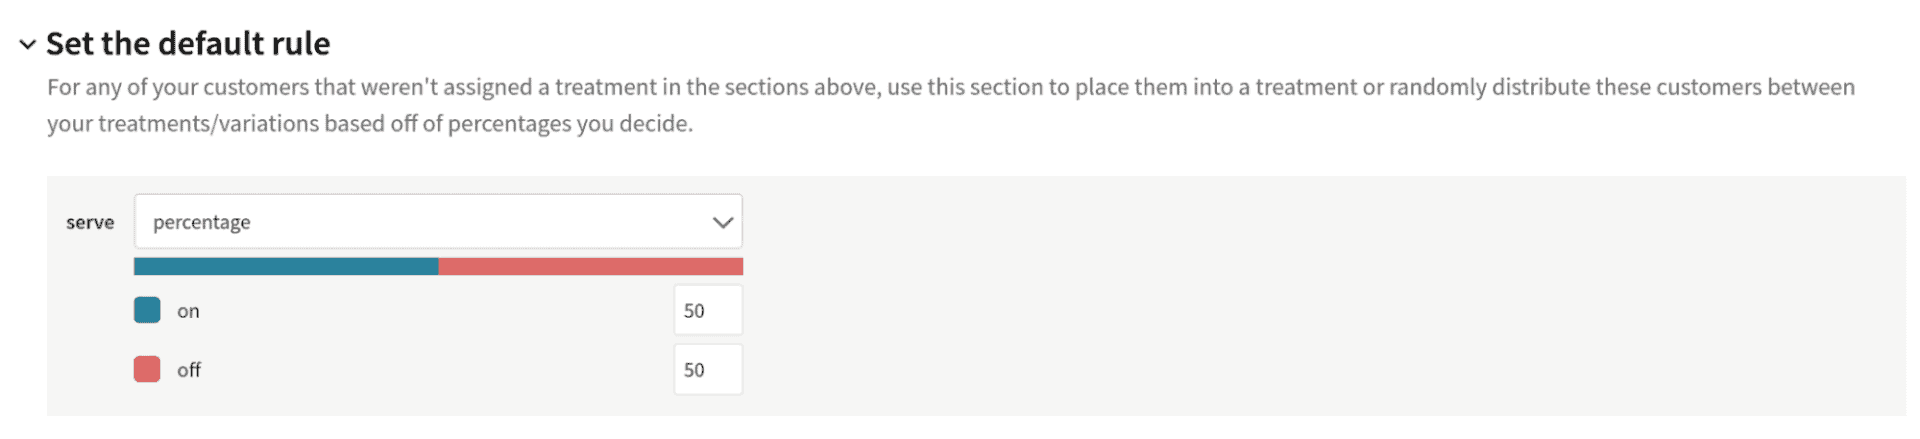
Try going to the pithy_test_feature configuration page in your Split dashboard and changing the default treatment value from off to on. Look under the Set the default rule heading on the split configuration form.
Click Save changes and Confirm.
Run a new request with demo2 and the feature will be on.
Hey, demo2, GitHub says: Keep it logically awesome.Code language: Shell Session (shell)Change the default rule back to off before continuing (don’t forget to Save changes and Confirm).
Use Tracking to Monitor Your Features
Split has a great feature that allows you to log metrics and track them. Imagine you’re worried about the effects on performance of this new feature and you want to keep an eye on it in production.
Edit the home() controller method by adding the following line at the beginning of the method.
// start time for performance tracking
long startTime = System.nanoTime();Code language: Java (java)
Add this at the end, right before the return statement.
// stop time for performance measuring
long stopTime = System.nanoTime();

// calculate millis execution time
double methodDurationMillis = (double)(stopTime - startTime) / 1000000;

logger.info("methodDurationMillis = " + methodDurationMillis);

// track the performance metric
splitClient.track(userName, "user", "home_method_time_millis", methodDurationMillis);Code language: Java (java)
Our controller method has gotten quite large at this point. In a real-world scenario, you would likely create a SplitService and abstract away all of the Split specific code. Aside from making the controller method significantly smaller, it’s a best practice to be able to decouple the Split code from your application logic. The GitHub repo that goes along with this post has the Split code abstracted away.
This code uses System.nanoTime() to calculate the number of milliseconds required to execute the method and uses the SplitClient.track() method to log this metric with Split. The track() method takes four parameters:
- the username
- the traffic type (
userin this case) - the identifier for our metric (
home_method_time_millis) - the value of the metric (the method duration in milliseconds)
Traffic type is used when splits are defined as well. In both cases, you used user as the traffic type because you used a username as the unique identifier. However, this need not be the case. Traffic type and identifier could basically be anything, based on use case, such as email, account ID, UUID, etc.. The traffic type parameter (both here and in the split definition) specify the nature of the unique key being passed in as the first parameter (again, the username in this case). However, if the traffic type of the track() call does not correspond to a traffic type in a split, you will get an error.
This time, before you run the test requests, open the Data hub in the Split dashboard. Click on the the data hub icon on the left menu. Change the Data type dropdown to Events.
Click the blue Query button.
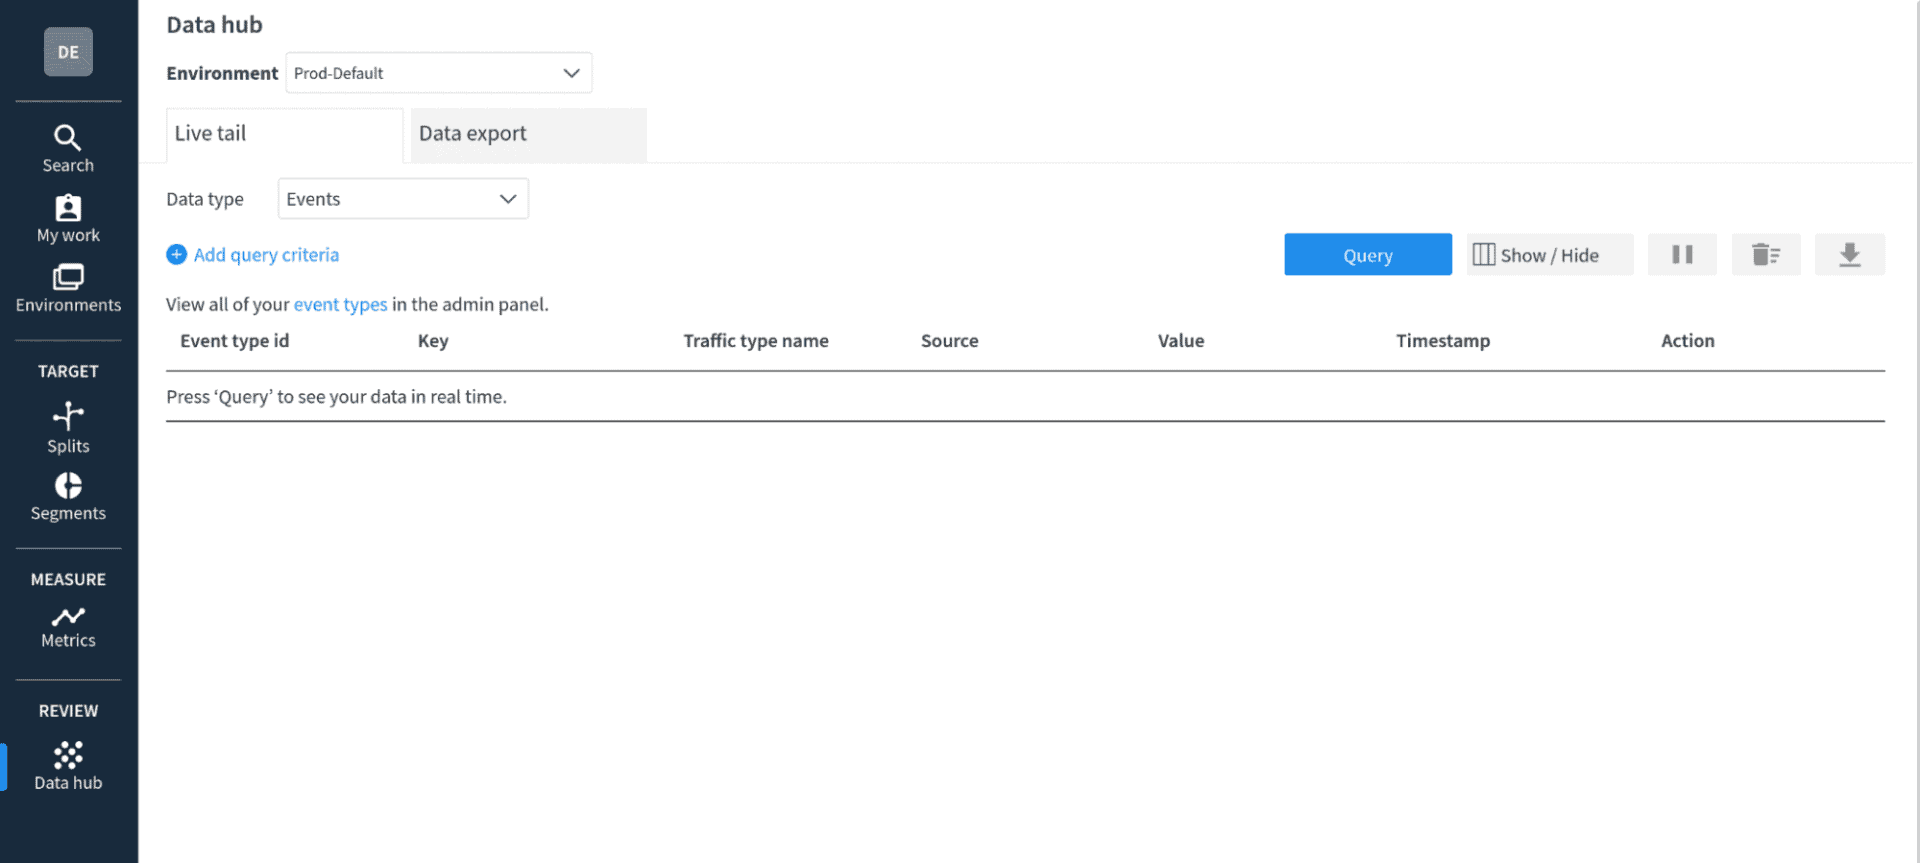
The data hub allows you to see data as it arrives at the Split servers in near real time. In this case, you’re going to watch the track events arrive.
Restart the project. Press control-c to stop the Spring Boot app if necessary and use the same command to restart it.
./mvnw spring-boot:runCode language: Shell Session (shell)Open another shell and use HTTPie to make some requests.
You can use the following commands to do a simple for loop to make multiple commands.
for i in {1..5}; do http :8080 --auth demo2:demo; done;
for i in {1..5}; do http :8080 --auth demo:demo; done;Code language: Shell Session (shell)
You should see a list of events in the table.
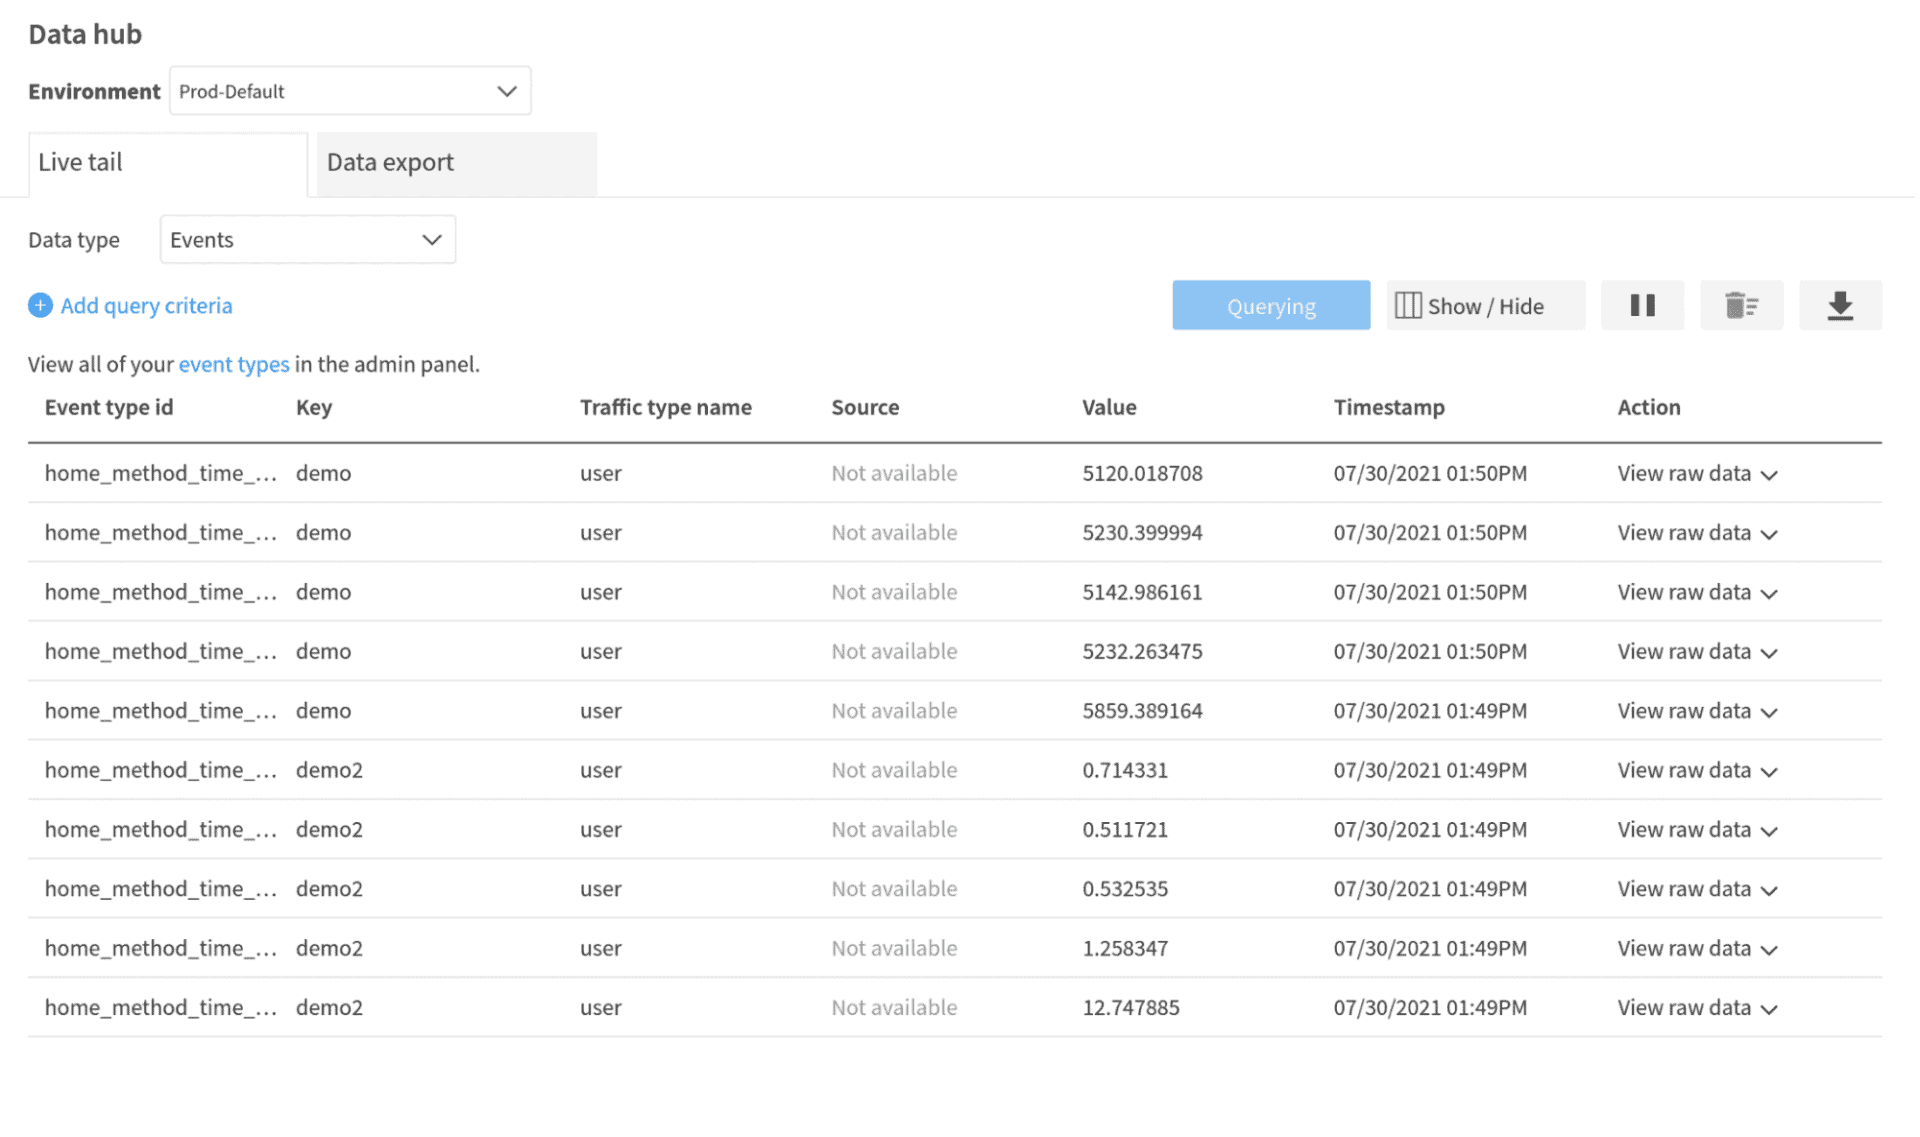
Notice that the value you’re seeing is the method duration value being passed as the value of the event. If you pause the query, you can inspect the raw data of each event.
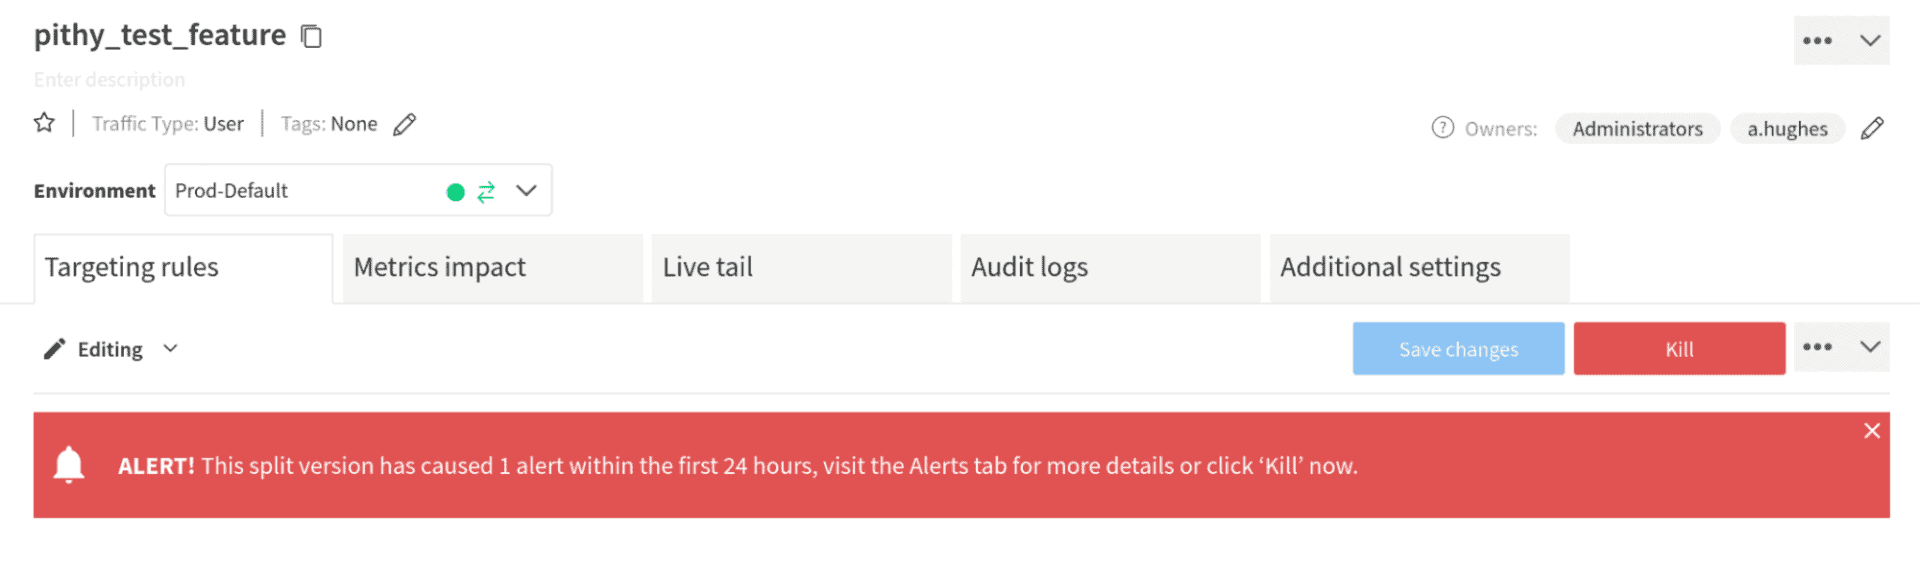
Looking at these values, you can see that the demo user, the user with the treatment turned on, is suffering from terrible performance. In a live situation, if you wanted to disable this feature, you could employ the “kill switch” feature of Split. This enables you to quickly react to negative situations with new features without impacting the overall performance of your application. Go to the split pithy_test_feature and click the red Kill button in the upper right. Type KILL in the form field and click Kill at the bottom.. All users would then receive the default value, which is off. If you re-run the for loops above, you’ll see that you get the same quick response whether the user is demo or demo2
Create a Metric and an Alert
The last feature I want to demonstrate in this tutorial is using metrics to set alerts. Split has the ability to define conditions based on metrics and tracking that can trigger alerts. In this case, you’re simulating a new feature that causes the performance to degrade, so you’d want to trigger an alert when the method being tracked takes significantly longer when the new feature is enabled.
Split alerts require a statistically significant sample size to fire. Split alerts require at least 355 distinct user data points. This means that our simple, two-user example would never reach statistical significance and would never fire.
In order to demonstrate alerts, add a new controller called TriggerAlertController.java.
src/main/java/com/example/demo/TriggerAlertController.java
@RestController
public class TriggerAlertController {

    // treatment name pulled from application.properties
    @Value("#{ @environment['split.api.treatement-name'] }")
    private String treatmentName;

    Logger logger = LoggerFactory.getLogger(DemoController.class);

    SplitClient splitClient;

    public TriggerAlertController(SplitClient splitClient) {
        this.splitClient = splitClient;
    }

    @GetMapping("trigger-alert")
    public String triggerAlert() {

        for (int i=0; i<1000; i++) {

            String uuid = UUID.randomUUID().toString();
            SplitResult result = splitClient.getTreatmentWithConfig(uuid, treatmentName);
            String treatment = result.treatment();

            int simulatedDelay = 0;

            // set the boolean flag according to the treatment state
            if (treatment.equals("on")) {
                simulatedDelay = ThreadLocalRandom.current().nextInt(5000, 6000 + 1);
            } else if (treatment.equals("off")) {
                simulatedDelay = ThreadLocalRandom.current().nextInt(10, 50 + 1);
            } else {
                throw new RuntimeException("Couldn't retrieve treatment from Split.");
            }

            splitClient.track(uuid, "user", "home_method_time_millis", simulatedDelay);

            logger.info("(" + i + ") treatment = " + treatment + ", simulatedDelay = " + simulatedDelay);

        }

        return "Done";
    }

}Code language: Java (java)
The controller method in this class processes a loop 1000 times, creating a new UUID (Unique User ID) for each loop iteration. This UUID simulates a unique user request, which it uses to retrieve the treatment for the split. The split will be configured to return a random value, either on or off for each simulated user.
The treatment on state will have a metric value of 5000-6000 and the off state will have a metric value of 10-50. In this way, the method quickly creates enough user data points to reach the statistically significant threshold.
Before you run this test, you need to change the default rule of the pithy_test_feature split to randomly assign a value to users not specifically assigned a value in the targeting rules (that is, any users except demo).
Open the pithy_test_feature split in your Split dashboard. In the Set the default rule section of the split’s configuration page, change the serve value to percentage. By default, this will create a 50/50 split between the on and off values, which is fine
Click Save changes and Confirm.
Editing and saving in this way automatically restores the Split from its killed state from earlier.
Next you need to create a metric and an alert. The first step to creating an alert is to create a metric. You can think of a metric as a place where data is processed and an output is calculated.
In the Split dashboard, click Metrics in the left menu.
Click the blue Create metric button.
Give the metric a name: Method performance.
Change Select desired impact to decrease. This is measuring (or simulating a measurement of) method performance in milliseconds, so you want this metric to decrease and an increase represents a degradation of performance.
Change Measure as to average of event values per user. The value you want to calculate and track is how the method performance changes over time.
Select the event type used in our tracking: home_method_time_millis. This is the event identifier being used in the track method calls.
Click Create.
Once you have a metric, you can create an alert. Click the Alert policy tab at the top of the metric panel.
Click Create alert policy.
Name it Poor performance alert.
Under Set alert threshold, change the value to 1%.
Click Create alert policy.
You’ve now created an alert that monitors the metric value (as an average value calculated per user) and will alert if the value increases to greater than 1% over the split’s baseline treatment. In this case, the baseline treatment is the off state, so the alert is essentially looking for a 1% difference between the on and off treatment states.
The percent threshold is based on statistical significance. This means that sample size has a large effect on what actual values will alert. Take a look at the Split docs on degradation threshold for alerting to get a better understanding of this.
Restart the Spring Boot application and run the trigger-alert method from a shell using the following command.
http :8080/trigger-alert --auth demo:demoCode language: Shell Session (shell)Notice that although you are not actually doing anything with the demo user in the split, the method is still protected by Spring Security and requires an authenticated user.
This will quickly create 1000 ad hoc users identified by a random UUID. They will be randomly assigned a treatment value, half on and half off. The on users will return performance values much larger than the off users, which triggers an alert in the Split dashboard.
You may have to wait for a few seconds or a few minutes for the split impressions (treatment requests) to be posted to the servers.
Complete Your Controlled Rollout in Java
There’s a ton of depth in the Split dashboard and feature flag implementation, with a lot of configuration options. This tutorial walked you through a simple Java and Spring Boot application that implemented a feature flag using Split’s Java SDK. You saw some current best-practices regarding using the SDK. You also saw how to create segments of users and use those segments in a split’s targeting rules. You used treatment configurations to pass values to your client application based on the split state. Finally, you used Split’s metrics and alerting to monitor method performance (at least in a simulated fashion)( and trigger an alert when performance degrades.
Ready to learn more? We’ve got some additional resources covering all of these topics and more! Check out:
- Containerization with Spring Boot and Docker
- A Simple Guide to Reactive Java with Spring Webflux
- Get Started with Spring Boot and Vue.js
- Build a CRUD App in Spring Boot with MongoDB
- Reduce Cycle Time with Feature Flags
- Feature Monitoring in 15 Minutes
And as always, we’d love to have you follow us on YouTube and Twitter for more great content!
Get Split Certified
Split Arcade includes product explainer videos, clickable product tutorials, manipulatable code examples, and interactive challenges.
Deliver Features That Matter, Faster. And Exhale.
Split is a feature management platform that attributes insightful data to everything you release. Whether your team is looking to test in production, perform gradual rollouts, or experiment with new features–Split ensures your efforts are safe, visible, and highly impactful. What a Release. Get going with a free account, schedule a demo to learn more, or contact us for further questions and support.