
Not too long ago, continuous integration and continuous delivery (CI/CD) were enough to stretch our limits. They helped us push features to our customers quickly. But these days it’s not enough. A growing number of teams and companies improved on that process and moved to a continuous deployment model, where they quickly push changes to production, even before a feature is complete.
To take advantage of the tools we have today and keep up with our competitors, we should look further and see if continuous deployment can improve our development and delivery process, too.
With continuous deployment, we can push changes to our Node.js app quickly and have them in production once they pass automated tests. Although that might seem like a stretch from where you are right now with your deployment process, it’s doable and has advantages over the manual deployments most of us have worked with.
In this post, we’ll look at a simple Node.js app and see how we can start incorporating CI/CD and continuous deployment practices into our development pipeline.
But first, let’s start by defining what continuous deployment means.
CI/CD Background
To understand continuous deployment, let’s refresh our understanding of continuous integration and continuous delivery (CI/CD).
When we started with CI/CD, we made strides by automating our project build and adding automated tests. And we made an effort to merge code back to our main branch more frequently.
We started using Jenkins, Circle CI, and other tools. We learned to write tests using Jasmine, Mocha, Chai, or other libraries. And we merged our code once a day, or at least tried to. Our deployments were better, too, because we provided easy push-button production deploys that made the process repeatable and easier to roll back.
Although pushing our code to production still required manual intervention, our one-button push allowed our teams to speed up our deployment cadence. Teams that were deploying once a quarter or once a year switched to deploying once a month or once a week.
Continuous Deployment in Node.js
So, what does continuous deployment give us that the previous two steps in the ladder did not? Well, with continuous deployment, we’re not waiting on someone else to push a button and send changes to production. And we’re not bundling all our changes into one release. Instead, with continuous deployment, we’re deploying every change that we push to our main branch, as long as our automated checks pass.
Does that sound scary?
It can provide safer deployments, as we’re only changing the application in small ways each time we deploy. If we introduce a bug, it’s easy to find which deployment and which code change caused the problem. And your customers get to experience features sooner. Then you can build on top of the feedback and metrics you gain from those customers to build more features that they want.
But getting there will take some work. Your automated test suites need top-notch coverage, and you’ll have to build trust in the process with your business partners. Plus, you’ll also learn to separate code deployments from feature releases. But what does that mean?
In our traditional software engineering life cycle, we assume that when a feature gets deployed to prod, it becomes available to our customers right then and there. However, with continuous deployment, we need to ensure that turning features on and off can be done independently of the deployment. We need to be able to deploy code that’s not yet ready to be used by customers but can sit harmlessly in production waiting for us to turn it on.
If you’re not ready to bring continuous deployment into your pipeline yet, you can still get started with feature flags to help enable continuous deployment once you’re ready. And this is where Split can help.
Build a Simple App in Node.js
In this post, you’ll build a simple Node.js API and incorporate CI/CD and Split to set yourself up for continuous deployment. Let’s get started.
Workspace Prerequisites
To begin, make sure you have Node.js and npm installed on your development machine. Click on the links to download and install for your operating system. For example, I am working on a MacBook, so I’ll install both using the following brew command, which installs both Node.js and npm:
brew update
brew install nodeCode language: Shell Session (shell)Additionally, sign up for Split so you can see how using a feature flag can help turn features on and off for your customers.

After that minimal setup, you can begin building your Node.js application.
Create Your Node.js Application
From the command line, create a folder for your application and use npm init to get started.
ProTip: you can run
npm init -y, to keep all the default values.
mkdir simple-node-api
cd simple-node-api
npm init -yCode language: Shell Session (shell)
Next, add the Split SDK for JavaScript, Express, as well as Nodemon. For Nodemon, you’re only going to use that locally, so you can use the --save-dev flag on the npm install command. You’ll only use it locally to run the application.
npm install --save-dev nodemon
npm install --save @splitsoftware/splitio expressCode language: Shell Session (shell)
Next, add a couple of scripts to the package.json file. These lines define how to start the app for production and start the app for development using nodemon.
"scripts": {
  "test": "echo \"Error: no test specified\" && exit 1",
  "start": "node index.js", // <-- add this line
  "dev": "nodemon index.js" // <-- add this line
}Code language: Arduino (arduino)
And then add an index.js file that defines one primary GET endpoint that will be used for this demo.
const express = require('express');
const port = process.env.port || 8000;
const app = express();

app.get('/', (req, res) => {
    res.send('Hello World!');
});

app.listen(port, () => { console.log('Our App Is Up And Running!'); });
module.exports = appCode language: JavaScript (javascript)
Finally, you can now run the app locally, using npm run dev. If everything is set up correctly, you should see the following output:
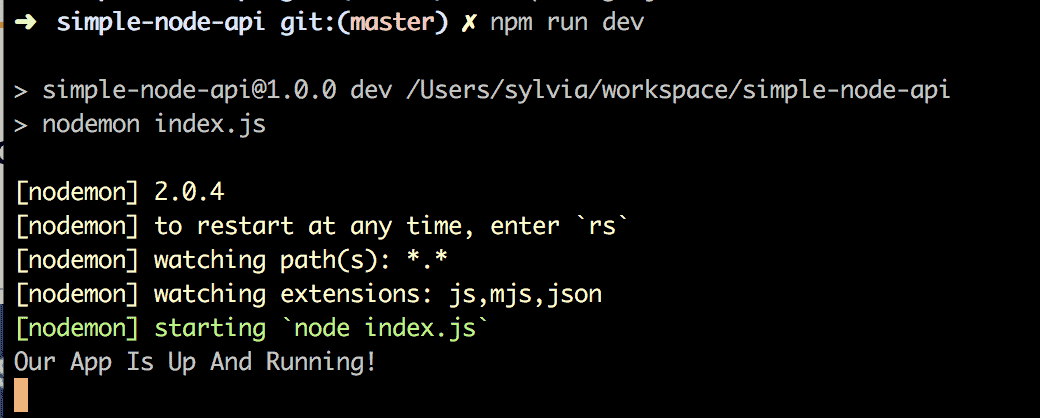
To verify you’re all set, go to http://localhost:8000 with your browser.
Alternatively, you can also verify your API from the command line if you have cURL installed.
curl -i http://localhost:8000Code language: Shell Session (shell)Now that you’re up and running locally let’s add a quick automated test.
Add Automated Tests
To fulfill your continuous integration duties and ensure that you’re pushing out well-tested code, you’ll want to add an automated test to validate the functionality of your app. Thankfully, since your app contains only one endpoint, you’ll only need one test for now.
To begin, add Mocha and SuperTest to our application through the command line.
npm install mocha supertest --save-devCode language: Shell Session (shell)Next, create a test directory within your simple-node-api directory, and add a small test.js file with the following contents:
const request = require("supertest");
const app = require("../index");

describe("GET /", () => {
    it("responds with Hello World!", (done) => {
        request(app).get("/").expect("Hello World!", done);
    })
});Code language: PHP (php)
This test will call your GET endpoint and verify that the expected message returns.
Before you’re able to run your test, you’ll also need to modify your package.json scripts section to include the new test folder.
...
"scripts": {
  "test": "mocha ./test/* --exit", // <-- modify this line
  "dev": "nodemon index.js"
},
...Code language: JSON / JSON with Comments (json)
Now when you run the test, you should see the following output:
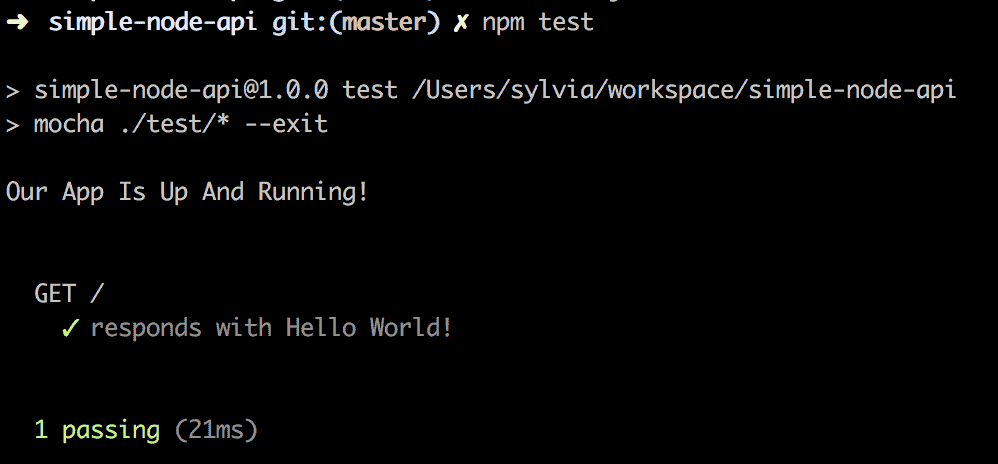
Congrats! You’re on your way to continuous integration.
Set up CI/CD in Node.js
Before we get to continuous deployment, you’ll need to progress through continuous integration (CI) and continuous delivery (CD).
So, let’s lay some groundwork by creating a build pipeline that deploys the application to Heroku.
First, create a repository in your GitHub account called simple-node-api. After creating the repository, you’ll want to tie that into your local app using the commands below in your local command line, which will get everything in sync.
echo node_modules > .gitignore
git init
git remote add origin git@github.com:<your github handle>/simple-node-api.git
git add .
git commit -m "initial commit"
git push origin masterCode language: Shell Session (shell)
Now that your project lives in GitHub, you’ll be able to start setting up your CI/CD pipeline.
Set up Continuous Integration
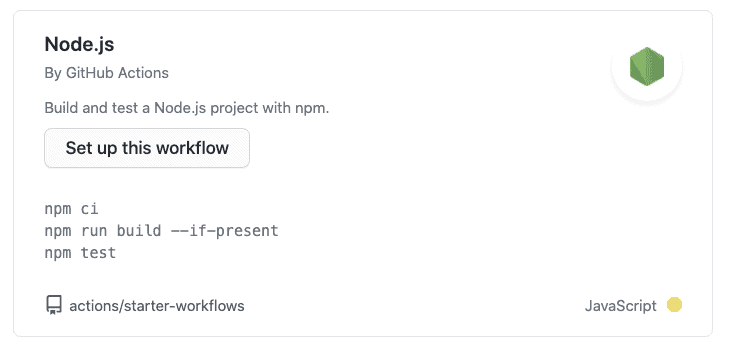
There are a lot of options for continuous integration. These include TravisCI, CircleCI and Jenkins, to name a few. GitHub Actions provides a very easy, free, and highly flexible way to set up continuous integration, and it’s what I use in this post. Navigate to your simple-node-api project in GitHub and click Actions. Click New workflow. There’s a built-in template for Node.js projects, so that makes it easy to get started. Click Set up this workflow under Node.js.
The next thing you see is a file called node.js.yml. If you look carefully, you’ll notice that this file is being created in your GitHub repo. Here’s what the YAML file looks like:
name: Node.js CI

on:
  push:
    branches: [ main ]
  pull_request:
    branches: [ main ]

jobs:
  build:
    runs-on: ubuntu-latest

    strategy:
      matrix:
        node-version: [10.x, 12.x, 14.x, 15.x]
        # See supported Node.js release schedule at https://nodejs.org/en/about/releases/

    steps:
    - uses: actions/checkout@v2
    - name: Use Node.js ${{ matrix.node-version }}
      uses: actions/setup-node@v2
      with:
        node-version: ${{ matrix.node-version }}
    - run: npm ci
    - run: npm run build --if-present
    - run: npm testCode language: YAML (yaml)
The important things to point out at this point are:
- branches – both for push and pull requests against the array of specified branches (main by default), this CI definition will be run.
- matrix – this CI definition will automatically run on the specified different versions of Node.js. This ensures that you can support however many versions of Node.js are important to you.
- run – Within the steps section, each run command executes for each node version specified in the matrix section.
Click Start commit and Commit new file. This will commit the CI definition and kickoff the first run. If you click Actions again, you can see the outcome of the GitHub Action.

ProTip: make sure to run
git pull origin mainon your local machine as you’ve made changes to the repo on GitHub. This gets it back in sync.
Let’s break the build, just to see what that looks like. Edit the index.js file and replace the word World with There:
app.get('/', (req, res) => {
    res.send('Hello There!');  // edit this line
});Code language: JavaScript (javascript)
Commit and push this change. Return to the Actions tab in GitHub, and you should notice that the build fails.

This is because our test now fails. You can verify this locally by running npm test again. Revert the changes and push up to GitHub again, and you should see that the build is passing once again.
Set up Continuous Delivery
For this example, I will use Heroku to deploy the app. Heroku is an easy-to-use hosting platform with a free tier that supports a variety of languages, including Node.js. I also regularly use the Heroku CLI, and I encourage you to as well.
To start, register for Heroku. Click on your profile image in the upper right and choose Account Settings. Scroll down to the API Key section. Click Reveal and then copy the key.
Back in GitHub, click Settings for the simple-node-api repo. Click Secrets. Click New repository secret. In the Name field, type: HEROKU_API_KEY. In the Value field, paste the Heroku API Key that you copied. Click Add secret.
This is a one-time setup step that we’ll make use of in just a little bit. First, let’s make sure we can deploy the app to Heroku manually.
Deploy to Heroku Manually
The good news here is that the app is all ready to deploy to Heroku as-is! Using the Heroku CLI, execute the following:
heroku apps:create <unique name>
git push heroku mainCode language: Shell Session (shell)
NOTE: All apps in Heroku must have unique names, and
simple-node-apiis already taken. In my case, I used:micah-simple-node-api. Use a name that works for you.
The first command creates an app in Heroku attached to your account. It also automatically adds a new remote to your project. The second command uses this new remote to deploy your project to Heroku. Pretty easy, right?
After the deploy is done, your app is now publicly available, and you should be able to curl to it:
curl https://<unique name>.herokuapp.comCode language: Shell Session (shell)Deploy to Heroku Automatically
Now that we know our app is deployable to Heroku let’s get it set up to deploy automatically. Also, we want to make sure that the deploy happens ONLY IF the tests pass.
Open up the node.js.yml file in your project. We already have a job called build. We’re now going to add a job called deploy (NOTE: whitespace matters with YAML. The deploy section should be at the same indentation as the build section).
name: Node.js CI/CD ## <-- it’s not just CI anymore

## <-- don’t change anything in this section

jobs:
  build:
    ## don’t change anything in this section
  deploy: ## <-- this is the new stuff
    needs: build
    runs-on: ubuntu-latest
    steps:
      - uses: actions/checkout@v2
      - uses: akhileshns/heroku-deploy@v3.12.12
        with:
          heroku_api_key: ${{secrets.HEROKU_API_KEY}}
          heroku_app_name: "micah-simple-node-api"
          heroku_email: "micah@afitnerd.com"Code language: YAML (yaml)
The line with needs indicates that this job is dependent on the build job. If the build job fails, the deploy job will not execute.
This job uses the akhileshns/heroku-deploy@v3.12.12 action created just for deploying to Heroku.
Remember when you copied your Heroku API key and stored it as a secret in your GitHub repo at the beginning of this section? The heroku_api_key makes use of this. This is the mechanism GitHub supplies to ensure that we’re not publishing secrets directly in our repos.
Commit the changes to node.js.yml and push it up to your GitHub repo. Click on the Actions tab again. You can click on the new workflow job that gets launched to see its progress. You should notice that the deploy job is run and completes successfully.
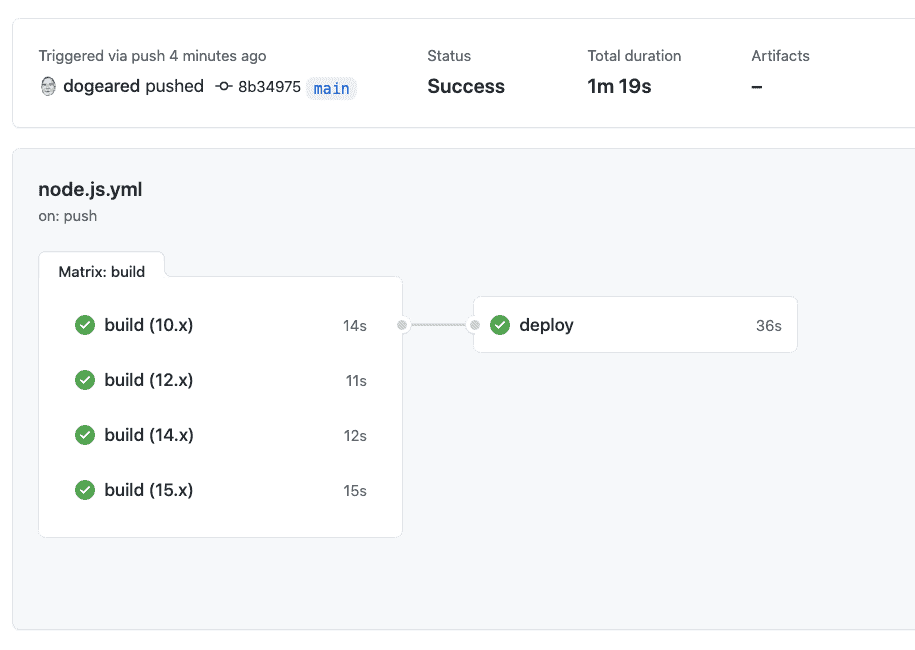
With everything wired together, you’ll now be able to watch your latest code deploy out to your Heroku instance by just pushing your latest code to main.
However, you want to make sure that any new code doesn’t throw your customers off. Therefore, you’ll want to hide new and in-process features behind a feature flag to make sure your features activate when you want them to. And this is where Split comes in.
Time to Split Things Up, with Feature Flags!
Now, let’s add a bit to your index.js file so that we can see our Split treatments at work and how you might use them in production to trigger different implementations for your customers. Replace the code in index.js with the following:
const express = require('express');
const port = process.env.PORT || 8000;
const app = express();

var SplitFactory = require('@splitsoftware/splitio').SplitFactory;

var factory = SplitFactory({
    core: {
        authorizationKey: process.env.SPLIT_API_KEY
    }
});
var splitClient = factory.client();

var getTreatment = function() {
    return splitClient.getTreatment('ANONYMOUS_USER', 'hello-treatment');
}

splitClient.on(splitClient.Event.SDK_READY, function () {
    console.log('split.io sdk is ready');
    console.log('treatment is: ' + getTreatment());
});

app.get('/', (req, res) => {
    let treatment = getTreatment();
    if (treatment == 'on') {
        res.send('Hello, Your Treatment is ON!');
    } else if (treatment == 'off') {
        res.send('Hello, Your Treatment is OFF!');
    } else {
        res.send('Hello, This Is The Default!');
    }
});

app.listen(port, () => { console.log('Our App Is Up And Running!'); });

module.exports = appCode language: JavaScript (javascript)
If you look at the file above, the simple app still doesn’t have too much going on. However, depending on whether your Split treatment returns on, off, or control, you can change the code that executes.
And you don’t have to worry that our Split treatment hasn’t been set up yet. By default, treatments come back as control, so you don’t have to worry about having the treatment set up completely before adding in your code if you plan accordingly.
At this point, we’ve broken our test! Try running npm test and you’ll see what I mean. Update your test.js file to the following:
const request = require("supertest");
const app = require("../index");

describe("GET /", () => {
    it("responds with Hello, This Is The Default!", (done) => {
        request(app).get("/").expect("Hello, This Is The Default!", done);
    })
});Code language: JavaScript (javascript)
Run npm test again, and the test should pass again (which proves that your code still works even though it’s not connecting to Split just yet).
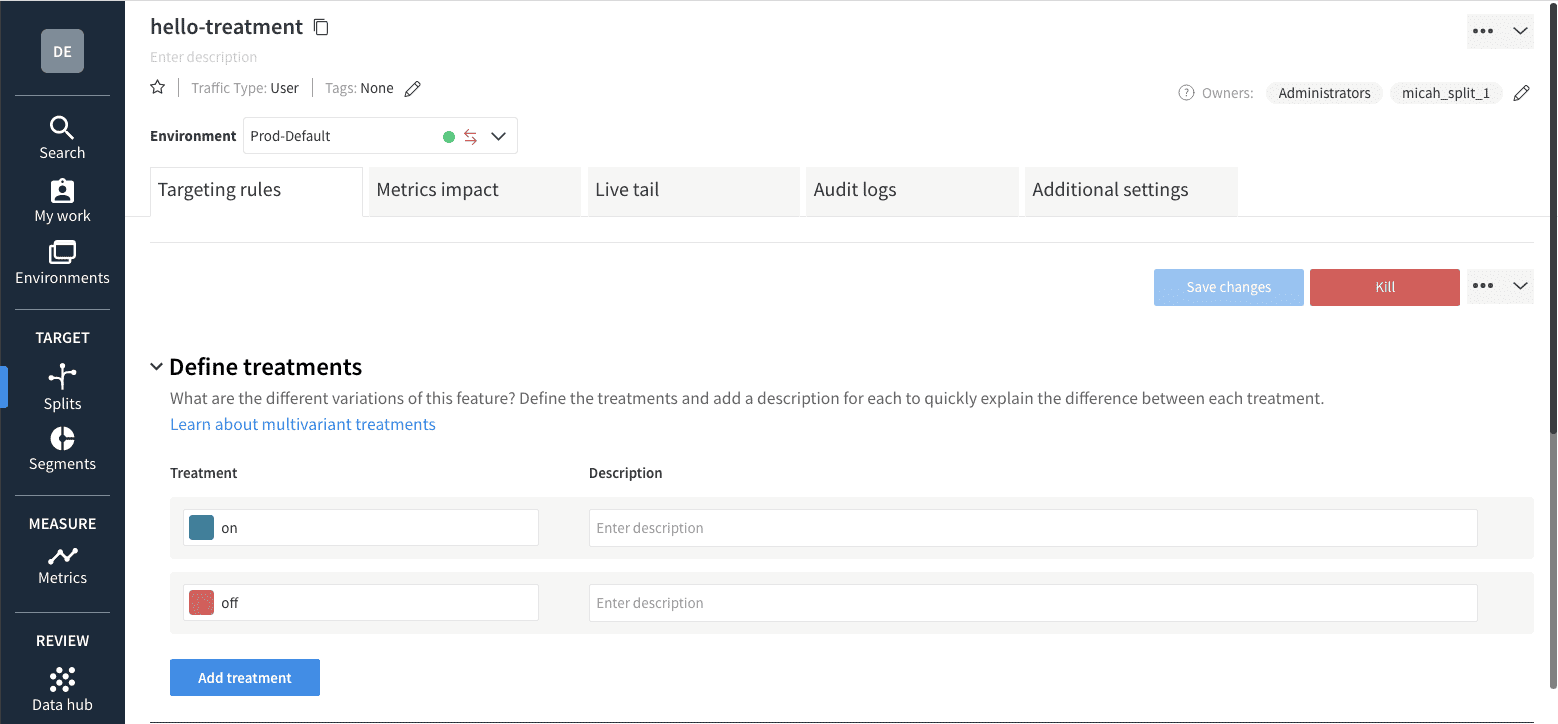
Head over to your Split dashboard to create the treatment. As usual, you can keep it fairly simple and just create a default treatment.

And then, after creating your treatment, add a default rule. Leave the default treatments of on and off. Click Save changes and then Confirm.
Notice on line 9, there’s a reference to process.env.API_KEY. We need to set this value in your Heroku app’s environment. Fortunately, this is super easy to do. In your Split admin console, you need to locate your API key. Click on the square tile in the upper left. Then click Admin settings. Click API keys. You want to copy the correct Server-side API key. In my case, I set up my split in the Prod-Default environment. Click Copy next to the correct Key. From your terminal window, execute:
heroku config:set SPLIT_API_KEY=<paste in key>Code language: Shell Session (shell)Now, push your latest changes to GitHub and let your CI/CD pipeline take over.
ProTip: You can monitor the progress of your pipeline on the Actions tab of your GitHub repo. You can also watch the log output of the Heroku app with:
heroku logs -t.
When the app is deployed, curl to the endpoint once again:
curl https://micah-simple-node-api.herokuapp.comCode language: Shell Session (shell)You should get the response:
Hello, Your Treatment is OFF!Code language: Shell Session (shell)When you’re ready to flip the switch, go back to your Split dashboard and turn your default treatment to on. Once it’s been turned on, swing over to your command line and execute curl once again.
curl https://micah-simple-node-api.herokuapp.comCode language: Shell Session (shell)You should get the response:
Hello, Your Treatment is ON!Code language: Shell Session (shell)As you can see, I turned my treatment on. Now it’s giving me the expected output based on the index.js implementation.
The Split configuration is at its most simple here. You can create targeting rules such that only specific users see a new feature.
Great job! You’ve made it. Now, you’re in continuous deployment territory. Not only can you deploy at will via the CI/CD pipeline, but you can also release features that are not fully ready and test them in production without impacting the experience of other users.
Learn More about Node.js, Continuous Deployment, and Feature Flags
Let’s review all your hard work. As you followed along in this post, you created a small Node.js API, deployed it to Heroku using GitHub Actions, and implemented a CI/CD pipeline. And with Split added in, now you can add new code and functionality to your app effortlessly and safely, just by putting it all behind a feature flag. You can also switch treatments on and off if needed.
You’re well on your way to continuous deployment.
All the code from this post can be found on the splitio-examples/simple-nodejs-cicd-example GitHub repo. You can even see the build and deploy jobs from the Actions tab.
As always, if you’re looking for more great content like this, we’d love to have you follow us on Twitter @splitsoftware and subscribe to our YouTube channel.
Get Split Certified
Split Arcade includes product explainer videos, clickable product tutorials, manipulatable code examples, and interactive challenges.
Deliver Features That Matter, Faster. And Exhale.
Split is a feature management platform that attributes insightful data to everything you release. Whether your team is looking to test in production, perform gradual rollouts, or experiment with new features–Split ensures your efforts are safe, visible, and highly impactful. What a Release. Get going with a free account, schedule a demo to learn more, or contact us for further questions and support.