
Hey friends and devs! I hope you had a chance to read the first article on getting Up and Running With Git and GitHub. You should have an intro-level grasp of how GitHub works in conjunction with git. You should also know a handful of Linux commands that you will most likely use. As someone who works in the terminal a lot, those are the only commands I use on a daily basis.
Let’s move on to another scenario doing work inside your organization’s repo. In the examples below, my personal GitHub account will act as a closed, private organization repo. The same principles will apply.
Getting Access
Before you can start working on your company’s code within your repos, you will most likely have to get access to them. Whatever that process looks like for your org will vary. Once you get access, you will most likely have to set up an SSH key. There are plenty of articles out there on how to do that. I believe GitHub only allows working with SSH instead of HTTPS authorization.
Let’s Clone It!
Once you have access to your organization’s repositories—private or public—we can start working on getting some code contributed to the project. The first thing you are going to want to do is to review the repo and code. Open some of the files and directories in GitHub and just browse the code. Get a feel for what the codebase looks like.
Check out the open pull requests and even the closed ones. See what is in the works and what has already been done. Check out what the standard is for commit messages and PR titles. I like to use conventional commits personally, and if my team isn’t using them, I implement them in a standard. This site on conventional commits is a go-to for any team trying to work that out.
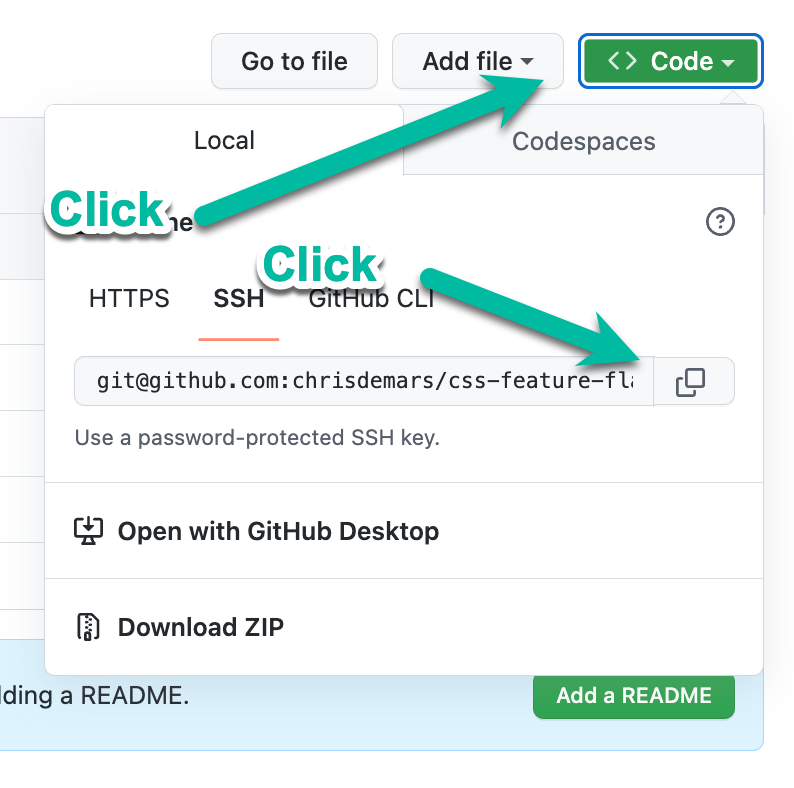
Find the project within your org and look for the green code button with <> symbols. Click that and then click the “copy” button that is at the end of the URL underneath SSH. SSH should also be clicked on, so you are using a secured version of the repo.
Perfect! Once that is done, you will have the repo in your clipboard. The next thing we are going to do is move on to cloning that repo to your local machine.
Clone That Repo!
Move back to your terminal; we are going to run git clone. The clone command will make a 1:1 copy of the repo in GitHub to your local machine. Make sure that you are in the right directory where you want to keep the project. When you clone the repo, the action of doing that will create a directory with the same name.

If you run ls in your terminal, you will see that the project directory was created inside the directory you are currently in.
Make sure you are on the main branch and install any dependencies you need to get up and running. Every project is going to be different. Some projects might use npm, yarn, or other types of package managers that your org is using. I personally always do a git pull on the main branch to make sure I have the most up-to-date code. Even when you start to work the next day and throughout the day, make sure you run a git pull.
This post won’t get into rebasing and merging code in and out of branches. You will have to perform a rebase every now and then, depending on how up-to-date you are with what is in the main branch. Just make sure you keep up to date.
At this point, you should be ready to cut a branch off main and start working on your feature or bug fix.
Features, Bugs, and Branches: Oh My!
What is a branch? A branch is a separate stream that starts off 1:1 with main but will change with the code you add to it. The code you add can be a feature, bug fix, doc change, so on and so forth. You will eventually merge your code into the main branch once tests pass, it has been QA’d, etc. I personally have a standard when it comes to branch creation, and that is as follows:
lastname/name-of-feature-or-bug-fixThe above translates into the branch below:
demars/adds-button-to-form-componentThe way you create a branch in the terminal looks something like this: git checkout -b <branchname>. You are telling git to checkout or create a branch using the -b flag and passing it a name. I will iterate again, your team might have a standard way of doing this. This is my way and the way I advocate for within a team if there is not already a set-in-stone branching strategy.
Working in your branch won’t affect anyone else’s branches or the main branch since it is siloed away from the rest. Make sure not to merge or rebase anything until you are given the thumbs up by the powers that be.
Push That Code
When your code is ready to be pushed up to GitHub in your branch, you will run the git push command. You will notice that you will get an error message about your branch. You can’t push your branch up to GitHub without setting the upstream first. The remote is the repo that lives in GitHub.

Run git push —set-upstream origin <branchname> in order to set the upstream so you can start pushing to it.

If you were to run a git status, you would see that everything is up to date. Therefore, you are ready to move on with the GitHub flow. You should be good to submit a PR (pull request) against the main branch so that your code can be pulled in.
Pull That Code In
A pull request is just that, you are requesting for someone in your org, possibly a senior engineer, to look at your code, review it, and pull the changes in. Once a PR is approved, the code can be merged into the main branch. Squashing and merging can be done directly in GitHub.
When we create our pull request, we will be prompted to check the base and main branches to see how the flow works. Make sure that your branch is being listed and that you are submitting the PR against the main branch. You will first see the yellow bow with the “Compare & Pull Request” green button. Click on the green button.


Once all of that has been filled properly, the green “Create pull request” button will be enabled so you can submit the PR. You can also create a draft PR if you are working on something and aren’t ready to submit, but your teammates can review it.

Once you click the “Create pull request” button, you will be moved to a screen that looks like the one below. You can see this is where all the info is. The PR is open, the repo you want to merge into main, commits, file changes, and checks.

A lot of the Netlify things you see in the screenshot are from my specific deploy platform. Your mileage may vary. If all the checks have passed, you will see that the branch has no conflicts with the base branch and is able to be merged without conflicts. You can now merge or squash and merge. A lot of teams I know and have worked for like to squash and merge. Squashing will squash all the commits together into one clean commit while still preserving the history.
Merging
You’ll see another green button that pops up to confirm the merge, do that.
Congratulations, you merged your first PR in your org’s project.

Wrapping Up
You successfully went through the GitHub flow using clone, pull, push, and submitting a PR. Give yourself a pat on the back! You did a great job. Now that your code is not merged into the main branch, it sits in just the right place for everything to work.
Make sure when you cut the next branch to work with your git checkout main so that you are on the main branch. Then do a git pull to get all the changes from everyone including yourself. Cut that branch and keep making things happen!
Get Split Certified
Split Arcade includes product explainer videos, clickable product tutorials, manipulatable code examples, and interactive challenges.
Switch It On With Split
The Split Feature Data Platform™ gives you the confidence to move fast without breaking things. Set up feature flags and safely deploy to production, controlling who sees which features and when. Connect every flag to contextual data, so you can know if your features are making things better or worse and act without hesitation. Effortlessly conduct feature experiments like A/B tests without slowing down. Whether you’re looking to increase your releases, to decrease your MTTR, or to ignite your dev team without burning them out–Split is both a feature management platform and partnership to revolutionize the way the work gets done. Switch on a free account today, schedule a demo, or contact us for further questions.