The concept of Serverless Computing, also called Functions as a Service (FaaS) is fast becoming a trend in software development. This blog post will highlight steps and best practices for integrating Split feature flags into a serverless environment.
A quick look into Serverless Architecture
Serverless architectures enable you to add custom logic to other provider services, or to break up your system (or just a part of it) into a set of event-driven stateless functions that will execute on a certain trigger, perform some processing, and act on the result — either sending it to the next function in the pipeline, or by returning it as result of a request, or by storing it in a database. One interesting use case for FaaS is image processing where there is a need to validate the data before storing it in a database, retrieving assets from an S3 bucket, etc.
Some advantages of this architecture include:
- Lower costs: Pay only for what you run and eliminate paying for idle servers. With the pay-per-use model server costs will be proportional to the time required to execute only on requests made.
- Low maintenance: The infrastructure provider takes care of everything required to run and scale the code on demand and with high availability, eliminating the need to pre-plan and pre-provision servers servers to host these functions.
- Easier to deploy: Just upload new function code and configure a trigger to have it up and running.
- Faster prototyping: Using third party API’s for authentication, social, tracking, etc. minimizes time spent, resulting in an up-and-running prototype within just minutes.
Some of the main providers for serverless architecture include, Amazon: AWS Lambda; Google: Cloud Functions; and Microsoft: Azure Functions. Regardless of which provider you may choose, you will still reap the benefits of feature flagging without real servers.
In this blog post, we’ll focus on AWS lambda with functions written in JavaScript running on Node.js. Additionally we’ll highlight one approach to interacting with Split feature flags on a serverless application. It’s worth noting that there are several ways in which one can interact with Split on a serverless application, but we will highlight just one of them in this post.
Externalizing state
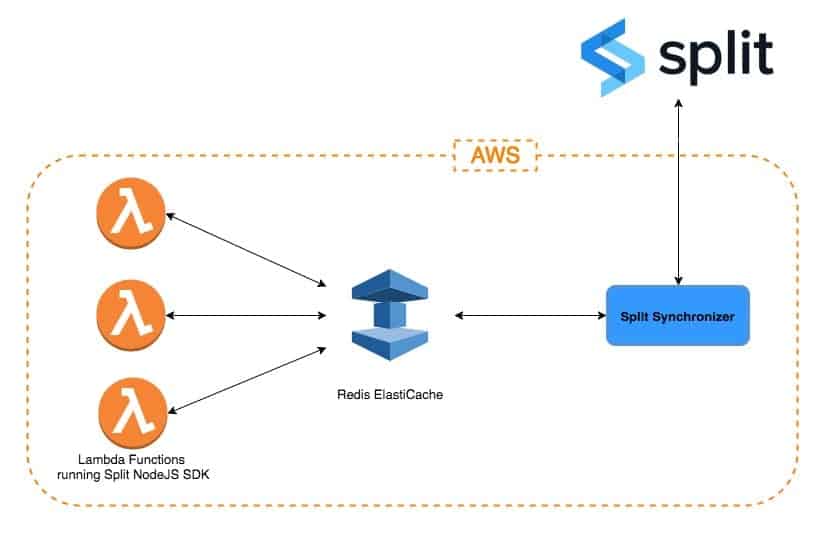
If we are using Lambda functions in Amazon AWS, the best approach would be to use ElastiCache (Redis flavor) as an in-memory external data store, where we can store our feature rules that will be used by the Split SDKs running on Lambda functions to generate the feature flags.
One way to achieve this is to set up the Split Synchronizer, a background service created to synchronize Split information for multiple SDKs onto an external cache, Redis. To learn more about Split Synchronizer, check out our recent blog post.
On the other hand, the Split Node SDK has a built-in Redis integration that can be used to communicate with a Redis ElastiCache cluster. The diagram below illustrates the set up:
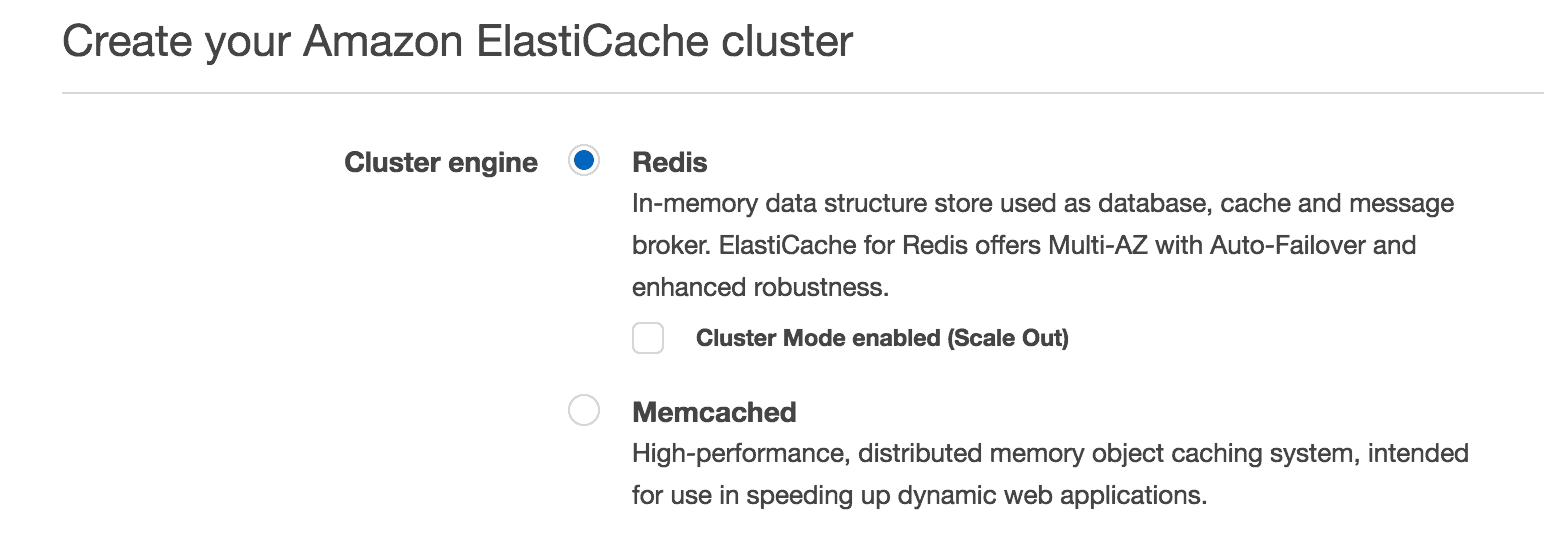
Step 1: Preparing the ElastiCache cluster
Start by going to the ElastiCache console and create a cluster within the same VPC that you’ll be running the Lambda functions from. Make sure to select Redis as the engine:
Step 2: Run Split Synchronizer as a Docker Container Using ECS
The next step would be to deploy the Split Synchronizer on ECS (in synchronizer mode) using the existing Split Synchronizer Docker image. Refer to this guide on how to deploy docker containers.
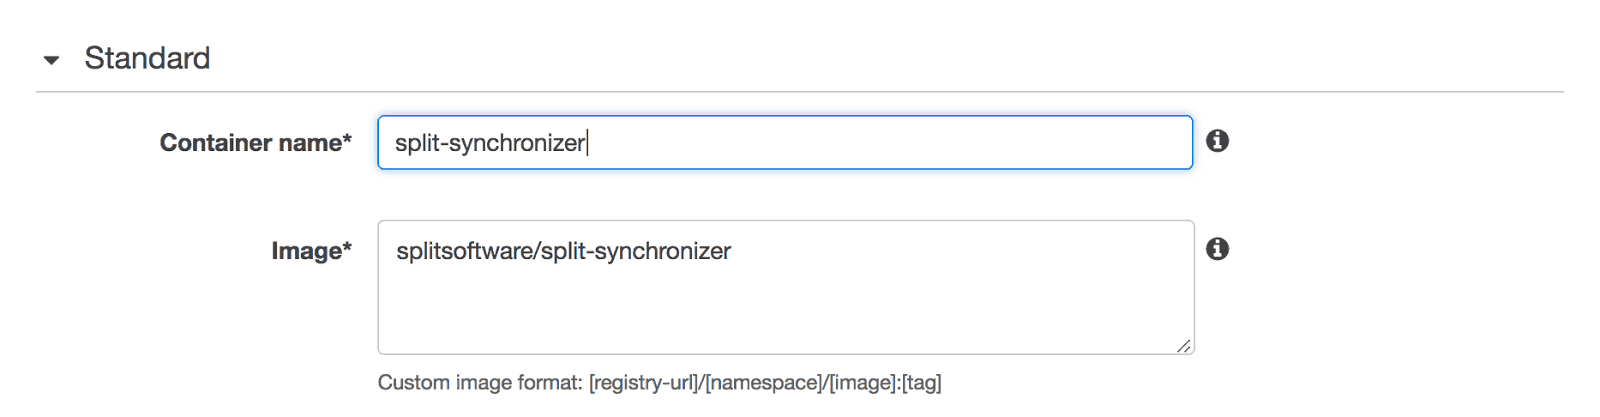
Now from the EC2 Container Service (ECS) console create an ECS cluster within the same VPC as before. As a next step create the task definition that will be used on the service by going to the Task Definitions page. This is where docker image repository will be specified, including any environment variables that will be required.
As images on Docker Hub are available by default, specify the organization/image:
And environment variables (specifics can be found on the Split Synchronizer docs):

Any Docker port mapping needed can be specified during the task creation.
At this point we have the EC2 cluster and we have our task. The next step is to create a service that uses this task — go to your new cluster and click “create” on the services tab. You need to at least select the task and the number of tasks running concurrently:
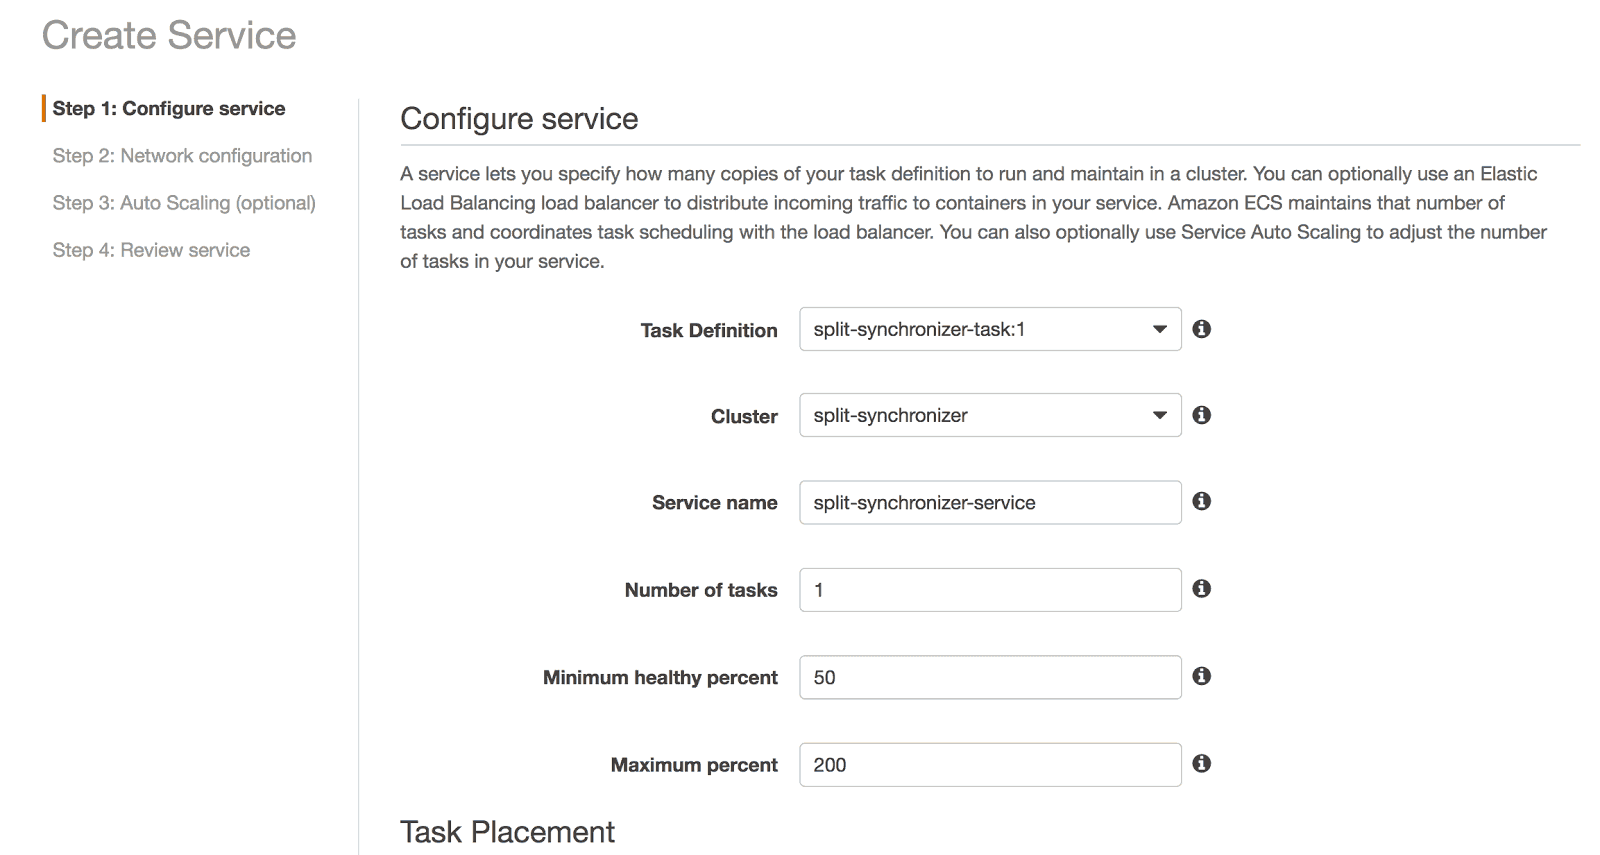
Finish with any custom configuration you may need, review and create the service. This will launch as many instances as specified. If there were no errors, the feature flags definitions provided by the Split service should already be in the external cache, and ready to be used by the SDKs integrated in the lambda functions that we’ll set up in the next section.
Step 3: Using Feature Flags on Lambda Functions
There are two things we need to know before we start:
- The Lambda programming model uses a handler function, which Lambda will call when the function is triggered. It’s also the one that receives parameters from AWS:
- the event that triggered the function;
- the context;
- a callback function to return the results.
- Lambda functions can be written directly on the AWS console as long as it doesn’t have any library dependencies. If extra dependencies are needed, a deployment package should be built, which is no more than a .zip file with the functions code, as well as the required dependencies. Since we’ll be integrating a Split SDK to provide feature flags, we will be adding extra dependencies, and as such will have to create a deployment package.
Our custom code
On the custom function, install the @splitsoftware/splitio npm package and include the node_modules folder on the zip.
Step-by-step of an example function:
- Go to the working directory of the project and install the
@splitsoftware/splitiopackage. - Create an
index.jsfile. Require the@splitsoftware/splitiopackage there. - Instantiate the SDK client on consumer mode making sure it points to the correct Redis cluster (we’ll use an env variable for this in the next step). Don’t set a prefix for storage configurations unless same prefix was used for the Synchronizer.
- Write whatever code is required but export the function as
handler.
One important thing to note — as async storage is used, async calls to the API will be received.
View the example code below:
const splitio = require("@splitsoftware/splitio").SplitFactory;

  const handler = (event, context, callback) => {
    const factory = splitio({
      mode: "consumer",
      core: {
        authorizationKey: "YOUR_AUTH_KEY",
      },
      storage: {
        type: "REDIS",
        options: {
          url: `redis://${process.env.ELASTICACHE_PRIMARY_ENDPOINT}/0`,
        },
      },
    });

    const client = factory.client();

    await client.ready();

    client
      .getTreatment("a_key", "my_feature")
      .then((treatment) => {
        if (treatment == "on") {
          // do something
        } else {
          // do something else
        }
        client.destroy();
        callback(null, `Treatment for a_key: ${treatment}`);
      })
      // If we had an error, return it as the first argument in the callback
      .catch((err) => callback(err));
  };

module.exports = handler;Once the code has been written, it’s time to prepare the deployment package by creating a zip that includes index.js and the node_modules folder. Next, go to the Lambda console and select “create function”. On the blueprint selection page, select “Author from scratch” option and dd the trigger that will be used. It’s recommended not to enable it until you’re certain that the function works as expected.
Upload the code
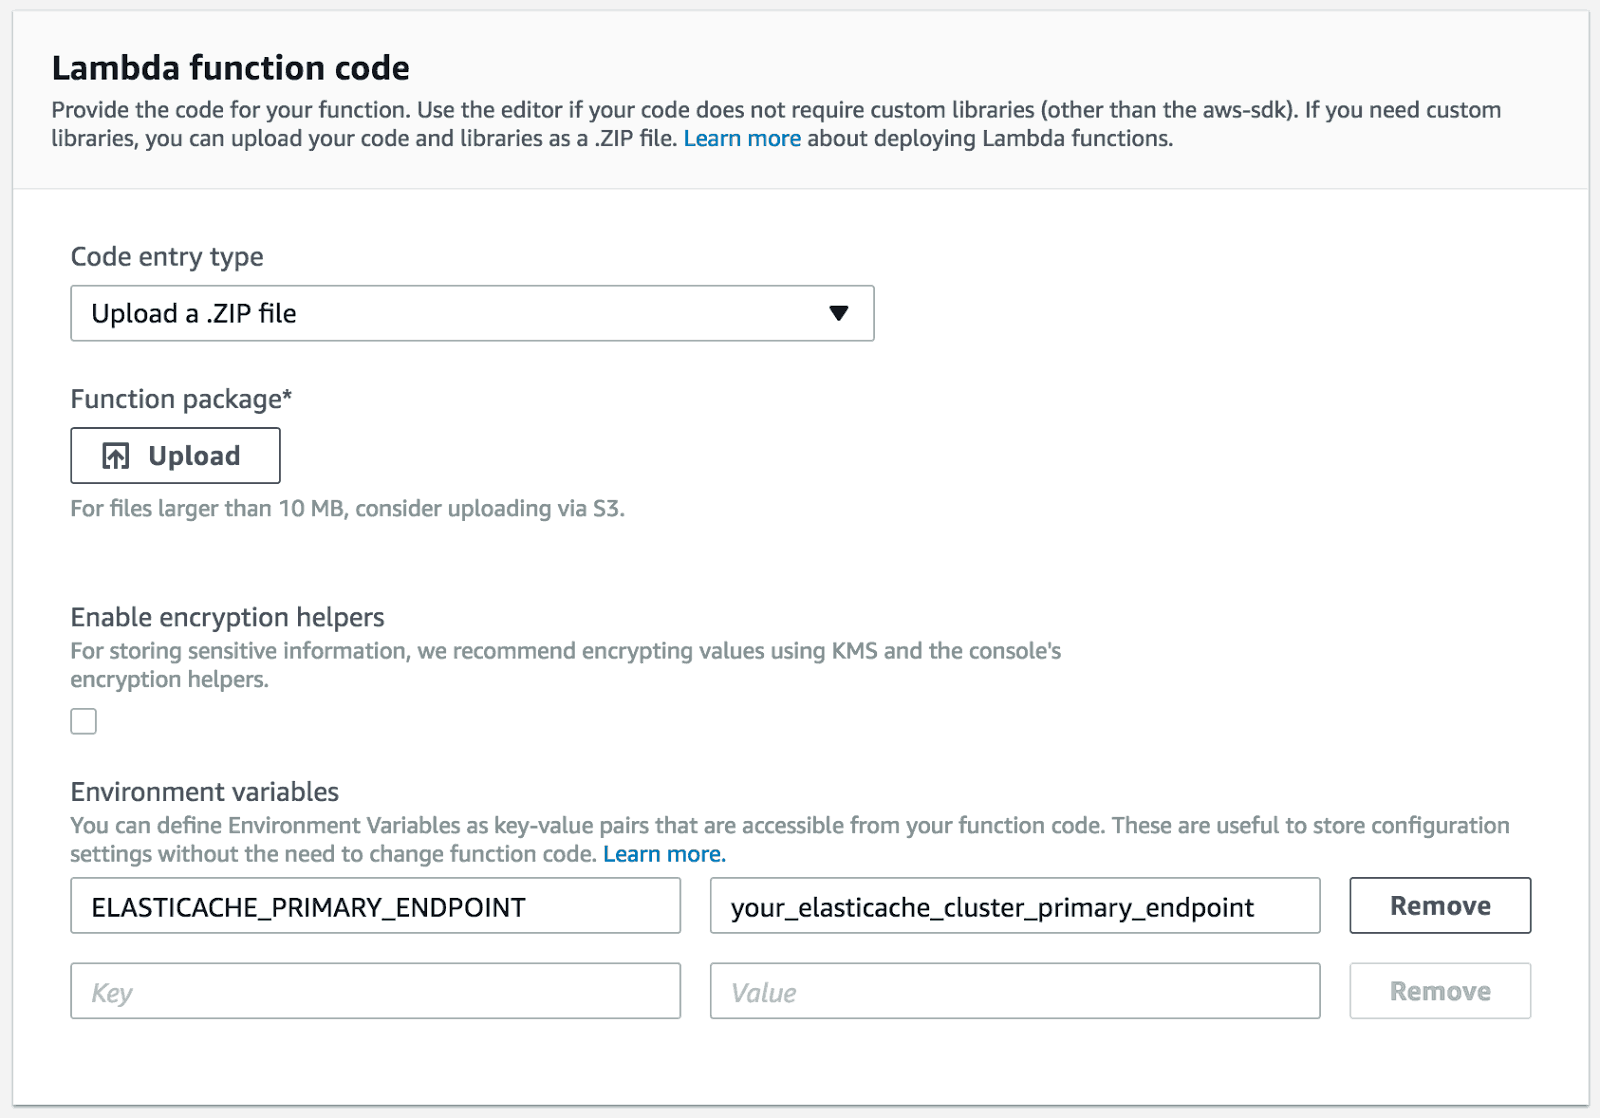
On the Lambda function code section, select the “Upload a .ZIP file” option. It can also be uploaded to S3 and the URL specified. Any environment variables required on Lambda can specified here (for example the one pointing to Redis ElastiCache needed in the previous step):
Set up your handler function in the section called “Lambda function handler and role”. Leave the default as index.handler.
Note that the first part is the file name inside the zip where the handler function is exported, and the second part is the function name. For example, if a file is called app.js and the function is called myHandler, the “Handler” value would be app.myHandler.
On the Advanced settings of this step, set the VPC where the ElastiCache cluster is.
Once the roles and anything else that is required has been configured, click next, review and create the function.
That’s it! To test your function manually, just click the “Test” button, select a the synthetic trigger of preference and check that it works as expected.
Summary
There are few ways to make use of Split Feature Flags in a serverless application. This blog post covers the case of using Split Synchronizer and for javascript functions.
In future posts we’ll share another approach using Split “callhome” or Split Evaluator which is a microservice that can evaluate flags and return the result, in addition to storing the rules to evaluate the flags as highlighted in this post.
In case you’re wondering “can’t I hit the Split servers from my Lambda function?” The answer is yes, in a “standalone” mode, but it won’t be as efficient as having the state in one common place i.e. Redis. It’s NOT recommended to run the SDK in a standalone mode due to the latency it may incur at the creation of one SDK object per function.
For further help using Split synchronizer in a serverless environment contact us or use the support widget in our cloud console — we’re here to help!
Get Split Certified
Split Arcade includes product explainer videos, clickable product tutorials, manipulatable code examples, and interactive challenges.
Switch It On With Split
The Split Feature Data Platform™ gives you the confidence to move fast without breaking things. Set up feature flags and safely deploy to production, controlling who sees which features and when. Connect every flag to contextual data, so you can know if your features are making things better or worse and act without hesitation. Effortlessly conduct feature experiments like A/B tests without slowing down. Whether you’re looking to increase your releases, to decrease your MTTR, or to ignite your dev team without burning them out–Split is both a feature management platform and partnership to revolutionize the way the work gets done. Switch on a free account today, schedule a demo, or contact us for further questions.