
It’s needless to say that Single-Page Applications (SPA) took over the web development world by storm. Like it or not, SPA frameworks are here to stay, and one of the most popular ones—Angular—will be the topic of this article.
Deploy Continuously with Confidence – Sign up for a Split demo!

Speed up development cycles, reduce release risk, and focus your team on DevOps best practices that create maximum impact. Get a personalized demo today!
This is what the tutorial covers:
- Create an Angular app from scratch using Angular CLI
- Build simple CRUD app using Angular components, services, models, and routing
- Expand your app’s functionality with feature flags branching by Split
- Dive deeper into Split features with event tracking and monitoring
What will the app be about? Hopefully, you’re a sports fan as you’ll be building a simple app to track favorite basketball players!
Prerequisites
To follow this tutorial on adding feature flags to your angular app, you should have:
- Basic knowledge of how client-side web applications work
- Basic familiarity with the command line
- Beginner level understanding of Angular and TypeScript
- Node.js and npm installed
- A Split account
The full code example is available inside this splitio-examples GitHub repo if you prefer to follow the existing codebase while reading.
Bootstrap Angular App Using the CLI
Angular development team made it really simple to bootstrap a hello world example app. The only precondition is to install the Angular CLI on your machine locally, in case you don’t already have it.
npm install -g @angular/cliCode language: CSS (css)This will now allow you to use the ng command(s) anywhere in your terminal. Position yourself wherever in the local folder structure you want to create the app project folder, and run:
ng new angular-basketball-app --strict falseCode language: Arduino (arduino)No need to worry about creating the project directory. The CLI will create it for you as a child directory in whichever folder you run the above command. The --strict false flag will create a project without strict Typescript compiler rules, so you don’t get tangled up in compiler warnings in these early stages. You’ll get prompted for some information by the CLI console.
Navigate to the newly formed project directory:
cd angular-basketball-appCode language: Bash (bash)Don’t get scared with the endless amount of files this operation generates. Besides application source code, the CLI’s app-bootstrap command creates additional files for unit and end-to-end (e2e) tests by default. You’ll want to focus on the content of the src/app folder, as the main part of Angular’s app elements – like components and services – are placed inside it.
To have a bit more sense of what’s going on here use this command:
ng serve --openCode language: Arduino (arduino)The ng serve command launches the local server created by the framework, watches for file changes, and rebuilds the app as you save those changes. The --open (or just -o) option automatically opens the browser at http://localhost:4200. At this URL browser now renders a placeholder Angular page. You’ll be using the ng serve command a lot during the development. Each time you’d want to start the Angular server and see your app in the browser.
Take a look at the generated src/app/app.component.html file. It contains some placeholder HTML and CSS you’ll remove shortly and put in some of your own logic. But it’s important to notice that this template file has its TypeScript counterpart src/app/app.component.ts. Both of those files make up a key building element of Angular—a component. And Angular is all about components. The whole application is just a tree of components that starts with the top-level root AppComponent class exported from src/app/app.component.ts.
Replace the whole content of app.component.html with this and save:
<span>Hello, this is my app called {{title}}</span>Code language: Django (django)The browser auto-reloads on save and now displays the name of your app in the place of {{title}}. And it actually displays whatever you put as the value of the title field inside the AppComponent class. Try changing it back in the TypeScript file and the name will change again in the browser. The bottom line is that properties defined on the component class level are bound to the template file of that component, and eventually displayed to the user in the browser through HTML markup. And it all happens dynamically, of course. These bindings between component (TypeScript) and template (HTML) represent workhorses of Angular and make it a great framework for building cool interactive client-side apps.
Build a Model, Build a Service
Let’s start building the basketball app. It’ll have two different screens (pages or client-side routes). The first screen will show the list of basketball players with some additional data and CRUD action buttons, while the other screen should display a form to add a new player. Each screen will be associated with a different component and both of those components will be communicating with shared classes—services.
It’s always a good idea to start with the model. Make a dedicated models folder placed inside src/app. Once in the models folder, create a file named player.model.ts and add the following inside it:
export interface IPlayer {
  id: string;
  name: string;
  points: number;
  championshipCount: number;
  mvpCount: number;
}Code language: CSS (css)
This will come in handy in all other files working with a player entity, as TypeScript will help maintain the type safety and ease up the development through the exposed IPlayer model interface.
The next thing in line is to create an Angular service. Services in Angular are tailor-made to extract pieces of logic that will be used by different components and shared across the app. Go back to the src/app and create a folder named services. Navigate to src/app/services and utilize the CLI to generate a service:
ng generate service playerReplace the generated contents of player.service.ts with this:
import { Injectable } from '@angular/core';
import { IPlayer } from '../models/player.model';

@Injectable({
  providedIn: 'root'
})
export class PlayerService {

  players: IPlayer[] = [{
    id: Math.random().toString(),
    name: 'Michael Jordan',
    points: 32292,
    championshipCount: 6,
    mvpCount: 6
  }, {
    id: Math.random().toString(),
    name: 'Kobe Bryant',
    points: 33683,
    championshipCount: 5,
    mvpCount: 1
  },
  {
    id: Math.random().toString(),
    name: 'LeBron James',
    points: 35367,
    championshipCount: 4,
    mvpCount: 3
  }];

  public addPlayer(player: IPlayer) {
    this.players.push(player);
  }

  public deletePlayer(id: string) {
    this.players = this.players.filter(player => player.id !== id);
  }
}Code language: JavaScript (javascript)
Here you’ll be using a hardcoded list of players defined in the players field on the service class. You’ll be able to add or remove the players from the list by using addPlayer and deletePlayer methods. Obviously, this approach is used to simplify the tutorial. In a real-world app, you’d want to communicate with some server’s REST API to get, add or remove the data. This way, the whole state will be reset once the app gets reloaded in the browser, but that’s enough for the tutorial’s purpose.
Create Your First Angular Component
Off you go to the components. Navigate to src/app and utilize Angular CLI yet again to generate a PlayersComponent to display a screen for a list of players.
ng generate component playersReplace the code in the players.component.ts file with:
import { Component } from '@angular/core';
import { Router } from '@angular/router';
import { PlayerService } from '../services/player.service';

@Component({
  selector: 'app-players',
  templateUrl: './players.component.html',
  styleUrls: ['./players.component.scss']
})
export class PlayersComponent {
  constructor(
    private router: Router,
    public playerService: PlayerService
  ) { }

  addPlayer() {
    this.router.navigate(['/add-player']);
  }

  deletePlayer(id: string) {
    this.playerService.deletePlayer(id);
  }
}Code language: JavaScript (javascript)
Notice how this component exposes methods to add and delete a player. The deletePlayer component method is just forwarding the call to the deletePlayer service method, previously defined in the PlayerService. Therefore PlayerService is used as a dependency of the component inside the component class’s constructor. But you’re far from done here. The component still doesn’t render anything to the browser. Replace everything in players.component.html with this HTML code:
<header class="header">
  My basketball list
  <button (click)="addPlayer()">Add player</button>
</header>

<main>
  <div class="player_row">
    <div class="cell">Name</div>
    <div class="cell">Points</div>
    <div class="cell">Championships</div>
    <div class="cell">MVP titles</div>
    <div class="cell">Actions</div>
  </div>
  <div *ngFor="let player of playerService.players" class="player_row">
    <div class="cell">{{ player.name}}</div>
    <div class="cell">{{ player.points}}</div>
    <div class="cell">{{ player.championshipCount}}</div>
    <div class="cell">{{ player.mvpCount}}</div>
    <div class="cell">
      <button (click)="deletePlayer(player.id)">delete</button>
    </div>
  </div>
</main>Code language: Django (django)
This code lists all the players defined in the PlayerService utilizing Angular’s *ngFor directive – an extremely popular one to render listed items in a loop. It also displays two different button types, one to add a player that invokes the addPlayer method defined on the component, and the other to delete a player that invokes the deletePlayer method, which gets rendered for each player row, and also “lives” in the component.
Styling HTML is not a focus of this article. However, to make the browser display more readable content you can copy the code from src/app/players/players.component.scss from the repo(https://github.com/splitio-examples/split-angular-basketball-app-example) and use it in the local players.component.scss file.
Angular Routing To Make It All Work
This all may sound logical, but you’re probably wondering how all these pieces of code lying around can be picked up to display something meaningful in the browser. For that, one more step needs to be done, and that is routing.
To build an Angular app with multiple routes (and in the real world, that is usually the case), you’ll need to create a routing module. Create a file called app-routing.module.ts and place it inside src/app. Add this code to the file:
import { NgModule } from '@angular/core';
import { Routes, RouterModule } from '@angular/router';
import { PlayersComponent } from './players/players.component';

const routes: Routes = [
  {
    path: 'players',
    component: PlayersComponent
  },
  {
    path: '**',
    redirectTo: 'players'
  }
];

@NgModule({
  imports: [RouterModule.forRoot(routes)],
  exports: [RouterModule]
})
export class AppRoutingModule { }Code language: JavaScript (javascript)
This is how the routes are registered inside the Angular app. When a user navigates to /players, the PlayersComponent will render. If she navigates to any other route (marked with ** placeholder), the app will redirect to /players route. Probably you’re thinking it’s not too exciting to have just one route, but this code will start making more sense once we add another route (and another component) later in the tutorial.
If a user puts any route name in the address bar (or simply navigates via hyperlinks) there is no request for the new HTML page on the server. This is the core “feature” of a single page application – there are multiple screens rendered at multiple routes, but it’s all handled by Angular’s internal router that operates client-side exclusively.
The tradeoff is a bit bigger first load (because you need to load the whole Angular/JavaScript bundle needed to run the app), but subsequent navigation between screens (routes) is smooth and without any blank page flickering. Usually, the only requests your app makes after the initial load is to fetch various data from a server, often through a REST API.
You’re still not finished getting the routing in place. Replace the whole content of app.component.html with this single line of code:
<router-outlet></router-outlet>Code language: Django (django)router-outlet is a native directive of the framework (part of Angular’s own RouterModule which is imported inside AppRoutingModule) that instructs Angular where to render the content (meaning components) associated with different routes. In other words, at this place in the HTML file, the template bound to some component will be rendered as long as that component is matched to the route path inside AppRoutingModule.
You’re most probably seeing the Angular compiler error in the console now. Angular engine doesn’t recognize the router-outlet element if AppRoutingModule isn’t included as a dependency of the main AppModule. In the app.module.ts add the following line near the top:
import { AppRoutingModule } from './app-routing.module';Code language: JavaScript (javascript)Now add AppRoutingModule to the imports array of the module:
...
  imports: [
    BrowserModule,
    AppRoutingModule // this is the new line
  ],
...Code language: Arduino (arduino)
Finally, you can open the browser at localhost:4200/players and see the materialized list of three hardcoded players in front of you, luckily with some CSS in place.

The delete button should work as expected, but the same can’t be said for the one to add a new player. It currently leads to an unexisting route (which eventually redirects to the /players route, due to ** placeholder redirect rule), but you’ll get to that in the next chapter.
Using Angular Template Form
While in src/app generate one more component:
ng generate component add-playerCode language: C# (cs)Replace everything in add-player.component.ts with:
import { Component } from '@angular/core';
import { NgForm } from '@angular/forms';
import { Router } from '@angular/router';
import { IPlayer } from '../models/player.model';
import { PlayerService } from '../services/player.service';

@Component({
  selector: 'app-add-player',
  templateUrl: './add-player.component.html',
  styleUrls: ['./add-player.component.scss']
})
export class AddPlayerComponent {

  constructor(
    private playerService: PlayerService,
    private router: Router
  ) { }

  onSubmit(form: NgForm) {
    const player: IPlayer = {
      id: Math.random().toString(),
      name: form.value.name,
      championshipCount: form.value.championships,
      points: form.value.points,
      mvpCount: form.value.mvpTitles
    };
    this.playerService.addPlayer(player);
    this.router.navigate(['/players']);
  }
}Code language: JavaScript (javascript)
The main purpose of the AddPlayerComponent will be for a user to create a new player via an HTML form and through the onSubmit method. The method receives Angular’s form instance and extracts the values from it before forwarding it to the addPlayer method of the PlayerService. The form fields are defined in the add-player.component.html:
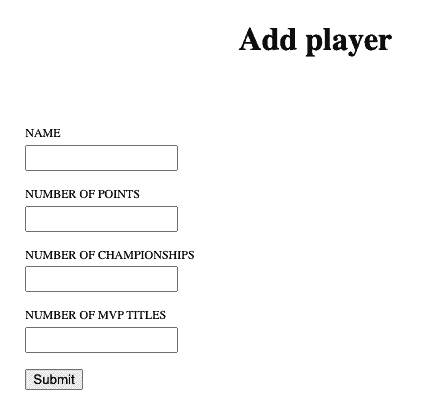
<p class="title"> Add player</p><br><br>

<form class="form" #contactForm="ngForm" (ngSubmit)="onSubmit(contactForm)">
  <div>
    <label class="label" for="name">Name</label>
    <input type="text" name="name" ngModel>
  </div>
  <div>
    <label class="label" for="email">Number of Points</label>
    <input type="number" id="points" name="points" ngModel>
  </div>
  <div>
    <label class="label" for="email">Number of Championships</label>
    <input type="number" id="points" name="championships" ngModel>
  </div>
  <div>
    <label class="label" for="email">Number of MVP titles</label>
    <input type="number" id="points" name="mvpTitles" ngModel>
  </div>
  <div><button type="submit">Submit</button></div>
</form>Code language: Django (django)
The name of each form field is defined via the value of the name attribute, and Angular’s native ngModel directive takes care that user input gets mapped correctly. To use template forms in Angular, FormsModule provided by Angular needs to be included in app.module.ts (otherwise you’ll again bump into the Angular compiler error in the terminal). Add these lines to the app.module.ts file:
...
import { FormsModule } from '@angular/forms';
...
  imports: [
    BrowserModule,
    AppRoutingModule,
    FormsModule // this is the new line
  ],
  ...Code language: C# (cs)
Again, if you want to use CSS styles referenced in the HTML above, just copy the contents of src/app/add-player/add-player.component.scss from the repo(*https://github.com/splitio-examples/split-angular-basketball-app-example) and use it in the local add-players.component.scss file.
Don’t forget to include the extra route in the app-routing.module.ts. First add the import statement at the beginning of the file:
import { AddPlayerComponent } from './add-player/add-player.component';Code language: JavaScript (javascript)Additionally, include the new route match rule in the routes array, just between the /players route and ** universal route.
...
  {
    path: 'add-player',
    component: AddPlayerComponent
  },
...Code language: CSS (css)
And that’s all there is to it. Feel free to open the browser at localhost:4200/players now. The add player button should navigate to the fully rendered localhost:4200/add-player route where you’ll be able to interact with the form and submit it.
Once submitted, the app navigates back to the /players route. That is taken care of by the this.router.navigate(['/players']) line in the onSubmit method inside the AddPlayerComponent.
Making a Feature Flag
Applications get released in cycles and each version usually brings a new set of features. Adding features isn’t always easy. At times it can be a simple implementation from the technical standpoint but a game-changer in the user experience, so you’d want to be careful about releasing it to the whole app’s audience at once. On other occasions it’s something users won’t even notice, but it brings error-prone code changes or refactorings you simply can’t release without making a thorough regression test first. In both cases feature flags can help make those processes less painful.
A good practice is to introduce feature flags in the early development stages, so branching logic can naturally scale up together with your project. Another advantage of feature flagging is that, if used properly, the testing phase of your app can be completely moved to the production environment, which in the end is the most relevant one to test against.
As an example, imagine that you’re still not sure if the add/remove buttons should be present on the players’ list screen. You’d want to perform some kind of A/B testing where only 50% of the users will see the buttons, while others won’t, and you’ll track user feedback to reach the final decision on the positioning of the buttons. Which user gets what kind of display will be completely random and decided by a configured feature flag.
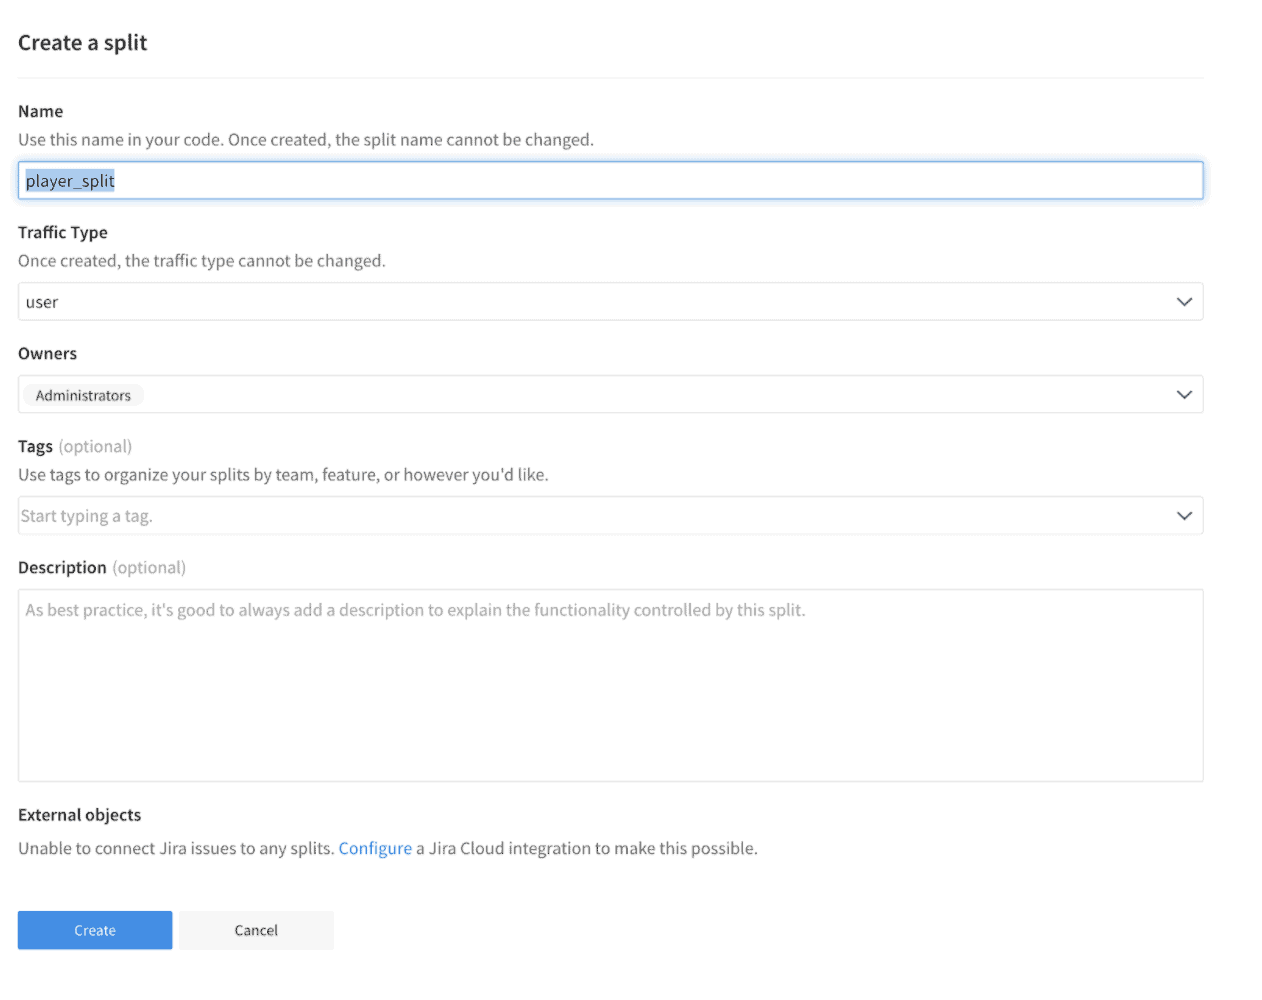
To create a feature flag, you’ll need access to the Split application. If you don’t have it yet, you should register for a Split account here to continue. After you log in to Split, go to the Splits section on the left, and click Create Split. In the dialog, you should enter the name of the split, which you’ll simply call player_split, and for Traffic Type select user. Leave the default settings for other fields and click Create to proceed.
The following screen is shown:
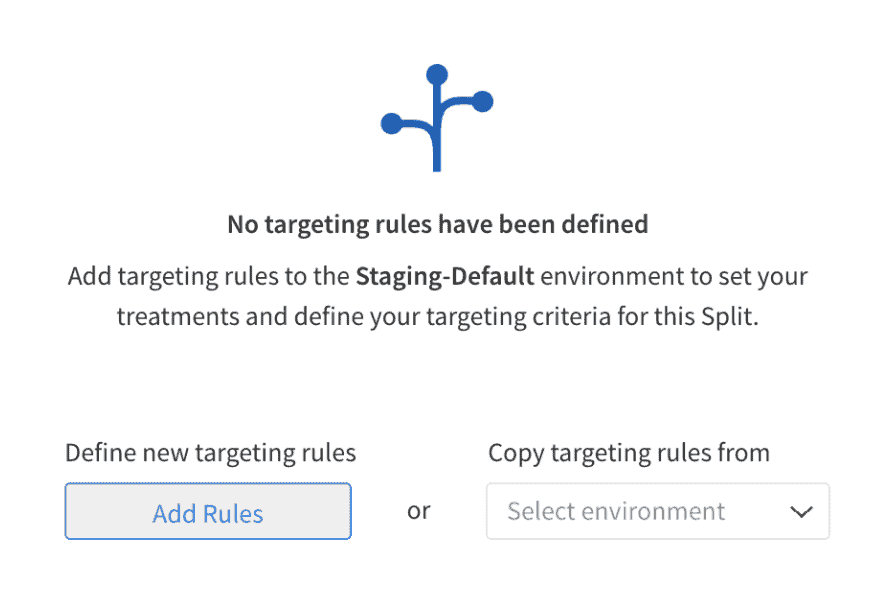
To add the split settings, click Add Rules.
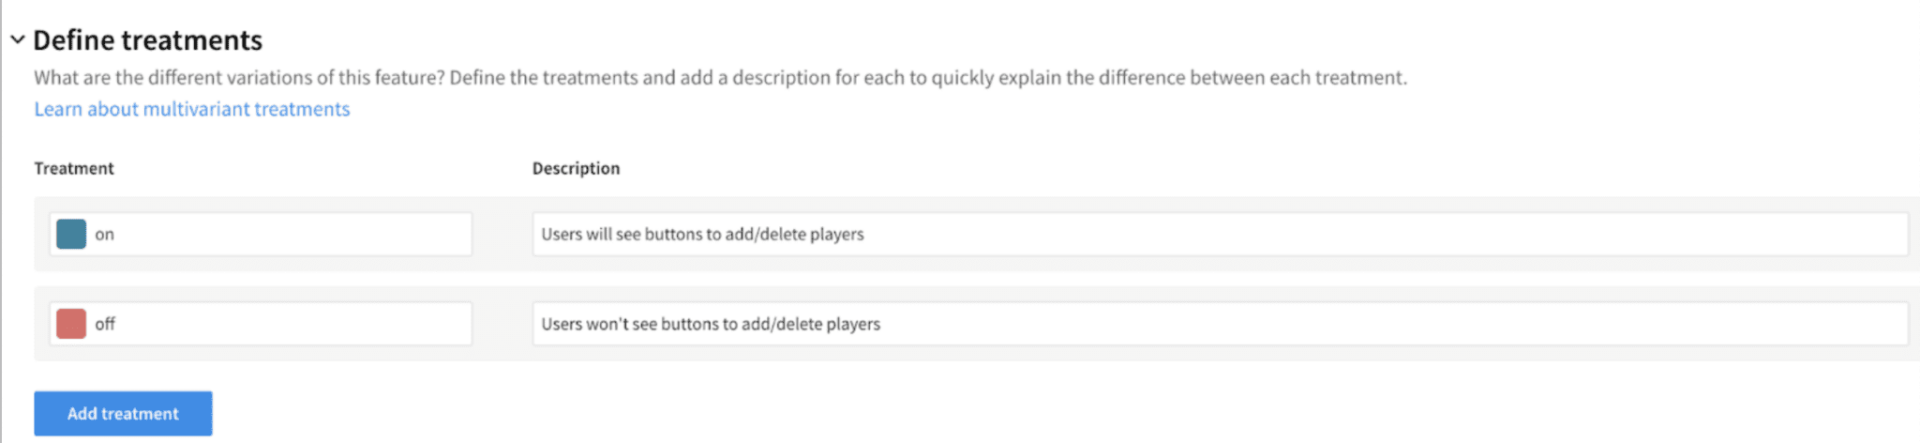
One of the most important concepts in understanding how feature flags work is called treatment. The term is used to describe the state of a feature in Split. Every feature you’ll release through Split has at least two treatments. The default values for treatments are on and off, but custom values can also be defined. Later in the tutorial, you’ll use on treatment to show add/remove buttons, while the same will remain hidden for the users with the off treatment.
To define the targeting audience for this split, proceed with setting up the targeting rules. You’ll define a percentage split, and it can be set up inside the Set The Default Rule section. Percentage split means treatments will be randomly distributed between users in a predefined ratio, which is 50:50 in this case.
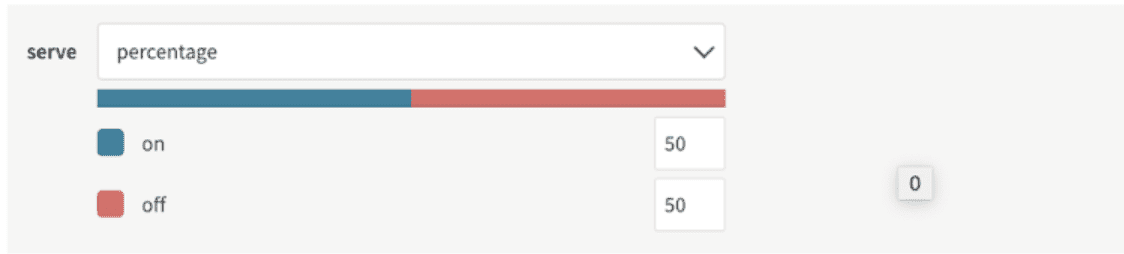
In a rare case the given split isn’t wired up to your application at runtime, the users will branch according to what you’ve set up inside the Set The Default Treatment section. Recommended practice here is to have the off treatment as the default one, as you probably don’t want new features to be accessible to all users, especially if those were not tested before the release.
Click Save changes, then click Confirm to save the split settings.
Create a Split Service in Angular
Back in the root of the Angular application, you’ll need to use the Browser SDK provided by Split to successfully integrate feature flags inside your app. More information about how to consume SDK APIs can be found here, but for starters just install the npm library @splitsoftware/splitio-browserjs.
npm install @splitsoftware/splitio-browserjsCode language: CSS (css)Generate a dedicated split service where the whole logic regarding the feature flags will be encapsulated. While positioned in src/app/services run this command in the terminal:
ng generate service splitCode language: Swift (swift)Replace the code in the split.service.ts with:
import { Injectable } from '@angular/core';
import { SplitFactory } from '@splitsoftware/splitio-browserjs';
import * as SplitIO from '@splitsoftware/splitio-browserjs/types/splitio';
import { Subject } from 'rxjs';

@Injectable({
  providedIn: 'root',
})
export class SplitService {
  private splitClient: SplitIO.IClient;
  public sdkReady$: Subject<void> = new Subject<void>();

  public initSdk(userId: string): void {
    const splitSDK: SplitIO.ISDK = SplitFactory({
      core: {
        authorizationKey: 'YOUR_API_KEY',
        key: userId
      }
    });

    this.splitClient = splitSDK.client();

    this.splitClient.on(this.splitClient.Event.SDK_READY, () => {
      this.sdkReady$.next();
    });
  }

  public getTreatment(): string {
    return this.splitClient.getTreatment('player_split');
  }
}Code language: C# (cs)
There’s a lot of stuff going on here. The method initSdk is needed to connect to the Split API in the first place. You can’t use any of your configured treatments unless you initialize Split in the app. Since this initialization is a precondition to all subsequent Split-related actions, it’s good to call this method as soon as the application starts.
A Split SDK instance is stored in the splitSDK variable and created by invoking the exposed SplitFactory method. authorizationKey and key are two values needed to invoke the method. The value for the authorizationKey is the API key provided to you by Split.
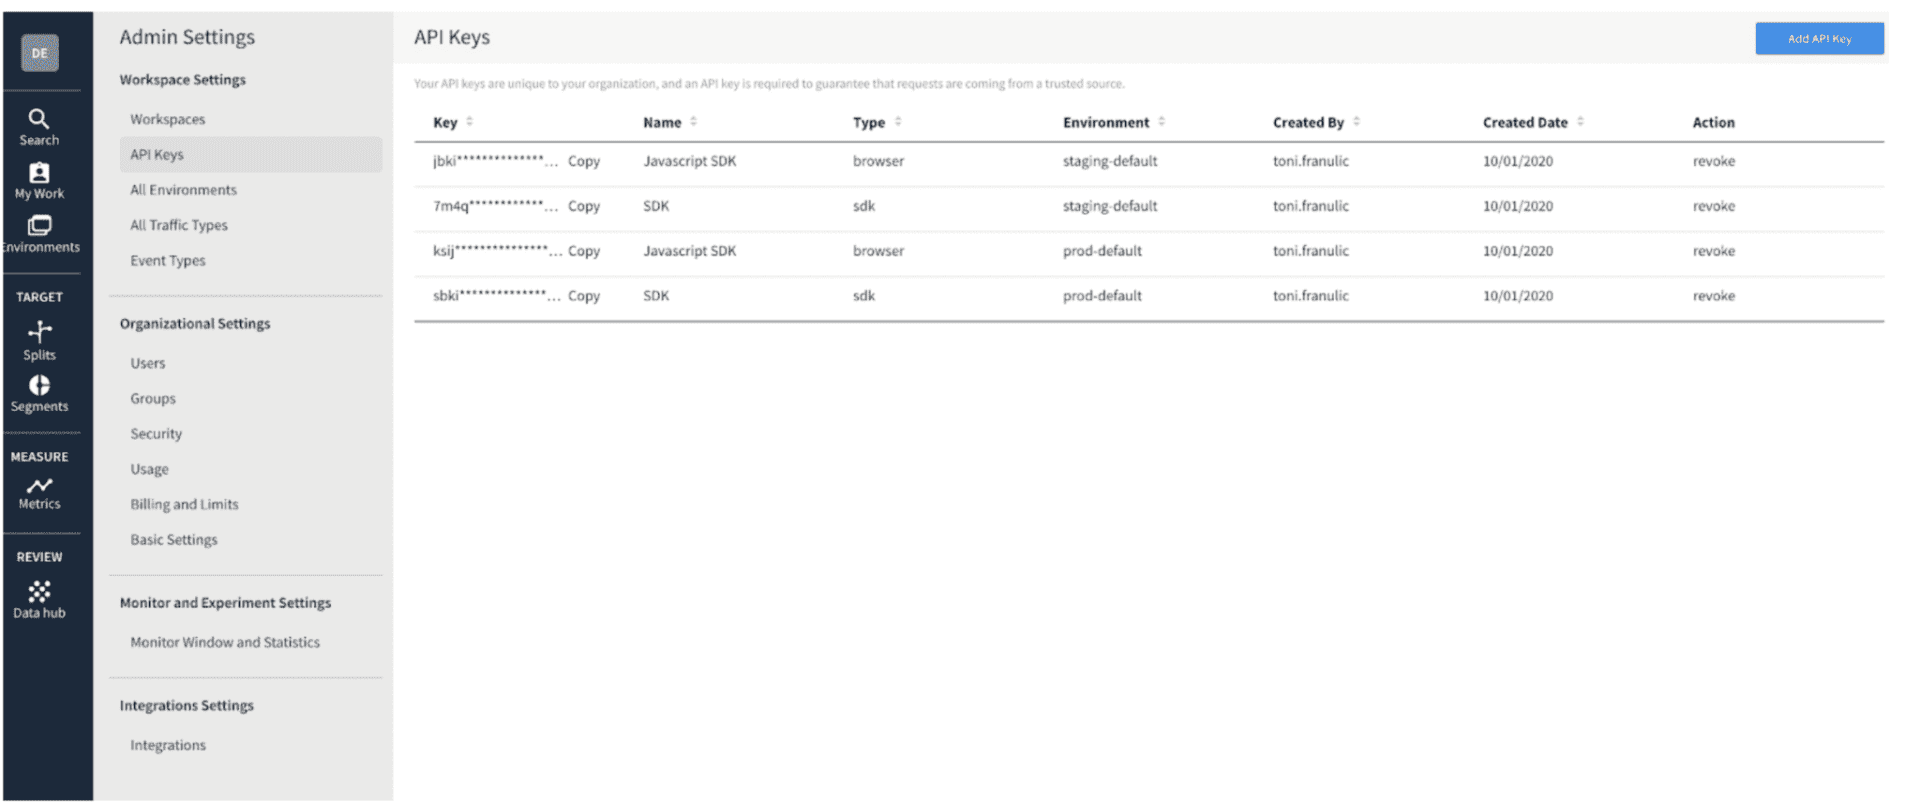
Instead of the YOUR_API_KEY placeholder, you should use the one from the Admin Settings of the Split dashboard. Click the square workspace icon in the upper left. Click Admin Settings, API keys. The key you’ll need is the JavaScript SDK of the type browser for the staging environment – the first one from the list below.
For the key property you’d want to use a value that is unique for the given user of the application. Split assures a consistent UI experience for each user based on the value of key. In other words, as long as the same value is sent for key, the Split API will send back the same treatment. A good idea to send here is some kind of unique user identification.
The Split client instance is created by invoking the client method on the splitSDK object. Note how you’d need to register a listener based on the client’s instance Event.SDK_READY event. It’s important to catch that event because it will signal to the rest of your app that Split APIs are ready to use. If a part of the app would try to use a Split API (like getTreatment) before this event triggers, it would simply not work, as the API connection isn’t established.
As part of the event’s callback, the line this.sdkReady$.next() runs. sdkReady$ is a subject registered in the service that emits events to all of its subscribers, once Event.SDK_READY fires. Another method exposed on the SplitService is getTreatment. It provides a treatment value for the given split name, that is sent as a parameter while invoking the getTreatment function from the Split API. The method takes a split name as an argument, so you’d want to put player_split there, as that name is used while creating the split in the dashboard.
Wire up Feature Flags to Alter Angular Content
The code in the SplitService is still not put to good use. Start with initializing the SDK as soon as the app starts. The ideal place for that is inside the AppComponent (defined in app.component.ts). Since there is still generated code in that file, you should completely replace it with this:
import { Component, OnInit } from '@angular/core';
import { ActivatedRoute } from '@angular/router';
import { SplitService } from './services/split.service';

@Component({
  selector: 'app-root',
  templateUrl: './app.component.html',
  styleUrls: ['./app.component.scss']
})
export class AppComponent implements OnInit {
  constructor(
    private splitService: SplitService,
    private route: ActivatedRoute
  ) { }

  ngOnInit() {
    this.route.queryParams.subscribe(params => {
      if (params.user)
        this.splitService.initSdk(params.user);
    });
  }
}Code language: JavaScript (javascript)
There are two important things to notice here and both are related to some of the useful Angular features.
For the sake of the article the user identification will be pulled from the URL’s query param in the form of ?user=someone. There is an effective way to get the query params in Angular, by subscribing to queryParams observable exposed through the ActivatedRoute interface. The interface represents the route object where a given component (in this case the AppComponent) is rendered. User data is then forwarded to the initSdk method previously defined in the SplitService
All of the above is placed inside the ngOnInit method. It means this piece of code will run as soon as the OnInit lifecycle hook gets triggered. It happens when the AppComponent gets initialized, at the very start of unfolding the Angular’s component tree.
To show or hide places of the UI based on data given by Split API, there are still few changes needed in players.component.ts. Import a reference to the SplitService at the top:
import { SplitService } from '../services/split.service';Code language: JavaScript (javascript)Add a line just above the constructor to declare a flag for displaying crud buttons:
crudButtonsShown: boolean = false;Code language: Arduino (arduino)Inside the constructor, add a new dependency to SplitService:
private splitService: SplitServiceCode language: Arduino (arduino)Finally, add the ngOnInit method where you’ll get subscribed to sdkReady$ subject:
  ngOnInit() {
    this.splitService.sdkReady$.subscribe(() => {
      const treatment = this.splitService.getTreatment();
      console.log('treatment:', treatment)

      if (treatment === 'on')
        this.crudButtonsShown = true;
      else
        this.crudButtonsShown = false;
    }, error => {
      console.log('Error connecting to Split SDK');
    });
  }Code language: JavaScript (javascript)
In the sibling HTML file, players.component.html, only two lines need to be changed. You’ll add one of the most common directives in Angular – *ngIf – to conditionally display the buttons. Replace the button tags already there with the following:
...
<button (click)="addPlayer()" *ngIf="crudButtonsShown">Add player</button>
...
<button *ngIf="crudButtonsShown" (click)="deletePlayer(player.id)">delete</button>Code language: Django (django)
You’re now ready to test the feature flag.
Open localhost:4200/players?user=john in the browser (make sure your Angular server is running) and open the DevTools with F12 (if you are using Chrome). Position yourself to the Console tab in the DevTools. If the connection to Split SDK is established the code inside the ngOnInit method of PlayersComponent should successfully fetch the treatment for the user based on the value inside the query params (john). The treatment value is logged in the console, and it either shows or hides the crud buttons. Remember, since we configured a percentage split, you don’t know in advance if the buttons will be shown or hidden (the chance is 50% for both).
However, what you should rest assured with is the following:
Every new request for the same URL (localhost:4200/players?user=john) should give you back the same treatment since the user identification (key) didn’t change (it’s still john).
You can check this by refreshing the URL multiple times. The appearance of the buttons should remain in the same state as in the first load. But, if you want to change that state, try changing the URL’s query param. If ?user=tim gives you the same result, try ?user=angela and so on, until you get the buttons shown or hidden.
The only rule is that, once you get the treatment for a given user for the first time, it stays consistent for the user, as long as you don’t reset it via the Split dashboard. That consistency is one of the key Split features.
Events and Monitoring at Split Dashboard
Besides creating flags, Split offers a palette of various services. One of those is tracking and monitoring the behavior of flagged features and their users in the real world. Split client instance exposes .track() method that receives up to four arguments:
Traffic Type: The traffic type of the key in the track call. You’d want to use the same value that you added to the traffic type when creating a split (user).
Event Type: Basically it’s the name of the event in the Split monitor panel and it can be set to any value. In this example, you’ll use the value user_age_group, as you’ll want to track the app’s users by age, to see where most of your audience comes from.
Value: Optional metric value for the specific user, it’s a dynamic piece of data that changes between users.
Properties: Optional set of additional properties
To learn more about tracking APIs explore Split docs.
To show how events are working let’s create a simple loop that will send tracking information to Split. In the split.service.ts expose a new method called fireManySplitEvents:
  public fireManySplitEvents() {
    const interval = setInterval(() => {
      this.initSdk(Math.random().toString());

      const ageGroups = [20, 30, 40, 50];

      this.sdkReady$.subscribe(() => {
        this.splitClient.getTreatment('player_split');
        this.splitClient.track('user', 'user_age_group', ageGroups[Math.floor(Math.random() * 4)])
      });
    }, 1000);

    setTimeout(() => {
      clearInterval(interval);
    }, 10000);
  }Code language: JavaScript (javascript)
The code in the loop will run every second, and after ten seconds the interval will be canceled. For each iteration, it’s needed to connect to the Split API as a different user, so the initSdk method is called with a random argument to emulate an unique user identifier (Math.random().toString()). Each mocked user will then get her treatment of the player_split; and most importantly, it will send randomized tracking data about her age group. Notice how the track method receives three arguments: traffic type user, event type user_age_group, and a random age group value. Options are omitted, as you don’t need additional customization here.
In a production app, you’d want to send an event value based on some real piece of information fetched from the user object, browser environment, or any other relevant data source.
Make sure fireManySplitEvents gets called by adding it to app.component.ts, at the end of ngOnInit method:
  ngOnInit() {
    this.route.queryParams.subscribe(params => {
      if (params.user)
        this.splitService.initSdk(params.user);
    });

    this.splitService.fireManySplitEvents(); // this is the new line
  }Code language: C# (cs)
Before opening the browser, open the Data hub in the Split dashboard by clicking the icon on the left menu. Use the dropdown and change the Data type to Events.
Click the blue Query button.
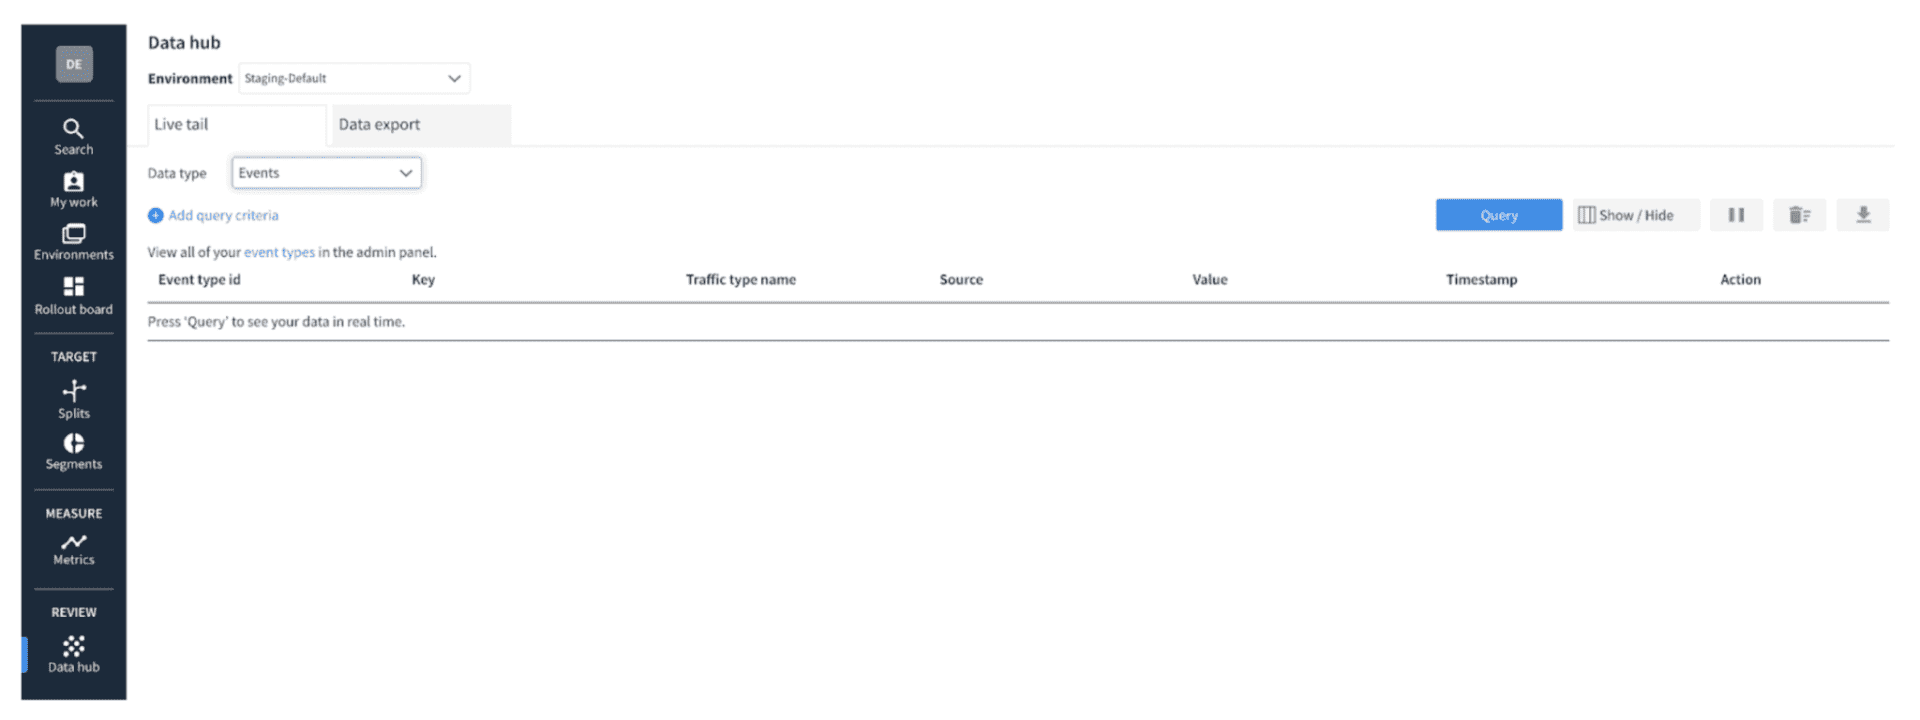
Data hub will now show the event data in near real-time, as it arrives at Split servers. Open your browser at http://localhost:4200/players (or refresh it if it’s already opened – in both cases the tracking event loop should fire), and observe what happens on the monitoring screen in Split. You should be able to see the generated events:
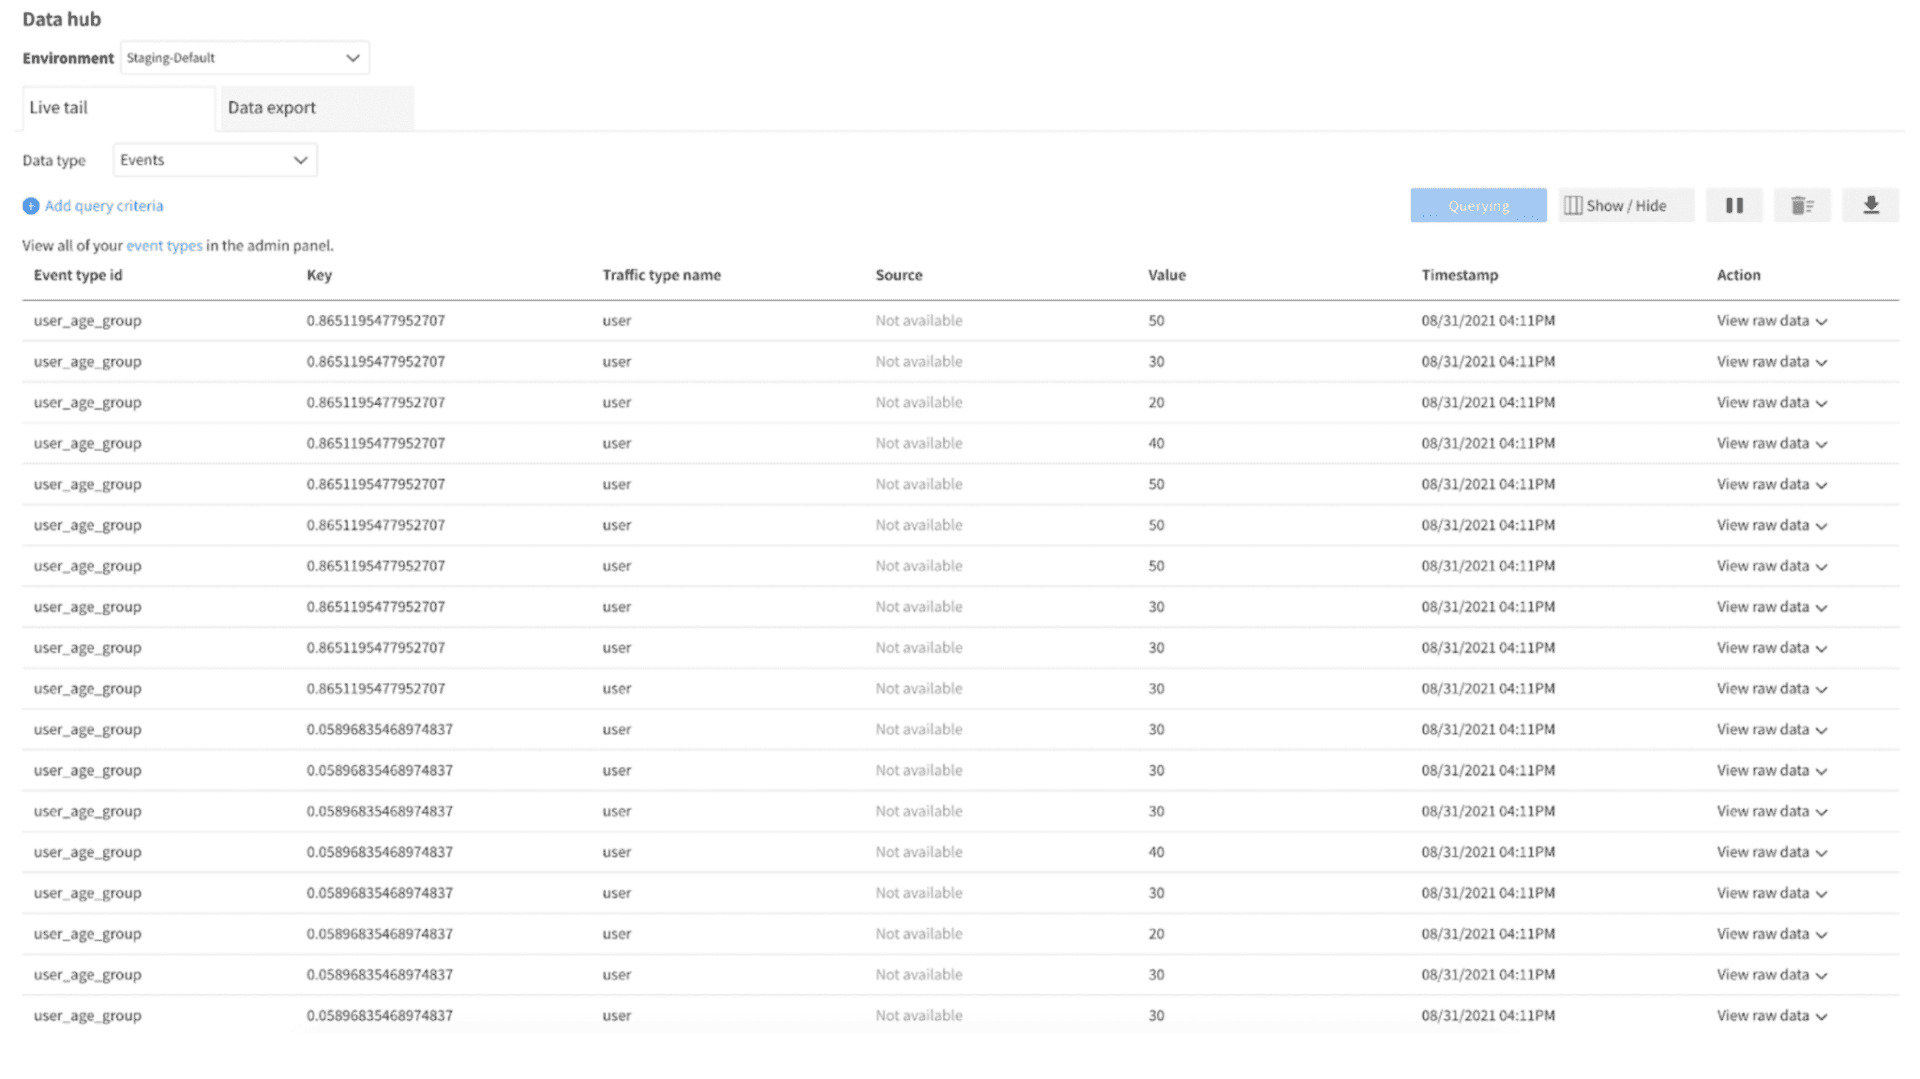
Notice how all the records have the same event type (user_age_group), but a random key (that is the user identification), and random metric value (varying from 20 to 50). You can pause live tracking at any moment by pressing the pause icon. Hopefully, this was a vivid enough example of how Split is more than just a flagging tool. Possibilities with event [tracking and monitoring] are huge and give you a chance to fine-tune it by your needs.
Removing the Feature Flags from Angular
It’s simple to remove the feature flag if you don’t need it anymore. Just remove the *ngIf directives from the players.component.html and the contents of the ngOnInit method inside player.component.ts. If you’re worried the Split APIs won’t be available in your app anymore – don’t be – as the initSdk method is completely decoupled from all other split-related actions. That means the invocation of initSdk inside app.component.ts stays as is, and if you need to connect to new treatments in the future it could be easily done, as you’re already connected to the Split API.
Final Thoughts
Congrats, you made it to the end of the tutorial. If you’re just getting started with Angular, hopefully, this cleared up your foggy landscape a bit. And if you already have significant experience in the framework, maybe you found some useful tips on how to split(!) client-side logic between components and services or just using the Angular CLI. But in both cases, you can probably take some relevant feature flag knowledge with you.
It’s been shown how various UI outcomes for web applications’ end users can be configured exclusively via feature flags, which deliver a consistent user experience. Once you get accustomed to Split, the sky’s the limit, as there are numerous ways and strategies on how to use and test feature flags inside your codebase at different points of the application development lifecycle.
Learn More About Adding Feature Flags
Ready to explore feature flags? Here are a few articles to get you started:
- Testing a Feature-Flagged Change
- How to Implement Testing in Production
- The 5 Phases of a Feature Launch
To stay up to date on all things in feature flagging and app building, follow us on Twitter @splitsoftware, and subscribe to our YouTube channel!
Get Split Certified
Split Arcade includes product explainer videos, clickable product tutorials, manipulatable code examples, and interactive challenges.
Deliver Features That Matter, Faster. And Exhale.
Split is a feature management platform that attributes insightful data to everything you release. Whether your team is looking to test in production, perform gradual rollouts, or experiment with new features–Split ensures your efforts are safe, visible, and highly impactful. What a Release. Get going with a free account, schedule a demo to learn more, or contact us for further questions and support.