
Introduction
Experimentation is a powerful tool for improving your website or app. By running experiments, you can test different variations of your features to see what works best for your users.
One challenge you sometimes run into with experimentation is wanting to test different solutions to the same problem without confusing users by showing them multiple solutions at once or when you’re concerned about interaction effects between the different solutions. When running multiple experiments, you may want to prevent users from seeing more than one experiment at a time. These are called mutually exclusive experiments.
In this article, we will show you how to use flag dependencies to run mutually exclusive experiments with Split. While this article will focus on how to do this in React, it can just as easily be implemented in other frameworks and languages. We will use the Split React SDK to render either a button, heading, or message that is only displayed if the user is not already in one of the other experiments.
Steps to Set It Up
To create the three flags and the mutual exclusivity between them, you will need to use the Split UI.
Here are the steps:
Creating the Parent Flag
- Go to the Split dashboard and click on the “Flags” tab.
- Click on the “Create Flag” button.
- Give the flag a name, such as
myComponentExperimentGroup. - Select the “Definition” tab and create three treatments in the “Treatments” section:
buttonA,headingB, andmessageC. - Now go to the “Targeting” section, and in the “Targeting rules” sub-section, select “Distribute treatments as follows”, setting
buttonAto 33%,headingBto 34%, andmessageCto 33%.
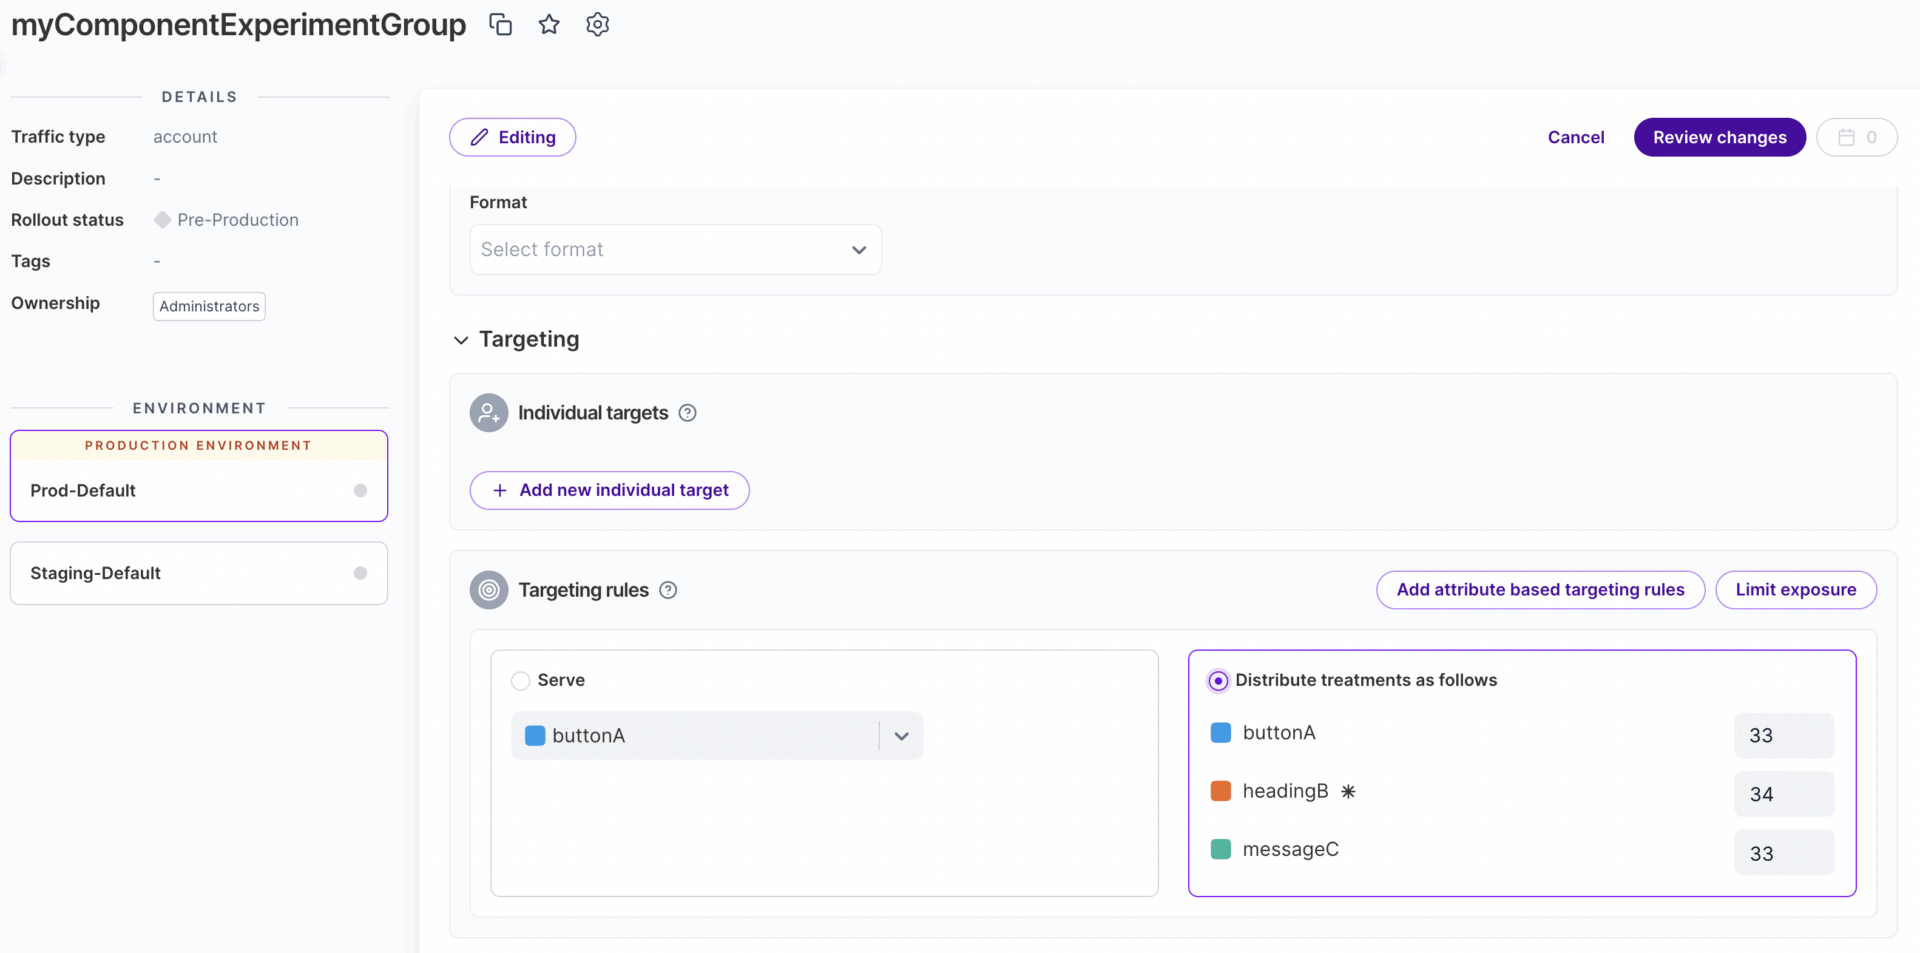
Now you’re ready to create the dependent flags.
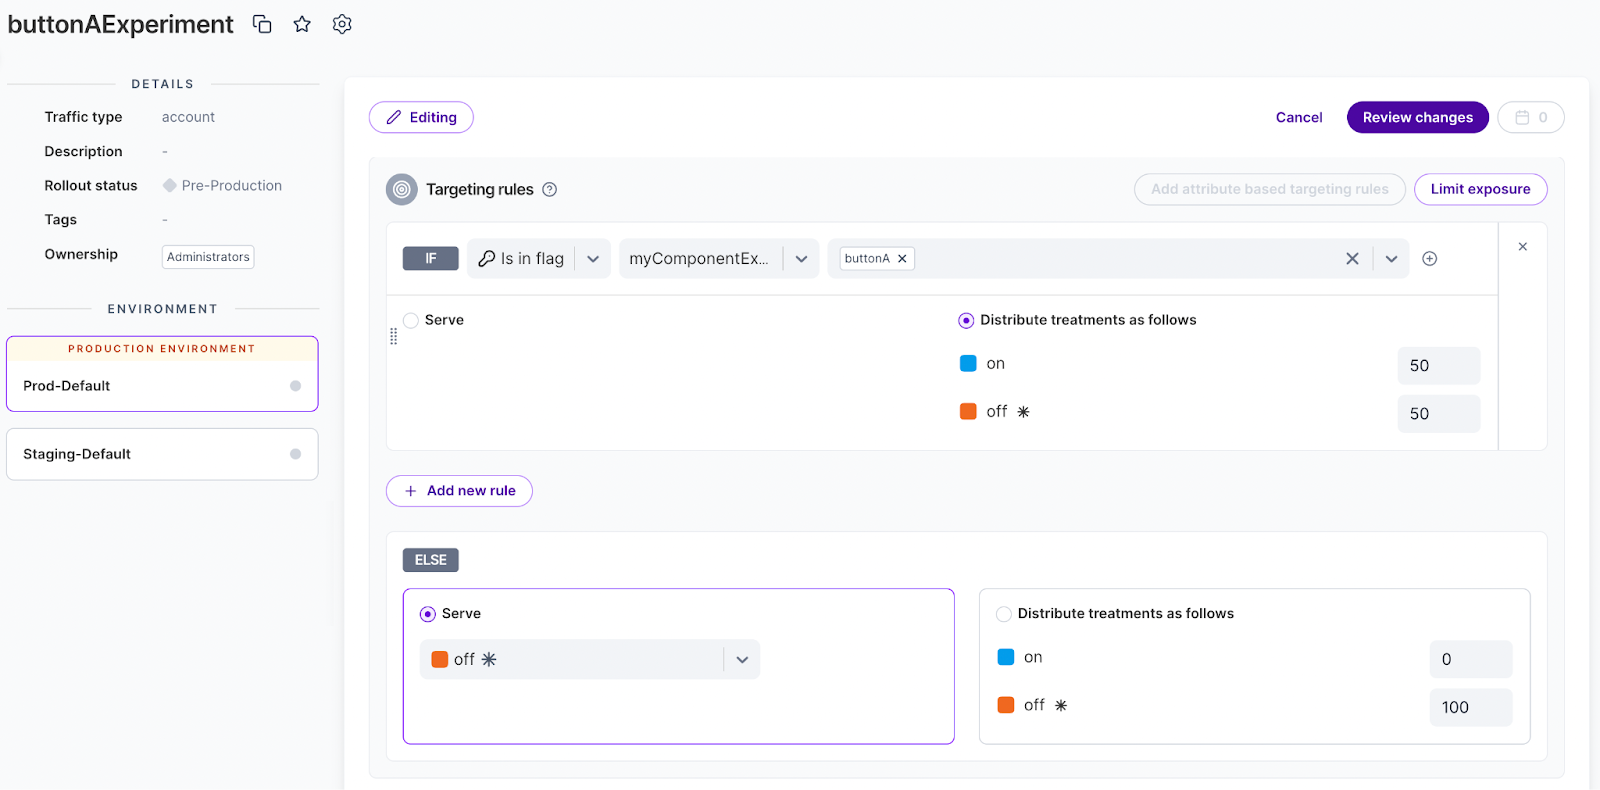
Creating the Dependent Flags
- Go to the Split dashboard and click on the “Flags” tab.
- Click on the “Create Flag” button.
- Give the flag a name, such as
buttonAExperiment. - Now go to the “Targeting” section and in the “Targeting rules” sub-section, click on the “Add attribute based targeting rules“
- In the matcher dropdown, select “is in Flag”, select myComponentExperimentGroup from the attributes dropdown, then select buttonAExperiment from the values dropdown.
- Finally, select “Distribute treatments as follows” and set on to 50% and off to 50%.
- Repeat steps 1-6 for the headingBExperiment and messageCExperiment flags.
Using the Flags in Your React Code
Once you have created the flags, you can use the useSplit hook to render the button, heading, and in your React code. Here is the code:
import React from "react";
import { useTreatments } from "@splitsoftware/splitio-react";

const MyComponent = () => {
  const {
    buttonAExperiment: { treatment: buttonTreatment },
    headingBExperiment: { treatment: headingTreatment },
    messageCExperiment: { treatment: messageTreatment }
  } = useTreatments(["buttonAExperiment", "headingBExperiment", "messageCExperiment"]);

  headingTreatment === "on" ? <h1>Heading experiment</h1> : null;
  buttonTreatment === "on" ? <button>Button experiment</button> : null;
  messageTreatment === "on" ? <p>Message experiment</p> : null;
}


export default MyComponent;
Your component is now referencing three flags: buttonAExperiment, headingBExperiment, and messageCExperiment. Since you’ve made all 3 of these flags dependent on myComponentExperimentGroup, only 1 of them will ever be on at any one time. Thus, you’ve made them mutually exclusive and you can analyze the impact of each of these experiments without worrying about interaction effects between them.
Conclusion
In this article, we showed you how to run mutually exclusive experiments in React with Split. We hope this article was helpful!
For more information on flag dependencies in Split with the React SDK, please see the following resources:
- Create a feature flag: https://help.split.io/hc/en-us/articles/9058495582349-Create-a-feature-flag
- Target with dependencies: https://help.split.io/hc/en-us/articles/360020527652-Target-with-dependencies
- React SDK:
https://help.split.io/hc/en-us/articles/360038825091-React-SDK
Switch It On With Split
The Split Feature Data Platform™ gives you the confidence to move fast without breaking things. Set up feature flags and safely deploy to production, controlling who sees which features and when. Connect every flag to contextual data, so you can know if your features are making things better or worse and act without hesitation. Effortlessly conduct feature experiments like A/B tests without slowing down. Whether you’re looking to increase your releases, to decrease your MTTR, or to ignite your dev team without burning them out–Split is both a feature management platform and partnership to revolutionize the way the work gets done. Schedule a demo to learn more.
Get Split Certified
Split Arcade includes product explainer videos, clickable product tutorials, manipulatable code examples, and interactive challenges.