A RESTful API in JavaScript can be built from scratch very quickly. It usually means using a Node.js environment and a server run by the Express library. One could argue that a downside of such a technical stack would be the lack of types – the fact that JavaScript isn’t a strongly typed language. But you can instantly stop worrying and learn to love JavaScript, well, actually – love TypeScript – JavaScript’s type-safe superset and an excellent tool for a better and safer development experience.
Let’s run quickly over the topics of this tutorial:
- Creating an Express-driven Node.js application exposing a REST API
- Making the application code strongly typed with TypeScript
- Adding new feature using feature flag branching (branch by abstraction) with Split
- Testing the configured percentage split
Wondering what the app’ll be about? Do the time zones of the world sound interesting enough? Let’s get started!
Deploy Continuously with Confidence – Sign up for a Split demo!

Speed up development cycles, reduce release risk, and focus your team on DevOps best practices that create maximum impact. Get a personalized demo today!
Prerequisites for Node and TypeScript
For the best experience inside this tutorial, you need to have:
- Basic knowledge of Node.js and Express
- Basic familiarity with the command line
- Node.js and npm installed
- A Split account
If you want to follow along by inspecting the codebase while reading the next sections, the full code example is available on a splitio-examples GitHub repo.
Set Up Your TypeScript Development Environment
You’ll start by creating a project directory and move to its root folder:
mkdir node-typescript
cd node-typescriptCode language: Bash (bash)Start the npm project by running npm init, creating a package.json file. As an alternative, you can copy the following JSON structure to the package.json that you’ll make on your own:
{
  "name": "node-typescript-api",
  "version": "1.0.0",
  "description": "Build an App with Node.js, Express, and TypeScript",
  "main": "index.js",
  "scripts": {},
  "license": "MIT"
}Code language: JSON / JSON with Comments (json)
If you plan to use TypeScript in your application, it’s best to hook it up at the very beginning, as TypeScript will provide useful development features while you code. Not surprisingly, it is installed as an npm package called typescript, and here you’ll install yet another one – ts-node:
npm i -D typescript ts-nodeCode language: Matlab (matlab)typescript package is the key library in all the applications using TypeScript inside the codebase. It transforms the TypeScript code to JavaScript in a process called transcompiling or transpiling. The subtle difference from the term compiling exists, as compiling defines code transformation from a high-level programming language to a low-level one. At the same time, transpiling is the term used for code transformation between high-level languages. However, in TypeScript ecosystem(s), you’ll probably run into both terms.
ts-node is a useful package that enables running TypeScript files (ones having the .ts extension) from the command line within the Node environments.
The -D, also known as --dev, means that both packages should be installed as development dependencies. After the installation, you’ll find the devDependencies property inside the package.json populated with these packages.
Next, create a tsconfig.json file in the project’s root folder. The presence of a tsconfig.json file in a directory indicates that the directory is the root of a TypeScript project. Also, this file allows you to configure how the typescript library will compile the TypeScript code inside the project. Populate the file with the following JSON:
{
  "compilerOptions": {
    "module": "commonjs",
    "target": "es6",
    "rootDir": "./",
    "esModuleInterop": true
  }
}Code language: JSON / JSON with Comments (json)
The crucial property of the configuration file is called compilerOptions. Options set here define most of the TypeScript configuration. Let’s cover some of the basic ones.
modulespecifies a module system to be used in the compiled JavaScript code. The standard module system inside a Node environment would be CommonJS.targetproperty defines the targeted JavaScript version of the compiled code. Since the code can be run on your server, inside a Node environment, the ES6 JavaScript version is good to go. But, if this was a client-side app that runs in, e.g., Internet Explorer browser, then you should aim for lower ECMAScript versions and have something like"target": "es5".rootDirdefines the root location of typescript files inside the project. It doesn’t necessarily need to be the root of the project folder, like here.esModuleInteropflag enables default imports for TypeScript modules withexport =syntax that you’ll need for importing from the Express library later on.
Bear in mind that this basic set of tsconfig.json options is just something to get you started. TypeScript and its compiler are highly configurable, and there is a lot more to learn about it. Feel free to explore the TypeScript docs for more information.
What Are Declaration Files in TypeScript?
Declaration files describe types of various JavaScript APIs to the TypeScript compiler. In your project, you’ll be defining your own types, but you’ll also need types for various Node APIs or different external packages that you’ll be using, like Express. These files often come with the .d.ts extension. They are used for TypeScript module resolution. Those files are modules that don’t have any code implementation inside but serve as a layer that describes the JavaScript implementation behind it by its type.
Some external JavaScript libraries have the TypeScript declaration files shipped within the npm package (like the one you’ll use later on – @splitsoftware/splitio). In contrast, the other declaration files need to be installed as a separate package that usually comes with a @types namespace prefix, provided by the DefinitelyTyped project. Node APIs type definitions also need to be fetched from the @types namespace, so let’s first install the @types/node package as a development dependency:
npm i -D @types/nodeCode language: CSS (css)Build an Express Server in Node
The next thing you’d need is to install Express.js, a popular package to create a server in Node.
npm i expressCode language: Matlab (matlab)With the TypeScript context in mind, let’s also install the types for Express as a development dependency:
npm i -D @types/expressCode language: CSS (css)In the root directory, create an app.ts where the server application will run:
import express from 'express';

const app = express();
const port = 3000;

app.listen(port, () => {
  console.log(`Timezones by location application is running on port ${port}.`);
});Code language: JavaScript (javascript)
The express module is required to create a server. With this configuration, the server will run on port 3000, with the base URL where the application runs being http://localhost:3000.
Install the utility package Nodemon, which will speed up your development by automatically restarting the server after each change. Nodemon is also installed as a development dependency, as you only need it during the development phase.
npm i -D nodemonCode language: Matlab (matlab)In the package.json file, inside the scripts property, add a script named serve with nodemon app.ts command that will be used to start the server. Remember, the ts-node package makes this possible under the hood, as normally you wouldn’t be able to start typescript files from the command line.
...
"scripts": {
    "serve": "nodemon app.ts"
  }
...Code language: Bash (bash)
Now you can start your server by simply running:
npm run serveCode language: Arduino (arduino)The following should appear in the terminal:
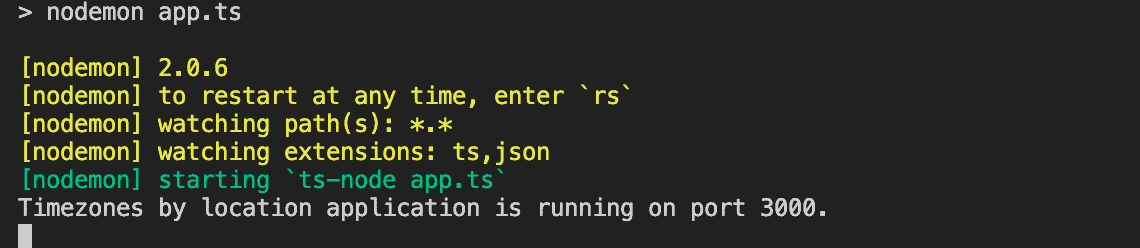
Alternatively and without Nodemon, you could run the server with npx ts-node app.ts.
Add an Endpoint inside the Node Server
Change the import statement on the first line, so you also import the TypeScript interfaces that will be used for request, response, and next parameters inside the Express middleware.
import express, { Request, Response, NextFunction } from 'express';Code language: JavaScript (javascript)As mentioned, this application will be all about the time zones of the world. The REST API will have a single GET /timezones endpoint, which will return the hardcoded list of locations with a timezone name, abbreviation, and the UTC offset. Since there is only one route, let’s just put it inside app.ts, by adding this code:
interface LocationWithTimezone {
  location: string;
  timezoneName: string;
  timezoneAbbr: string;
  utcOffset: number;
};

const getLocationsWithTimezones = (request: Request, response: Response, next: NextFunction) => {
  let locations: LocationWithTimezone[] = [
    {
      location: 'Germany',
      timezoneName: 'Central European Time',
      timezoneAbbr: 'CET',
      utcOffset: 1
    },
    {
      location: 'China',
      timezoneName: 'China Standard Time',
      timezoneAbbr: 'CST',
      utcOffset: 8
    },
    {
      location: 'Argentina',
      timezoneName: 'Argentina Time',
      timezoneAbbr: 'ART',
      utcOffset: -3
    },
    {
      location: 'Japan',
      timezoneName: 'Japan Standard Time',
      timezoneAbbr: 'JST',
      utcOffset: 9
    }
  ];

  response.status(200).json(locations);
};

app.get('/timezones', getLocationsWithTimezones);Code language: C# (cs)Notice how this endpoint returns a list of locations with a type LocationWithTimezone you just easily defined using a TypeScript interface. There is no conceptual difference between this type you made yourself or any other type, e.g., the one imported from an external declaration file. They both present the same TypeScript mechanism to describe a JavaScript entity. To make sure this route works, you can test it against a request made with curl from the terminal:
curl http://localhost:3000/timezonesCode language: Arduino (arduino)This is the response you should see in the console:
[{"location":"Germany","timezoneName":"Central European Time","timezoneAbbr":"CET","utcOffset":1},{"location":"China","timezoneName":"China Standard Time","timezoneAbbr":"CST","utcOffset":8},{"location":"Argentina","timezoneName":"Argentina Time","timezoneAbbr":"ART","utcOffset":-3},{"location":"Japan","timezoneName":"Japan Standard Time","timezoneAbbr":"JST","utcOffset":9}]Code language: JSON / JSON with Comments (json)Create a Feature Flag for Your Node + TypeScript App
Feature flags are used in numerous production applications around the world, and there is sound reasoning behind that. The natural state of living applications require updates from time to time, maybe even on daily or hourly basics. Every update or every new version of the application is a potential way to introduce a new bug. Feature flags come in handy in those situations, as they give you the ability to serve the latest version of the application only to a specific target inside your audience first.
Inside this tutorial, the newly introduced feature, or a code update, will be a new location added to the list of locations returned by GET /timezones route – a warm destination in the heart of Africa, known as Kenya. You don’t want all application users to get the Kenya location’s data at first. Maybe you want to see if that data is even relevant to the users, so you’ll want to do some kind of A/B testing first – let only half of the users get the time zone information about Kenya. Let’s start with the feature flag configuration.
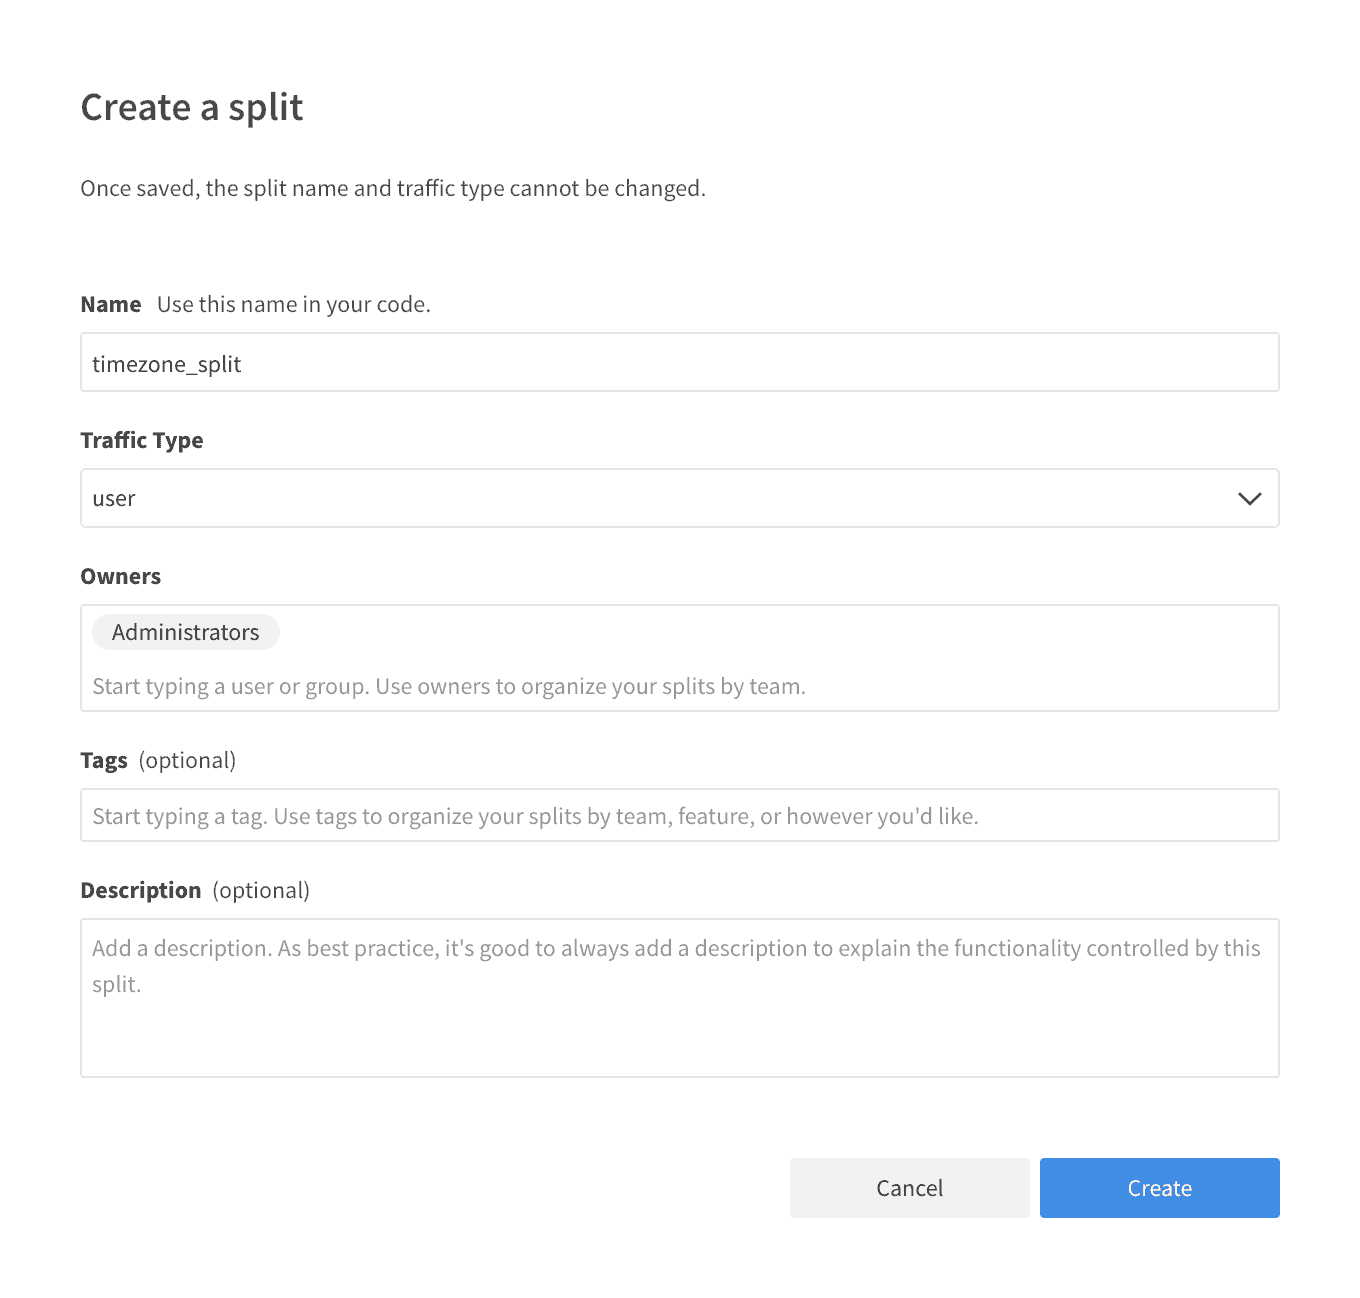
To create a feature flag, you’ll need access to Split application. If you don’t have a Split account yet, you should register one to continue. After you log in to Split, navigate to the Splits section on the left and click Create Split. The dialog will prompt you for the split’s name, which you can define as timezone_split. Leave the default settings for everything else and click Create to finish.
You should see a newly created split with a Staging-Default environment preselected :
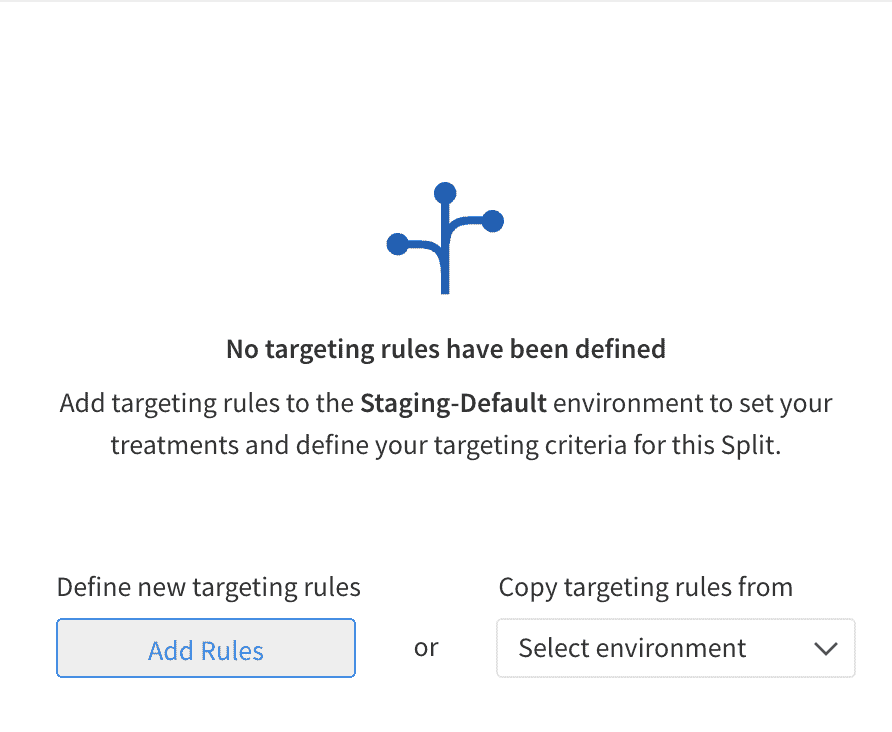
If Prod-Default environment is preselected, switch to Staging-Default by using the dropdown in the upper left corner:
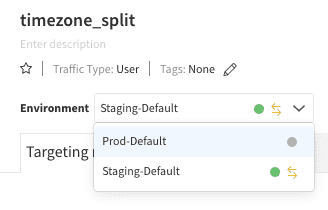
To configure the split settings, click Add Rules.
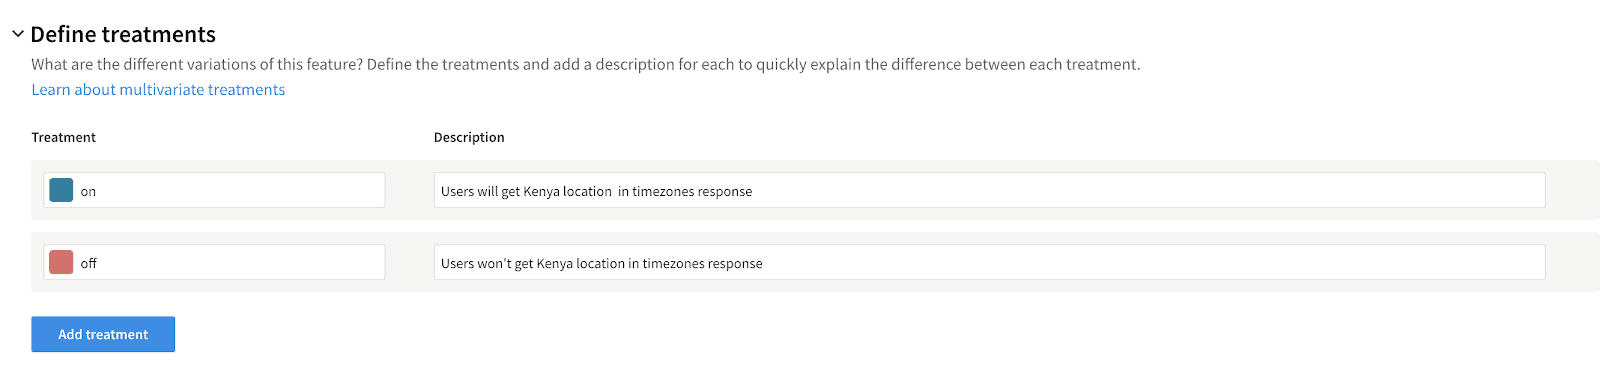
The state of a feature flag in Split is known as treatment. The most common values for treatments are on or off, but you can use anything else. As configured here in the Define treatments section, when the treatment is on, users will get a new location in the given response of the GET /timezones endpoint. If the treatment is off, the same endpoint will return the original list of locations with timezones, without Kenya.
Now, let’s set up the targeting rules, where you’ll define the targeted audience for this split. The split will be configured as a percentage split, and that kind of targeting is set up inside the Set The Default Rule section. Percentage split means that treatments will be randomly distributed between users in the percentage you define. As seen in the next picture, you’ll define that half of your users get the on treatment, leaving the other half with the off treatment.
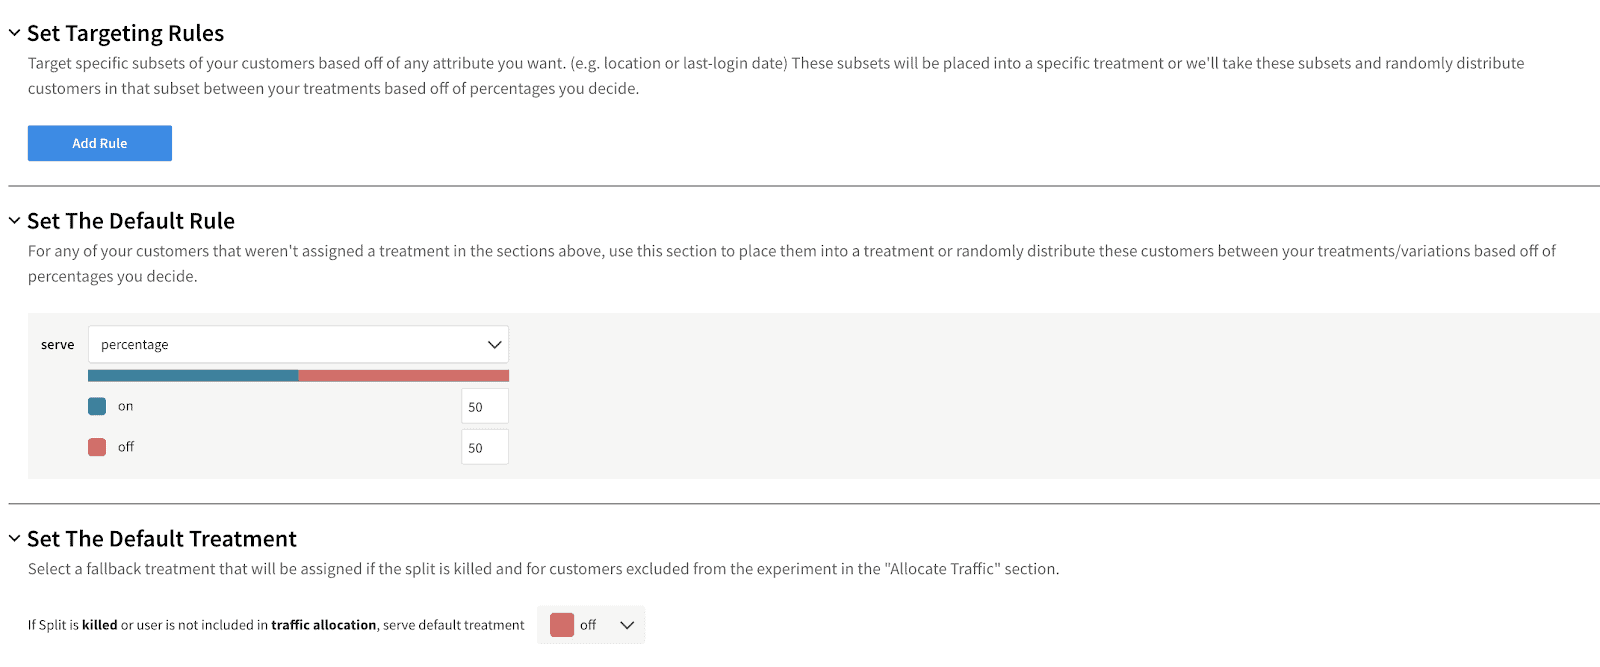
After that, you click Save changes and then Confirm, resulting in the split settings being saved.
Connect Your Feature Flag with Node
Back in the application code, Split Node.js SDK is needed to apply the previously set logic in the application runtime. It can be installed via npm, and it also ships with the TypeScript declaration files, so you don’t need to install a separate package for that:
npm i @splitsoftware/splitioCode language: CSS (css)Add the following code in the app.ts. Optionally, you can put the import statement at the top of the file.
import split = require('@splitsoftware/splitio');
const factory: SplitIO.ISDK = split.SplitFactory({
core: {
authorizationKey: 'YOUR_API_KEY'
}
});
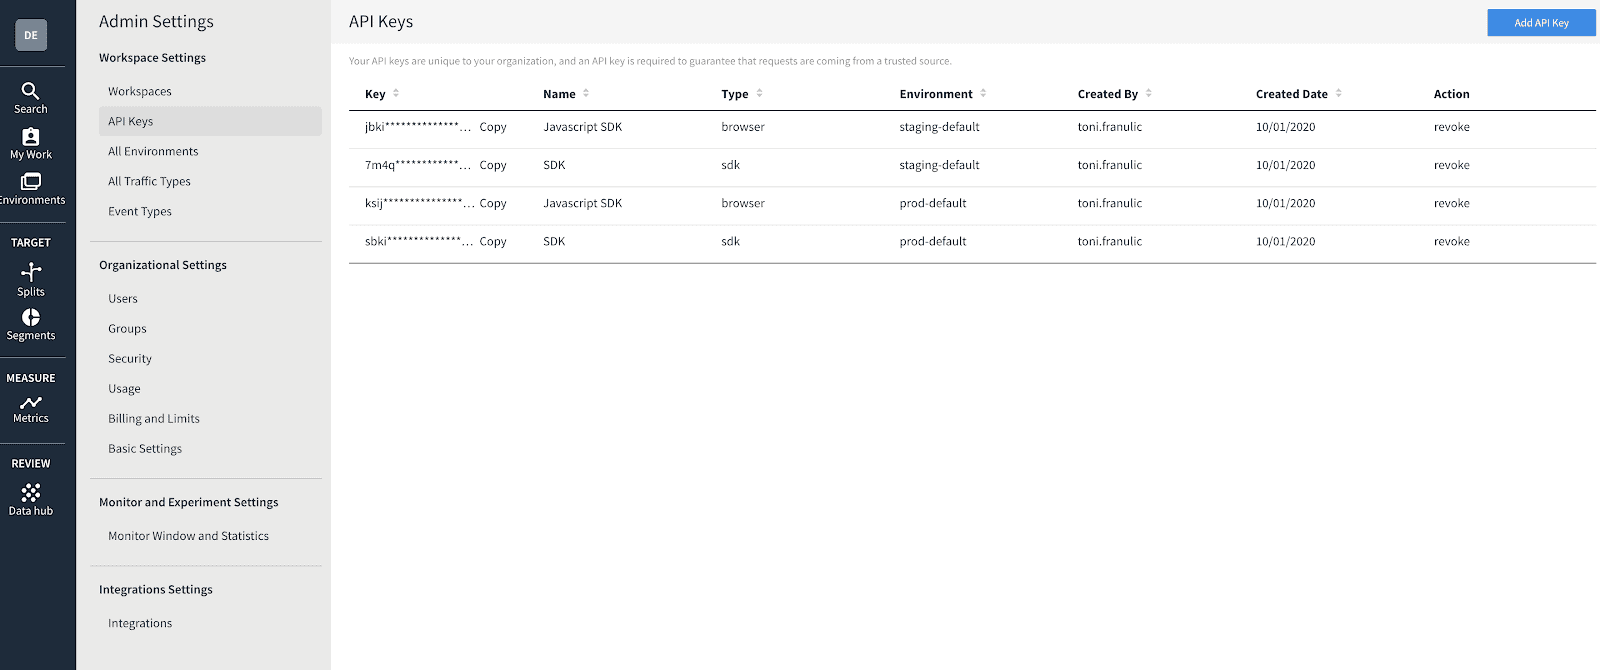
const client: SplitIO.IClient = factory.client();Code language: JavaScript (javascript)The API key you’ll use here is the one you can see in the Admin Settings of the Split dashboard. The key you search for is the second one from the – staging one for the SDK. Of course, in a production app, it is a good practice to store this key as an environment variable on your machine.
As SDK now communicates with the app, it can be utilized to get a respective treatment for a user’s request with the getTreatment method. The method receives two arguments – key and split name. You can use the key to identify a particular user and calculate a specific treatment for that user. Simultaneously, the split name is the identifier of the split configured in the Split dashboard.
A good idea is to put the logic for calculating the user’s treatment inside an Express middleware. Execute the function against each API request before proceeding further. That middleware can read the user’s authentication data, e.g., the data stored in the authorization header, and use it as a key for the getTreatment method. The second argument is the name of the previously configured split (timezone_split).
Place the following code above the app.get...; line:
const getTreatmentMiddleware = function (request: Request, response: Response, next: NextFunction) {
  const key: SplitIO.SplitKey = <SplitIO.SplitKey>request.headers['authorization'];
  request.treatment = client.getTreatment(key, 'timezone_split');
  next();
};Code language: PHP (php)
The sole purpose of the getTreatmentMiddleware is to put the treatment on the request object and proceed to the next middleware, which is the getLocationsWithTimezones function.
After adding this code, you’ll be getting an error from the TypeScript compiler – and a completely legit one – as there is no treatment property present on the Request interface, which is a type assigned to the request parameter. You shouldn’t think of this as a bad thing. TypeScript is doing here what the language was made for. It warns the developer about the type errors in compile time to avoid (much more severe) errors for the end-user in the runtime. Avoid the compile error by using a technique called declaration merging. That will effectively extend the Request interface provided by Express with your custom treatment property.
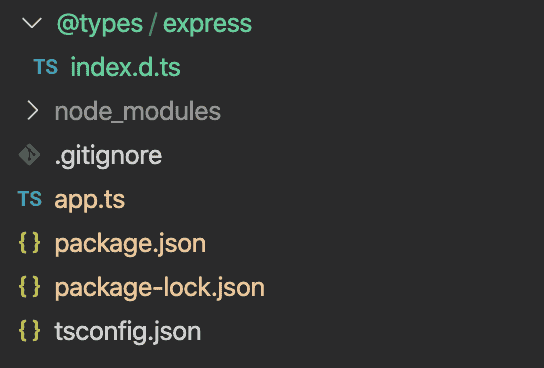
The way to expand Express declaration types is to create a declaration file inside the custom @types folder, with a structure that simulates the one located in ./node_modules/@types. That means creating an index.d.ts file located at ./@types/express/index.d.ts that will expand on Express type definitions found at ./node_modules/@types/express/index.d.ts.
Create the ./@types/express/index.d.ts file with:
mkdir @types
cd @types
mkdir express
cd express
touch index.d.tsCode language: Bash (bash)
Your project tree should look similar to the structure on the image:
Populate the file with this code:
export {}

declare global {
  namespace Express {
      interface Request {
          treatment?: any
      }
  }
}Code language: C# (cs)
Were you wondering about this wandering export {} statement from above? It is needed for this file to be understood as a typescript module, as only files with top-level import or export statements are interpreted as modules.
Add the typeRoots property to the tsconfig.json file, so the file now looks like this:
{
  "compilerOptions": {
    "module": "commonjs",
    "target": "es6",
    "rootDir": "./",
    "esModuleInterop": true,
    "typeRoots": [
      "./@types",
      "./node_modules/@types"
    ]
  }
}Code language: JSON / JSON with Comments (json)
This will ensure that the TypeScript compiler will search for types not only inside the ./node_modules/@types folder, which is the default but also in the custom folder ./@types that you’ve made. Finally, you can use the treatment property inside the Request interface in the app.ts, and the error in the console should disappear.
Let’s take a quick look on the angle bracket syntax (<SplitIO.SplitKey>) in this line of the middleware: const key: SplitIO.SplitKey = <SplitIO.SplitKey>request.headers['authorization'];. The angle brackets provide a nice TypeScript feature of type casting a variable from one type to another. In this particular case, request.headers['authorization'], of type string, is casted into SplitIO.SplitKey type, as getTreatment function’s type definition expects the first argument to be of the SplitIO.SplitKey type.
Edit the routing line by adding a treatment middleware:
app.get('/timezones', getTreatmentMiddleware, getLocationsWithTimezones);Code language: C# (cs)Now it’s time to use the request.treatment value for branching inside the endpoint function.
Route Branching with Feature Flags in Node
You should rework the getLocationsWithTimezone function to perform branching regarding the request.treatment value. Users who hit the on treatment will get an extra location in the response list – Kenya.
const getLocationsWithTimezones = (request: Request, response: Response, next: NextFunction) => {
  let locations: LocationWithTimezone[] = [
    {
      location: 'Germany',
      timezoneName: 'Central European Time',
      timezoneAbbr: 'CET',
      utcOffset: 1
    },
    {
      location: 'China',
      timezoneName: 'China Standard Time',
      timezoneAbbr: 'CST',
      utcOffset: 8
    },
    {
      location: 'Argentina',
      timezoneName: 'Argentina Time',
      timezoneAbbr: 'ART',
      utcOffset: -3
    },
    {
      location: 'Japan',
      timezoneName: 'Japan Standard Time',
      timezoneAbbr: 'JST',
      utcOffset: 9
    }
  ];

  if (request.treatment == 'on')
    locations.push({
      location: 'Kenya',
      timezoneName: 'Eastern Africa Time',
      timezoneAbbr: 'EAT',
      utcOffset: 3
    });

  response.status(200).json(locations);
};Code language: JavaScript (javascript)
Things will soon get more clear after you check what the endpoint returns with a curl request that uses an authorization header:
curl http://localhost:3000/timezones -H "authorization:user1"Code language: Elixir (elixir)Since we set the treatment up with a 50/50 split, you could get either response. So the Schrodinger’s response you are getting either includes or doesn’t include Kenya. The important thing is that every subsequent request with the same header value, or the same Split key, will give you the same treatment. Split ensures a consistent user experience.
Calculations that Split performs behind the scenes guarantee that for the same key parameter (user1), the getTreatment method returns the same treatment value every time, or at least until you say so.
Now try something different; for example, increment the number in the header value:
curl http://localhost:3000/timezones -H "authorization:user2"Code language: Elixir (elixir)Even a minor change in the Split key that gets sent with the getTreatment method results in a different set of treatment calculations provided by Split. Again, this request has a 50% chance of resulting in either the on or the off treatment. If you are getting back the same response for authorization:user2 as for the authorization:user1, you can keep incrementing the number in the header, and eventually, you’ll get a different treatment resulting in a different response.
Reallocate the Feature Flag
Sometimes the consistent user experience provided by percentage split isn’t what you necessarily want all the time. As previously hinted, that can be stopped by the split author. In some situations, you’d like to change the treatment some users are getting without changing the targeting rules. Easily achieve this by split reallocation. After this action, the configuration, including the targeting rules, will remain intact. But you should recalculate the treatment for each user.
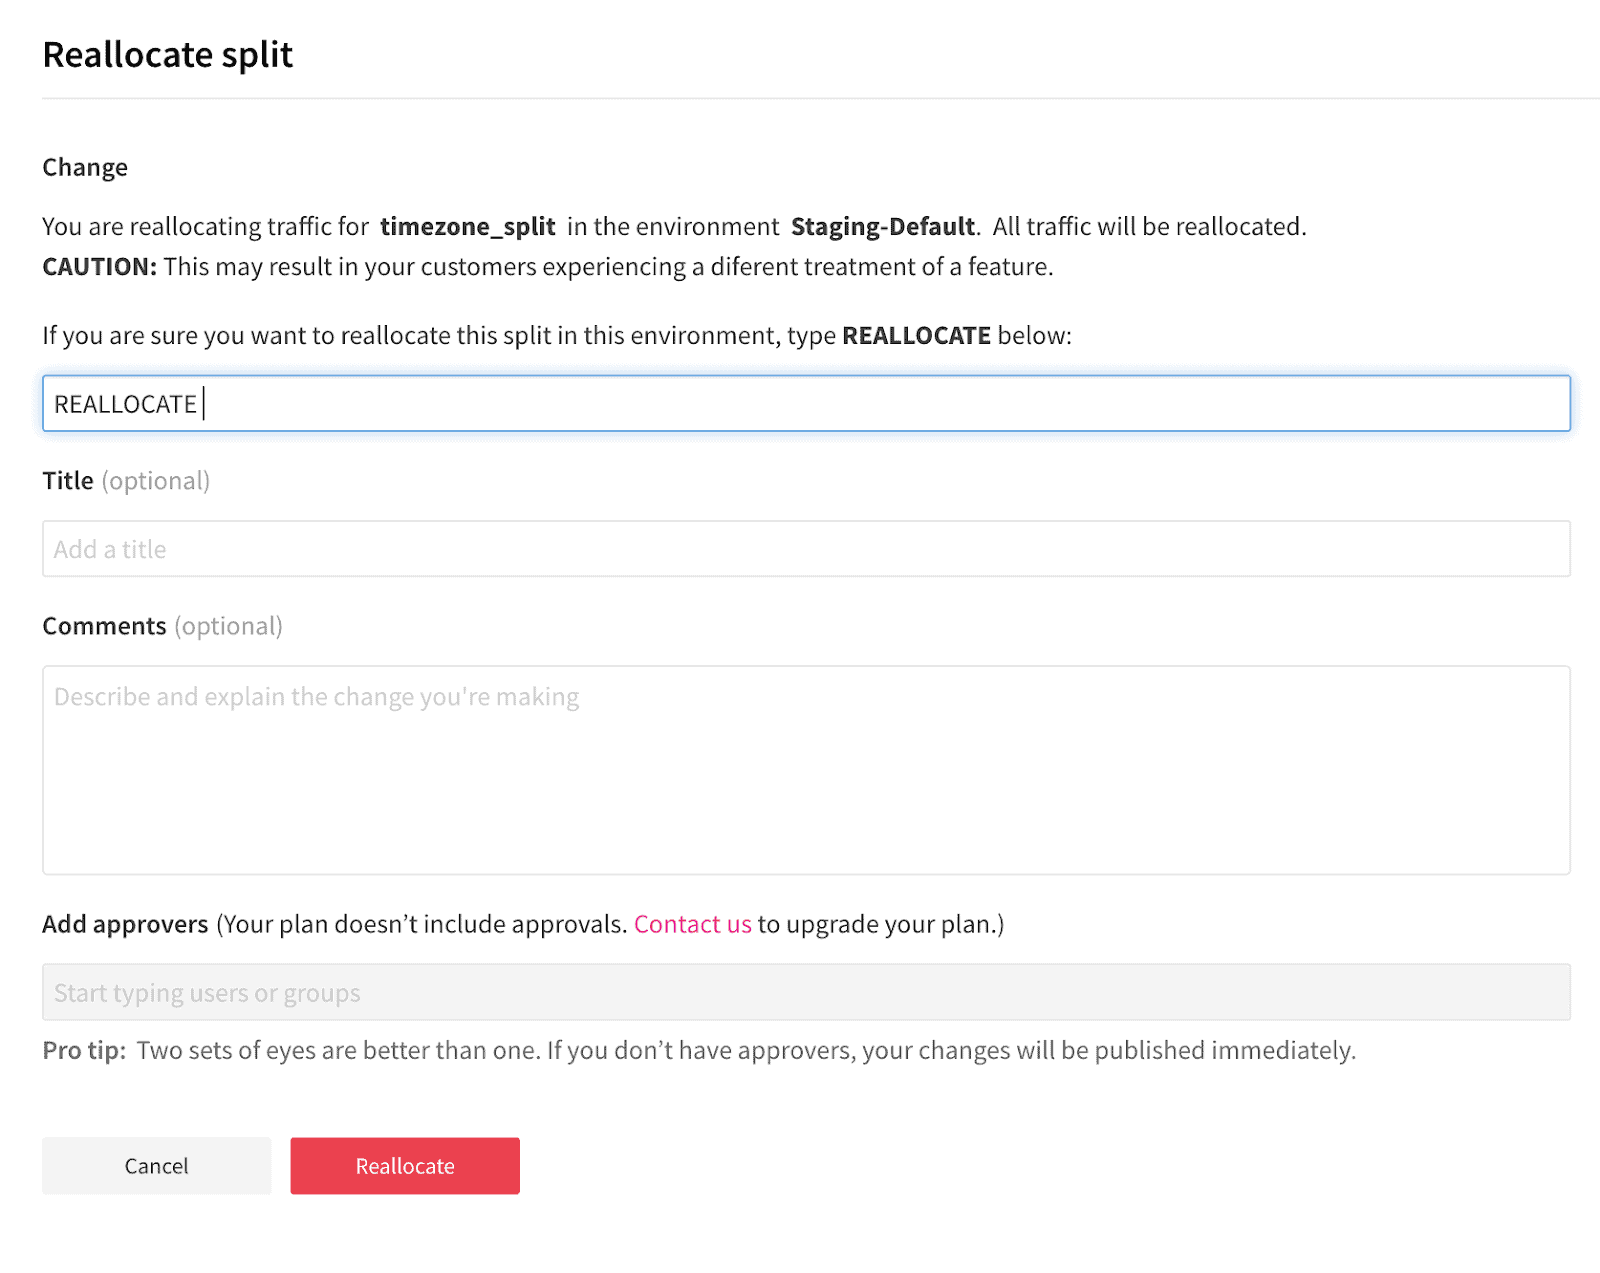
To reallocate the split, click on the three-dot menu in the upper-right corner of the timezone_split inside the Split dashboard, and then click Reallocate.

In the dialog, just type REALLOCATE in the first input field and click Reallocate again.
Now restart your server and try the first request again via curl:
curl http://localhost:3000/timezones -H "authorization:user1"Code language: Elixir (elixir)Calculate the treatment for this request again, thanks to the split reallocation. There is a 50% chance that this request’s treatment will be different than the one before the allocation. If you are getting the same treatment again, try to reallocate the split and restart the server again. Eventually, you’ll get a different treatment.
Feature Flags in Real World Node + TypeScript Apps
This is a vivid example of how feature flags can serve different responses based on specific targeting. In this case, the targeting was random and consistent at the same time. Imagine an A/B testing situation where you don’t know which solution is better, and you can’t target a specific slice of the users by any definable criteria. But you want them to have a consistent experience during the testing phase. That situation would require random but consistent targeting, as shown here.
If you want to see it all in one place, this is how app.ts file looks like in the end:
import express, { Request, Response, NextFunction } from 'express';
import split = require('@splitsoftware/splitio');

interface LocationWithTimezone {
  location: string;
  timezoneName: string;
  timezoneAbbr: string;
  utcOffset: number;
};

const app = express();
const port = 3000;

app.listen(port, () => {
  console.log(`Timezones by location application is running on port ${port}.`);
});

const factory: SplitIO.ISDK = split.SplitFactory({
  core: {
    authorizationKey: YOUR_API_KEY
  }
});

const client: SplitIO.IClient = factory.client();

const getLocationsWithTimezones = (request: Request, response: Response, next: NextFunction) => {
  let locations: LocationWithTimezone[] = [
    {
      location: 'Germany',
      timezoneName: 'Central European Time',
      timezoneAbbr: 'CET',
      utcOffset: 1
    },
    {
      location: 'China',
      timezoneName: 'China Standard Time',
      timezoneAbbr: 'CST',
      utcOffset: 8
    },
    {
      location: 'Argentina',
      timezoneName: 'Argentina Time',
      timezoneAbbr: 'ART',
      utcOffset: -3
    },
    {
      location: 'Japan',
      timezoneName: 'Japan Standard Time',
      timezoneAbbr: 'JST',
      utcOffset: 9
    }
  ];

  if (request.treatment == 'on')
    locations.push({
      location: 'Kenya',
      timezoneName: 'Eastern Africa Time',
      timezoneAbbr: 'EAT',
      utcOffset: 3
    });

  response.status(200).json(locations);
};

const getTreatmentMiddleware = function (request: Request, response: Response, next: NextFunction) {
  const key: SplitIO.SplitKey = <SplitIO.SplitKey>request.headers['authorization'];
  request.treatment = client.getTreatment(key, 'timezone_split');
  next();
};

app.get('/timezones', getTreatmentMiddleware, getLocationsWithTimezones);Code language: C# (cs)
Using feature flags can bring your software product to a whole new level. The Node TypeScript example shown here is just a small peek inside various ways to use feature flags to give the best possible experience to your application’s end users.
Learn More About Node, TypeScript, and Feature Flags
You’ve reached the end of the tutorial here. But feel free to continue learning about Node and TypeScript – a complementary set of tools for creating great server-side applications. Here are a few links to get you started:
- Bookmark Split’s Node.js SDK Documentation
- Build a library book API (another self-contained Node.js tutorial you can use or share): Get Started with Feature Flags in Node
- Spin up an example application showcasing integration of the Split JavaScript SDK on a React + Redux codebase.
Switch It On With Split
The Split Feature Data Platform™ gives you the confidence to move fast without breaking things. Set up feature flags and safely deploy to production, controlling who sees which features and when. Connect every flag to contextual data, so you can know if your features are making things better or worse and act without hesitation. Effortlessly conduct feature experiments like A/B tests without slowing down. Whether you’re looking to increase your releases, to decrease your MTTR, or to ignite your dev team without burning them out–Split is both a feature management platform and partnership to revolutionize the way the work gets done. Schedule a demo to learn more.
Get Split Certified
Split Arcade includes product explainer videos, clickable product tutorials, manipulatable code examples, and interactive challenges.