
Have you ever had to set up authorization in .NET Identity to manage access to an in-house or experimental feature? Keeping track of who has or needs access, including setting up users, roles, authentication, and a separate Identity database can be an entire job all by itself.
If you’re working on an API, you’d probably have to issue JWT bearer tokens. Setting up .NET Identity to manage users is a given, but what if there was an easier way to manage your authorization? What if you could pass along some key information of an authenticated user and immediately have their authorization validated? Today you’re going to learn how to do just that with feature flags
With Split for feature flags, you don’t have to keep track of which users are in which roles within your application. All you have to do is pass some sort of user identifier to a Split treatment, and Split will tell you if that user is authorized or not.
In the last post, we talked about Using Feature Flags in .NET Core Web API to control access to endpoints. For this tutorial, you’ll improve on that implementation by configuring access to the endpoints using a feature flag with targetting rules and a segment.
Previously access to the /api/pantry/image endpoints of a Pantry sample application were controlled by turning them on or off. This was helpful when the development team wanted to limit access for short term development and demo the feature to other departments.
Manually turning the feature on and off whenever the team wants to show someone how it works is slowly taking up more and more time. You’ve decided it would be better to leave the feature on all the time, and manage access in a different way. Instead of implementing .NET Identity, this project will use a simple login system to track the current user.
To follow along with this post, you’ll need these tools:
PRO TIP: Did you know you can run .NET on Linux and Mac too? The above link has resources for both platforms in addition to Windows.
Get Started with Feature Flags in ASP.NET Core
Go to Github and clone the Pantry repository from the previous blog post Using Feature Flags in .NET Core Web API. (You don’t need to have followed along with that tutorial to complete this one!)
After opening the project, create a new branch called Entitlements. In Visual Studio, click Git in the toolbar, then click New Branch. If you’re using the command line, you can use the following:
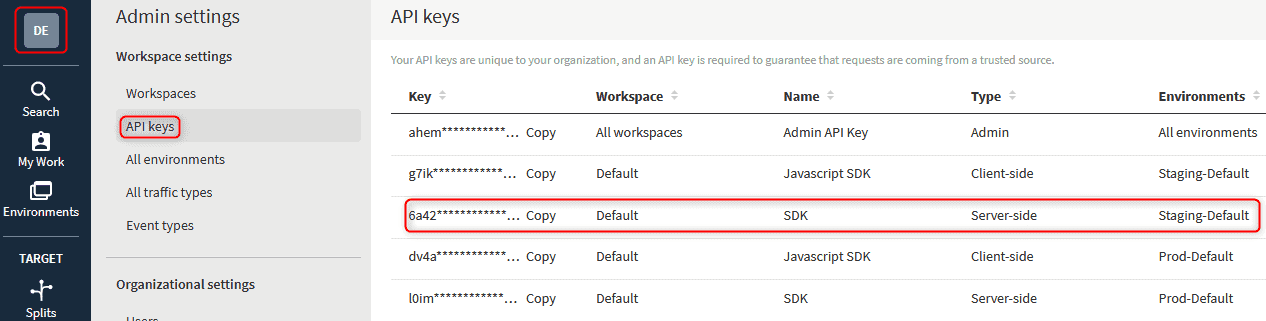
git checkout -b EntitlementsOpen appsettings.json, and replace the ApiKey with your Your Server-side Staging SDK API Key.
To get a copy of the API key, click the icon in the Top left corner -> Admin Settings -> API Keys. Then click copy next to your server-side staging SDK key.
Add a new class in Models called CurrentUser.cs and include the following:
namespace Pantry.Models
{
    public class CurrentUser
    {
            public int Id { get; set; }
            public string Username { get; set; }
    }
}Open AppDbContext.cs and add the following below ImageLocations:
Open AppDbContext.cs and add the following below ImageLocations:
public DbSet<CurrentUser> CurrentUser { get; set; }Create a new class in the Controllers folder called AuthenticateController.cs and add the following:
using Microsoft.AspNetCore.Mvc;
using Pantry.Models;
using System;
using System.Collections.Generic;
using System.Linq;
using System.Threading.Tasks;

namespace Pantry.Controllers
{
    [Route("api/[controller]")]
    [ApiController]
    public class AuthenticateController : ControllerBase
    {
        private readonly AppDbContext Context;

        public AuthenticateController(AppDbContext context)
        {
            Context = context;
        }


        [HttpPost]
        [Route("login")]
        public async Task<IActionResult> Login(CurrentUser user)
        {
            if (!String.IsNullOrWhiteSpace(user.Username))
            {
                await Context.CurrentUser.AddAsync(new CurrentUser() { Username = user.Username });
                await Context.SaveChangesAsync();

                return Ok("Logged In!");

            }

            return NotFound("User Not Found!");
        }
    }
}Replace the entire PantryController.cs with the following:
using Microsoft.AspNetCore.Mvc;
using Microsoft.EntityFrameworkCore;
using Pantry.Models;
using Splitio.Services.Client.Interfaces;
using System.Collections.Generic;
using System.Linq;
using System.Threading.Tasks;

namespace Pantry.Controllers
{
    [Route("api/[controller]")]
    [ApiController]
    public class PantryController : Controller
    {
        private readonly AppDbContext Context;
        public ISplitClient Client { get; }
        private bool ShowImageLocation
        {
            get { return GetStateOfImageLocation(); }
        }


        public PantryController(AppDbContext context, ISplitFactory split)
        {
            Context = context;

            var client = split.Client();
            client.BlockUntilReady(10000);

            Client = client;
        }

        [HttpGet]
        public async Task<ActionResult<IEnumerable<Product>>> GetProducts() => await Context.Products.ToListAsync();

        [HttpGet("{id}")]
        public async Task<ActionResult<Product>> GetProduct(int id) => await Context.Products.FindAsync(id) ?? (ActionResult<Product>)NotFound();

        [HttpPost]
        public async Task<ActionResult<int>> PostProduct(Product product)
        {
            var entityProduct = await Context.Products.AddAsync(product);
            await Context.SaveChangesAsync();

            return entityProduct.Entity.Id;
        }

        [HttpDelete("{id}")]
        public async Task<ActionResult> DeleteProduct(int id)
        {
            var product = await Context.Products.FindAsync(id);
            if (product == null)
            {
                return NotFound();
            }

            Context.Products.Remove(product);
            await Context.SaveChangesAsync();

            return Ok();
        }

        [HttpGet("/api/[controller]/image")]
        public async Task<ActionResult<ImageLocation>> GetProductImages(int id)
        {
            if (CurrentUserIsAuthorized())
            {
                if (ShowImageLocation is false)
                {
                    return NotFound();
                }

                var output = await Context.ImageLocations.FindAsync(id);

                return output;
            }

            return Unauthorized();
        }

        [HttpGet("/api/[controller]/image/{id}")]
        public async Task<ActionResult<ImageLocation>> GetProductImage(int id)
        {
            if (CurrentUserIsAuthorized())
            {
                if (ShowImageLocation is false)
                {
                    return NotFound();
                }

                return await Context.ImageLocations.FindAsync(id);
            }

            return Unauthorized();
        }

        [HttpPost("/api/[controller]/image")]
        public async Task<ActionResult<int>> PostProductImage(ImageLocation imageLocation)
        {
            if (CurrentUserIsAuthorized())
            {
                if (ShowImageLocation is false)
                {
                    return NotFound();
                }

                var entityProduct = await Context.ImageLocations.AddAsync(imageLocation);
                await Context.SaveChangesAsync();

                return entityProduct.Entity.Id;
            }

            return Unauthorized();
        }

        private bool GetStateOfImageLocation()
        {
            var treatment = Client.GetTreatment("Default_Value", "Pantry_API_ImageLocation");

            if (treatment == "on")
            {
                return true;
            }

            if(treatment == "off")
            {
                return false;
            }

            throw new System.Exception("Something went wrong!");
        }

        private bool CurrentUserIsAuthorized()
        {
            var currentUser = Context.CurrentUser.FirstOrDefault();
            if (currentUser != null)
            {
                var treatment = Client.GetTreatment(currentUser.Username, "Pantry_API_Entitlements");

                if (treatment == "on")
                {
                    return true;
                }
            }

            return false;
        }
    }
}Add Feature Flags to Your ASP.NET Core App
You need to create a new treatment and segment to handle the authorization.
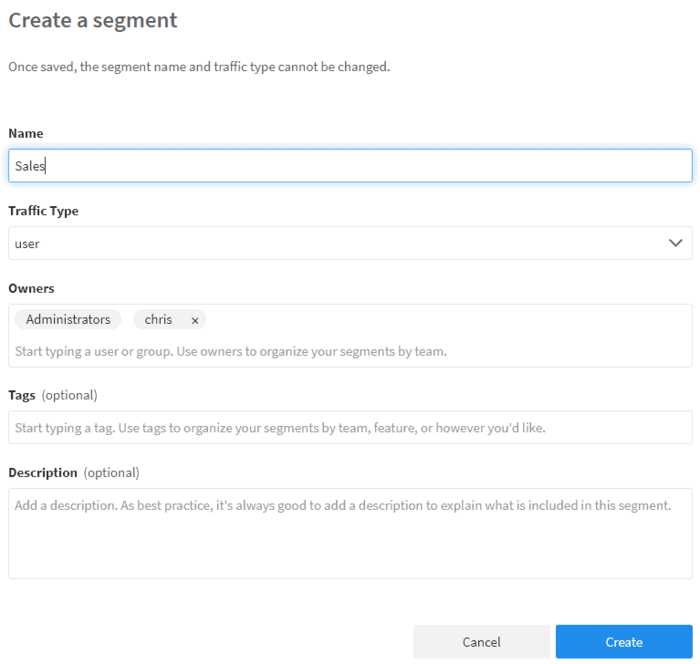
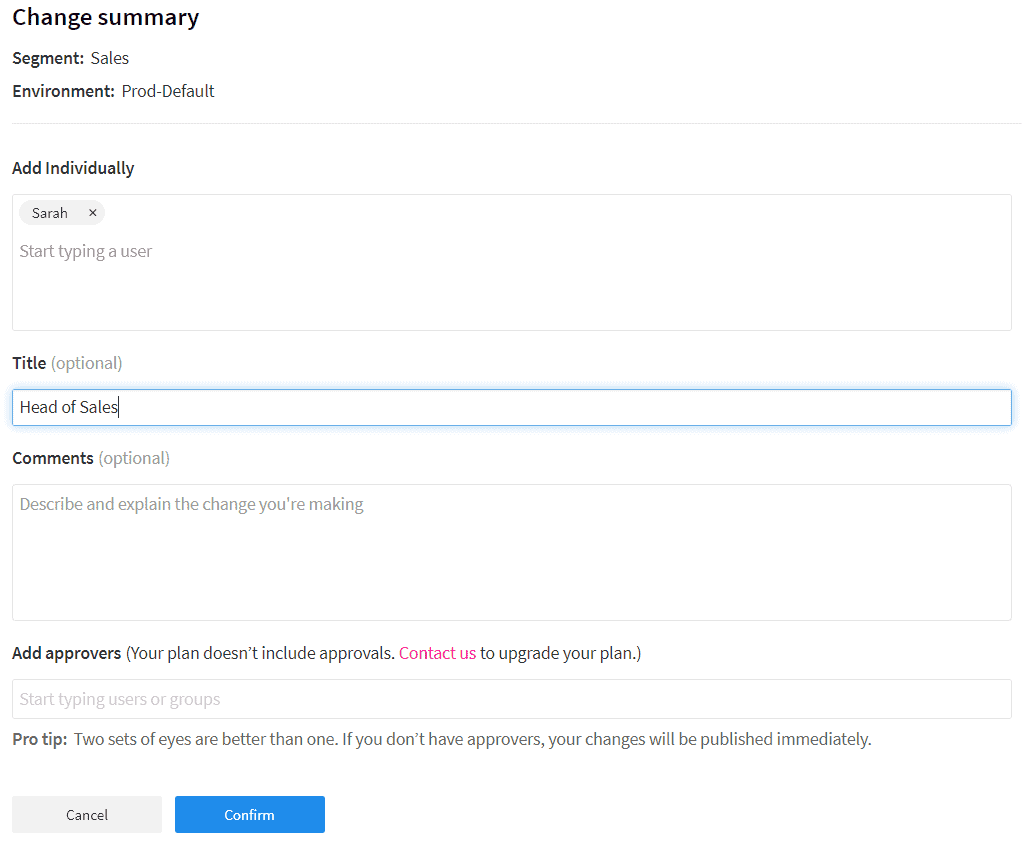
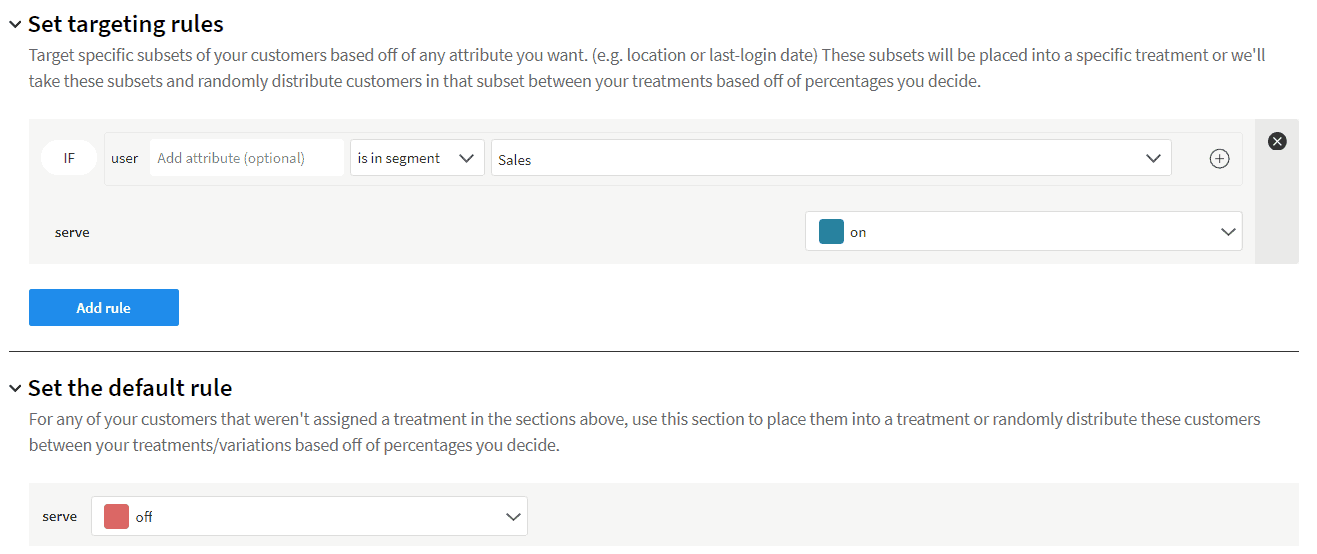
Log into your Split account, then click Segments on the left-hand side. Click Create Segment, name it Sales, and click create. Make sure your environment is set to Staging-Default. Click Add definition. On the new page in the User section, click Add User then ‘Add User Individually`. Add Sarah to the list of users, then click Confirm.
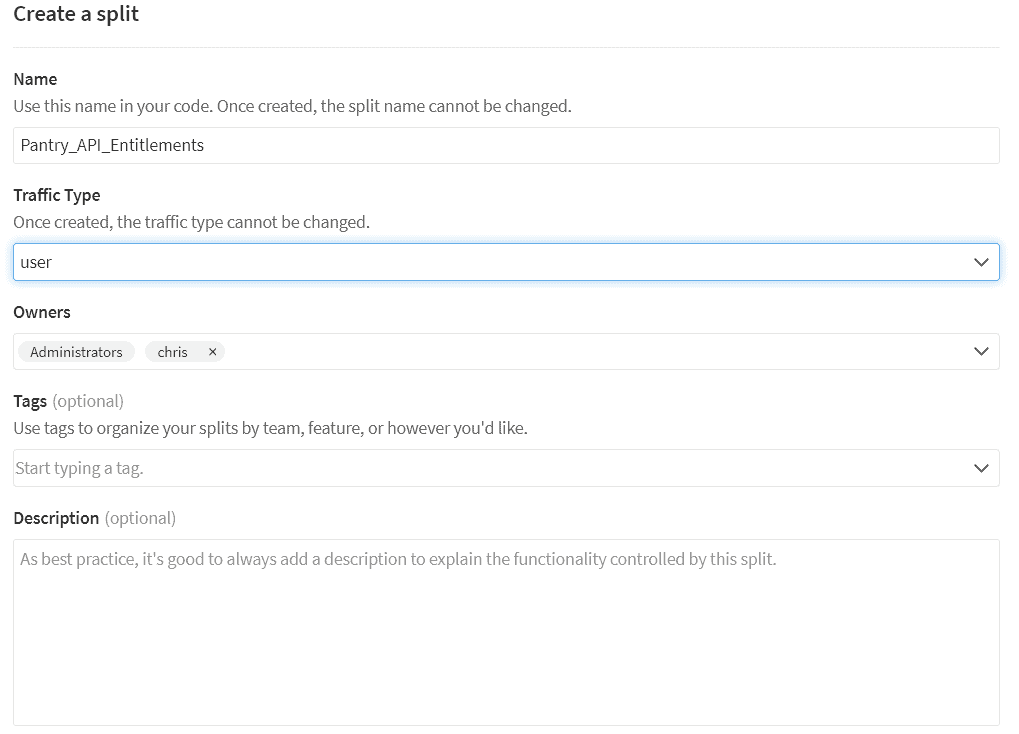
Now that you have a segment of users, you’ll need to create the treatment that will handle the authorization checks. Click Splits on the left-hand side. Click Create split, name it Pantry_API_Entitlements, select user from the Traffic Type drop down, and click create.
Click Add Rules, then scroll down to Set targeting rules and click Add rule. The default rule already looks for a user inside a segment, so select Sales from the dropdown, change serve to on, and click save changes on the top right. You’ll be brought to a change summary page where you can click confirm to apply the changes.
Add Tests to your ASP.NET Core App
Start the project and make a note of which port your application is using. You may need to replace the port number for the following API calls.
Note: If you’re using VS Code and the command line use dotnet run
Open up Postman and create a new POST tab.
Make sure to change the Content-Type in Headers to application/json for all POST calls you’re about to make. You may need to uncheck Content-Type and create a new one at the bottom of the list.
For the first POST call http://localhost:37095/api/pantry, but in Body select raw and add the following:
{
  "id": 1,
  "name": "Cereal",
  "expiration": "2022-01-01T00:00:00",
  "weight": 1,
  "count": 1
}Click SEND. You should get an HTTP status of 200 and a response of 1.
For the first GET, call http://localhost:37095/api/pantry.
Now create another POST using http://localhost:37095/api/pantry/image and the following just like before:
{
  "id": 1,
  "location": "/somewhere"
}Click SEND. You should get an HTTP status of 401 and an error response. Why? Because the treatment only allows access to people in the Sales group. You haven’t even logged in yet, and the system has no clue who you are.
{
  "type": "https://tools.ietf.org/html/rfc7235#section-3.1",
  "title": "Unauthorized",
  "status": 401,
  "traceId": "|980220d1-4ab6a5bca9342aa9."
}Let’s create a new POST using http://localhost:37095/api/authenticate/login and the following json:
{
  "username": "Sarah"
}Click SEND. You should get an HTTP status of 200 and a response of:
Logged In!If you go back and resend the POST to http://localhost:37095/api/pantry/image, you should get an HTTP status 200 and a response of 1.
Lastly, create another GET to fetch specific image locations based on product ID using http://localhost:37095/api/pantry/image/1.
If you’re logged in, you’ll get an HTTP status 200 and a response of:
Let’s turn the treatment off!
Go to your Splits and click Pantry_API_Entitlements. Scroll down to Set targeting rules, change serve from on to off. Click Save Changes in the top right corner, then when the Change summary page opens, click Confirm at the bottom.
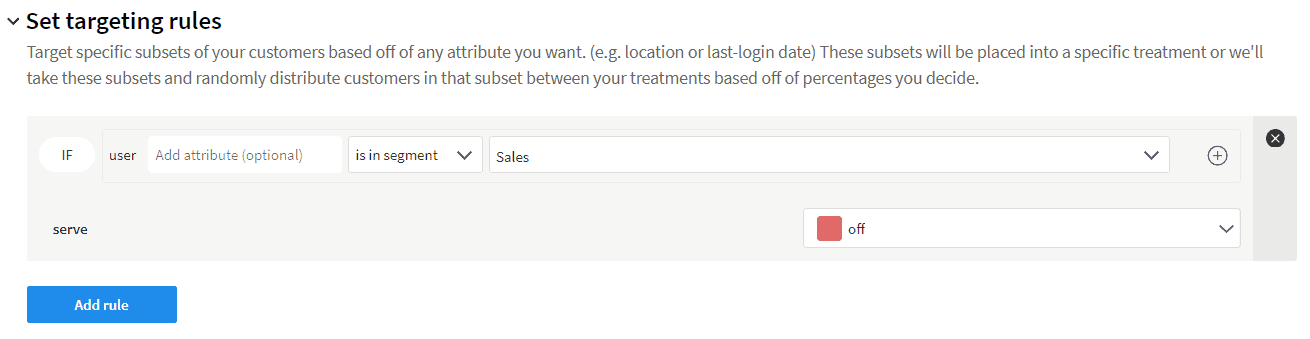
Even if you’re logged in and in the correct segment, you can’t access any Image endpoints.
Learn More About Feature Flags, Secure Entitlements, and More
Now you can control access to your features by adding users to your Segment. Better yet, someone else can add them to the segment while you focus on writing code. One of the great things about Split is the ability to create functionality in your applications that management can then control. Speaking from experience, there’s no better feeling than creating something and not having to manually edit the settings yourself.
Here are some other great things about Split I think you’ll like:
- How to Structure Feature Flags for Entitlements
- 7 Ways Feature Flags Improve Software Development
- Introducing the Split CLI
As always, if you’re looking for more great content like this, we’d love to have you follow us on Twitter @splitsoftware and subscribe to our YouTube channel.
Get Split Certified
Split Arcade includes product explainer videos, clickable product tutorials, manipulatable code examples, and interactive challenges.
Deliver Features That Matter, Faster. And Exhale.
Split is a feature management platform that attributes insightful data to everything you release. Whether your team is looking to test in production, perform gradual rollouts, or experiment with new features–Split ensures your efforts are safe, visible, and highly impactful. What a Release. Get going with a free account, schedule a demo to learn more, or contact us for further questions and support.