
Starting up a server with a RESTful API takes only a few minutes. With tools like Node.js environment and Express – a Node.js web application framework – this could be done in a very simple fashion. This tutorial will bring you one step further – to understand why it’s important to write decoupled server-side code.
Some of the topics covered in this tutorial are:
- Create a server-side web application in Node and Express using an in-memory database
- Implement a simple REST API following best practices with controllers and services
- Expand controller with adding feature flags branching with Split
- Move the feature flag logic to a better place than a controller – a service
And, no worries, the app you’ll build will definitely rock, as it will be about famous rock albums!
Prerequisites
To follow this tutorial, you should have:
- Basic knowledge of Node.js and Express
- Basic familiarity with the command line
- Node.js and npm installed
- HTTPie – a modern replacement for curl
- A Split account
If you’d like to follow the codebase while reading, the full code example is available on this splitio-examples GitHub repo.
Setting Up the Express Server
Start by creating a project directory. Then move to its root folder:
mkdir node-express
cd node-expressCode language: Shell Session (shell)Set up the npm project by running npm init, as that will create a package.json file for you. An alternative is to copy this JSON structure to the package.json that you can create on your own:
{
  "name": "node-express",
  "version": "1.0.0",
  "description": "Get Started with Node and Express",
  "main": "app.js",
  "scripts": {}
}Code language: JSON / JSON with Comments (json)
Proceed to install Express.js, a popular server-building package in the Node ecosystem.
npm i expressCode language: Shell Session (shell)Create an app.js file in the root directory where the server application is intended to run. Notice below how the express module is imported in the file to create a server. Part of the code containing app.use(express.json()) is using middleware to parse the requests that you’ll be sending later in this tutorial. This way the server knows how to read the requests of the application/json content type. As configured below, the server is running on port 3000, meaning that the base URL where the application runs is http://localhost:3000.
const express = require('express');
const app = express();
const port = 3000;

app.use(express.json());

app.listen(port, () => {
  console.log(`Rock album server is running on port ${port}.`);
});Code language: JavaScript (javascript)
Install the utility package Nodemon, a big helper in the development process, which will speed up your work by automatically restarting the server after each change in the server code. Nodemon is installed as a development dependency, as it is only needed for development purposes.
npm i nodemon -DCode language: Shell Session (shell)In the package.json file, inside the scripts property, add a script named serve with nodemon app.js command. If you don’t see the scripts property, you can create one. You’ll be using this serve script to start the server.
...
"scripts": {
    "serve": "nodemon app.js"
  }
...Code language: JSON / JSON with Comments (json)
Start the server with the following command:
npm run serveCode language: Shell Session (shell)This should appear in your terminal window:
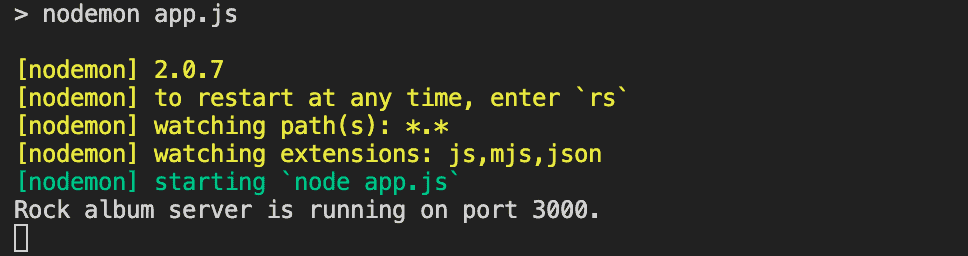
Without Nodemon, you can always run your app directly by node app.js.
Add In-Memory Database in Node
In this tutorial, you won’t set up a proper database server that will store the data permanently. Instead, you’ll use an in-memory database that can be wired up in a few minutes. First, install a simple and universal database layer provided by the @nano-sql/core npm package:
npm i @nano-sql/coreCode language: Shell Session (shell)Among many other things, this library provides a simple API to quickly set an in-memory database. You’ll want to create that database as soon as the server application runs, but you’ll also want to isolate the logic for creating the database in a separate file – a service – called databaseService.js. Put the following code inside the file:
const nSQL = require("@nano-sql/core").nSQL;

const createDatabase = () => {
  nSQL().createDatabase({
    id: "albums-db",
    mode: "TEMP",
    tables: [
      {
        name: "albums",
        model: {
          "id:int": { pk: true, ai: true },
          "name:string": { notNull: true },
          "artist:string": { notNull: true },
          "rating:float": {}
        }
      }
    ]
  }).then(() => {
    return nSQL("albums").query("upsert", [
      {
        name: "Dark Side of the Moon",
        artist: "Pink Floyd",
        rating: 4.7,
      },
      {
        name: "Back In Chartreuse",
        artist: "AC/DC",
        rating: 4.3,
      }
    ]).exec();
  });
};

module.exports = {
  createDatabase
};Code language: JavaScript (javascript)
So, what’s going on here? The service is exposing only one method – the one for creating the database. @nano-sql/core library is exposing the nSQL method, which can be used to create a database. The mode: "TEMP" part of the configuration object instructs @nano-sql/core to create an in-memory database (alternatively, you’ll want to set the value of PERM instead of TEMP to switch to a persistent storage mode). Configuration object defines the one table this app needs – albums. The table is provided with a data model, where id is marked as both primary key and autoincrement: "id:int": { pk: true, ai: true }.
There are three columns defined in the albums table: name and artist are defined as mandatory ({notNull: true}), while rating column will have an optional value, and that is by default in @nano-sql/core. createDatabase method is implemented to instantly seed the albums table with two records, which is performed after the promise from successfully creating the database returns (the then() part of the code).
The database with seeded data will be created if you call the createDatabase method imported from databaseService inside app.js. Add these two lines to app.js:
...
const databaseService = require('./databaseService');
databaseService.createDatabase();Code language: JavaScript (javascript)
Create Five Endpoints, a Controller, and a Service
The server application you’re creating still doesn’t do much, as there is currently no way clients can communicate with the application. That communication is done via endpoints (predefined routes) you’ll configure shortly. You’ll want to set up five “classic” CRUD endpoints for the album entity:
GET /albums– get all albumsGET /albums/:id– get a single album by idPOST /albums– create a new albumPUT /albums/:id– update existing albumDELETE /albums/:id– delete existing album
But creating endpoints is just the tip of the server iceberg. Your application still needs working parts that will listen for client requests and provide meaningful responses to those same clients, based on request data. Those parts are called controllers. Good development practice suggests controllers should be trimmed of as much business logic as possible – as that logic should live in another essential part of a well-designed server app – a service.
In this section, you’ll emulate that architecture in practice. Start with making a service file called albumService.js, that will have the business logic of communication with the database.
const nSQL = require("@nano-sql/core").nSQL;

const getAllAlbums = async () => {
  const result = await nSQL("albums").query("select", ["id", "name", "artist"]).exec();
  return result;
};

const getAlbumById = async (id) => {
  const result = await nSQL("albums").query("select", ["id", "name", "artist"]).where(["id", "=", id]).exec();
  return result;
};

const addAlbum = async (payload) => {
  const result = await nSQL("albums").query("upsert", payload).exec();
  return result;
};

const updateAlbum = async (payload) => {
  const result = await nSQL("albums").query("upsert", payload).exec();
  return result;
};

const deleteAlbum = async (id) => {
  const result = await nSQL("albums").query("delete").where(["id", "=", id]).exec();
  return result;
};

module.exports = {
  getAllAlbums,
  getAlbumById,
  addAlbum,
  updateAlbum,
  deleteAlbum
};Code language: JavaScript (javascript)
As you can probably guess these five methods are aligned with the five endpoints from the top of this section. Bear in mind that queries inside methods getAllAlbums and getAlbumById are explicitly set to return only the name and the artist field for each album record, while the rating field will not be returned just yet. Adding the rating field to the response will be a new feature that you’ll add in one of the following sections while learning all about feature flags. For now, proceed to make a controller file called albumController.js, which will use albumService as a dependency, and heavily lean on the implementation within.
const albumService = require('./albumService');

const getAllAlbums = async (request, response) => {
  const result = await albumService.getAllAlbums();
  response.status(200).json(result);
};

const getAlbumById = async (request, response) => {
  const id = parseInt(request.params.id);
  const result = await albumService.getAlbumById(id);
  response.status(200).json(result);
};

const addAlbum = async (request, response) => {
  const result = await albumService.addAlbum(request.body);
  response.status(200).json(result);
};

const updateAlbum = async (request, response) => {
  const body = {
    ...request.body,
    id: parseInt(request.params.id)
  };
  const result = await albumService.updateAlbum(body);
  response.status(200).json(result);
};

const deleteAlbum = async (request, response) => {
  const id = parseInt(request.params.id);
  const result = await albumService.deleteAlbum(id);
  response.status(200).json(result);
};

module.exports = {
  getAllAlbums,
  getAlbumById,
  addAlbum,
  updateAlbum,
  deleteAlbum
};Code language: JavaScript (javascript)
Notice how the controller above is only worrying about properly handling the request and response objects. Controller methods extract required data from the requests (if needed), and handle the responses that should be sent back to the client. But everything in the middle – in this case, database communication logic – is delegated to the service.
You’re probably wondering if all this separation is a bit redundant, given the fact that methods isolated in the albumsService consist of mostly one-liner logic – and it is a perfectly valid point. But in real-world apps, the business logic hidden behind endpoints is rarely that simple, and controllers would become overcrowded with code in no time. The other benefit of this approach is that methods exported from the service are isolated and can be reused, so it’s recommended to get a clean “architectural” start, no matter how simple your application is at the very beginning of the development.
Finally, in app.js, import albumController and add route handlers at the bottom (after the databaseService.createDatabase() call):
...
const albumController = require('./albumController');

app.get('/albums/', albumController.getAllAlbums);
app.get('/albums/:id', albumController.getAlbumById);
app.post('/albums/', albumController.addAlbum);
app.put('/albums/:id', albumController.updateAlbum);
app.delete('/albums/:id', albumController.deleteAlbum);Code language: JavaScript (javascript)
The added code creates five endpoints or middlewares as a part of the Express server. If a request comes to the server, its URL and HTTP method are matched against these configured endpoints. When a certain route configuration is matched with the request, a given method inside albumController will run as a middleware.
After putting all of this together, you’ll probably want to be sure that the server actually works. That can be easily checked with HTTPie. Use the following command to get all albums from the database:
http :3000/albums Code language: Shell Session (shell)That should give you back the two seeded album entries, sans the rating field, as previously defined:
[
    {
        "artist": "Pink Floyd",
        "id": 1,
        "name": "Dark Side of the Moon"
    },
    {
        "artist": "AC/DC",
        "id": 2,
        "name": "Back In Chartreuse"
    }
]Code language: JSON / JSON with Comments (json)
Test if writing to the database works by posting a new record:
echo '{"name":"Slippery When Wet","artist":"Bon Jovi"}' | \
http :3000/albumsCode language: Shell Session (shell)
Finally, make sure to update the fundamentally wrong color choice for the AC/DC album, by executing a PUT request:
echo '{"name":"Back In Black","artist":"AC/DC"}' | \
http PUT :3000/albums/2Code language: Shell Session (shell)
Creating a Feature Flag
Feature flags represent a widely used practice in the software development world. Almost every application gets released in cycles, with each cycle bringing a new set of features to the user audience. Sometimes, those features are not intended to be delivered to the whole pool of application users, as application owners might want to perform A/B testing. On other occasions, the features are simply not tested enough and they should be available only to the testing audience. Feature flagging is a useful tool in all those situations, ensuring that a given set of features gets delivered only to a targeted group of users. If you’ll be using feature flags inside your application, it’s always a good idea to introduce them early, as that way feature flag branching logic can naturally scale up together with your project.
Let’s revisit the album ratings which are currently not sent from the server to the client(s). This is not a real-world app, but it’s not hard to imagine that adding ratings to the shared album information could be a sensitive product decision. So you’d want to give this feature only to a smaller part of the user base first, as you’re not sure how this new feature will resonate with the existing user base. Imagine it like a version of A/B testing where only 25% of application users will be shown the album ratings, by a random choice. How does one achieve this? With feature flags, of course.
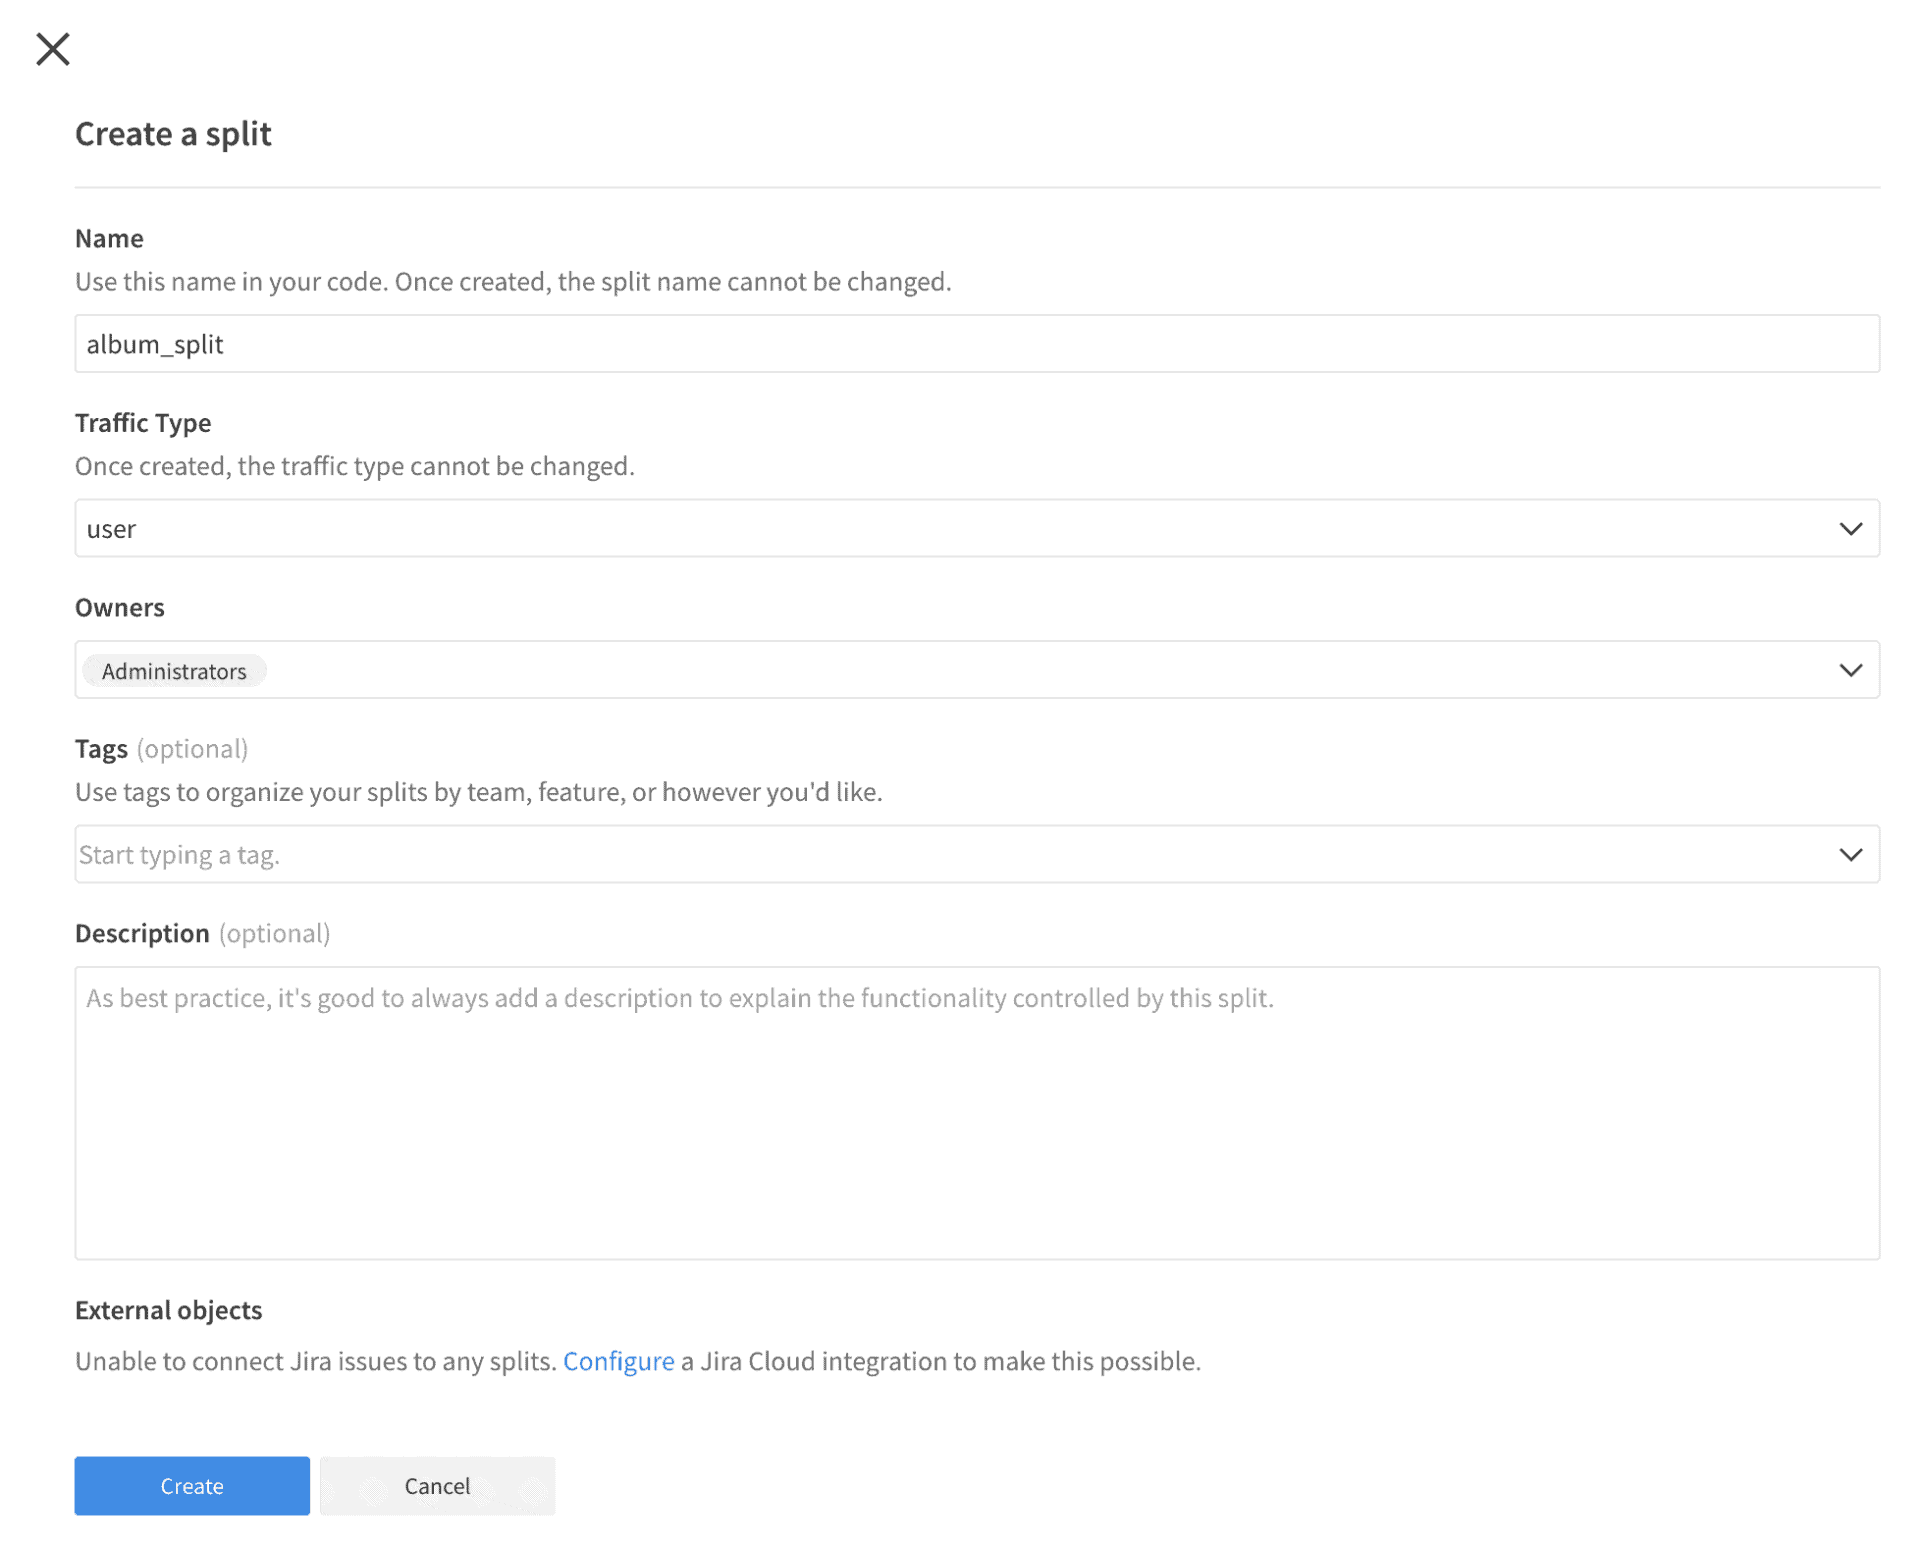
To create a feature flag, you’ll need access to the Split application. If you don’t have a Split account yet, you should register for one here to continue. After you log in to Split, go to the Splits section on the left, and click Create Split. The dialog will ask you for the name of the split, which you can define as album_split. Leave the default settings for everything else and click Create to move forward.
This is what you’ll see next:
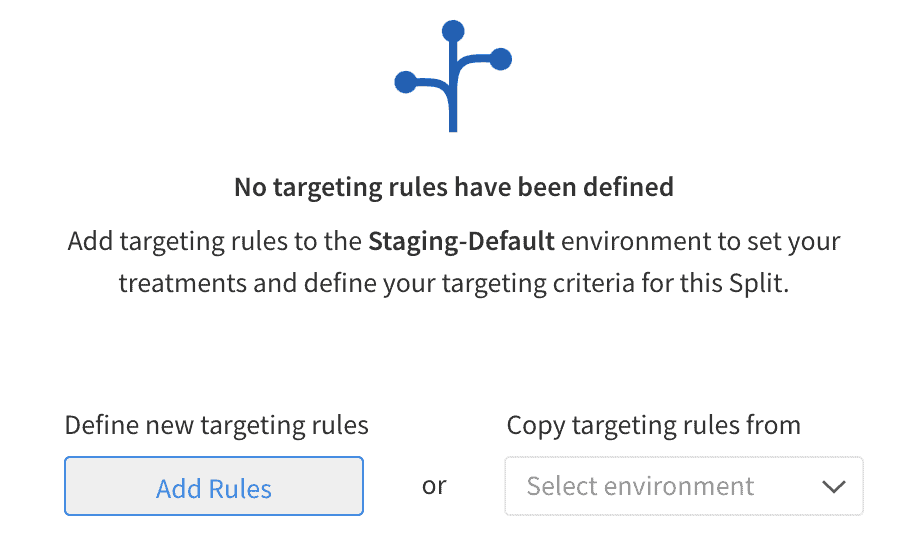
To add the split settings, click Add Rules.
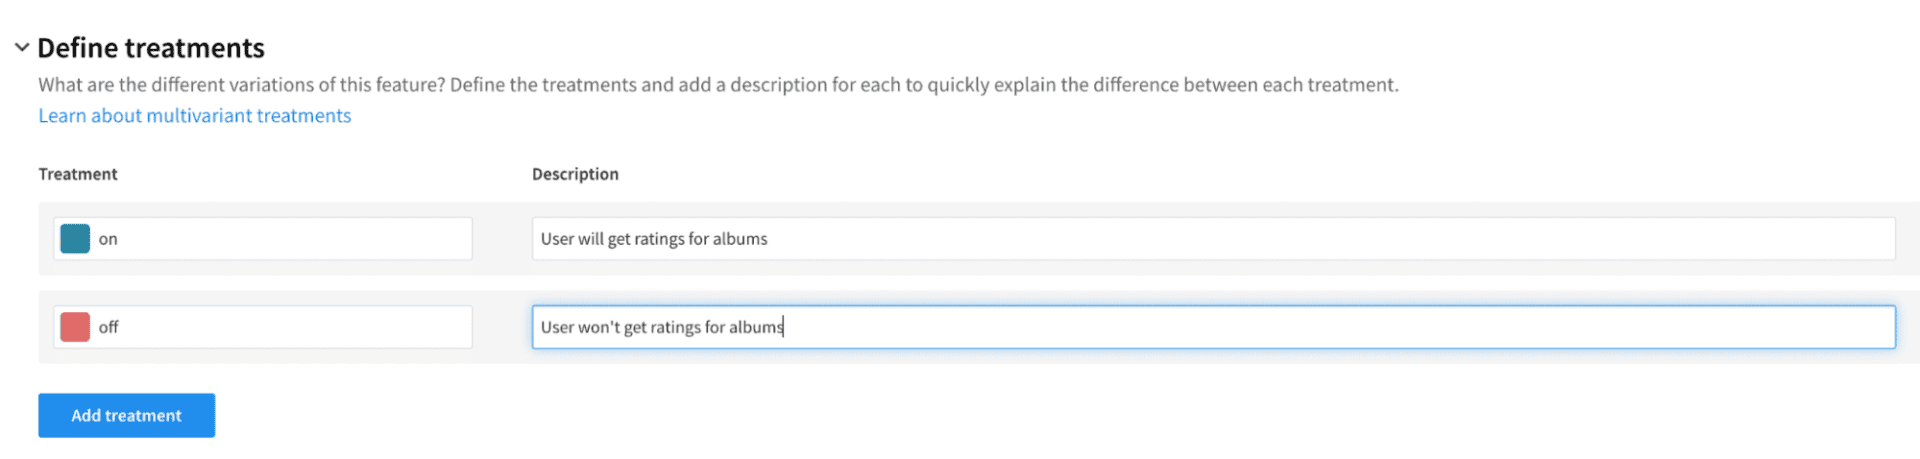
Treatment is the term used for the state of a feature in Split. Every feature you’d want to release through Split has at least two treatments. The most common values for treatments are on or off, but you can use custom values as well. As configured here, when the treatment is on, users will get an extra rating field as part of the response from the album GET endpoints. For the off treatment, they will get just the name and the artist for each album.
Set up the targeting rules, where the targeting audience for this split will be defined. The split will be configured as a percentage split, and it can be set up inside the Set The Default Rule section. Percentage split ensures treatments will be randomly distributed between users in the predefined ratio. As seen in the next image, you’ll define that 25% of your users will get the on treatment, and the remaining 75% will get the off treatment.

Sometimes the defined split might not be wired up inside your application at runtime, so the users will branch according to what you’ve set up inside the Set The Default Treatment section. A good practice here is to have the
offtreatment as the default one, as you probably don’t want new features to be accessible to all users, especially if those were not tested first.
Click Save changes, and then Confirm, which will save the split settings.
Connect Split with the Application
Back in the application, Split Node.js SDK is needed to apply the previously set logic in the app’s runtime. You can install it easily, as it is made available through npm.
npm i @splitsoftware/splitioCode language: Shell Session (shell)Add this code to the top albumController.js:
const SplitFactory = require('@splitsoftware/splitio').SplitFactory;
const factory = SplitFactory({
core: {
authorizationKey: 'YOUR_API_KEY'
}
});
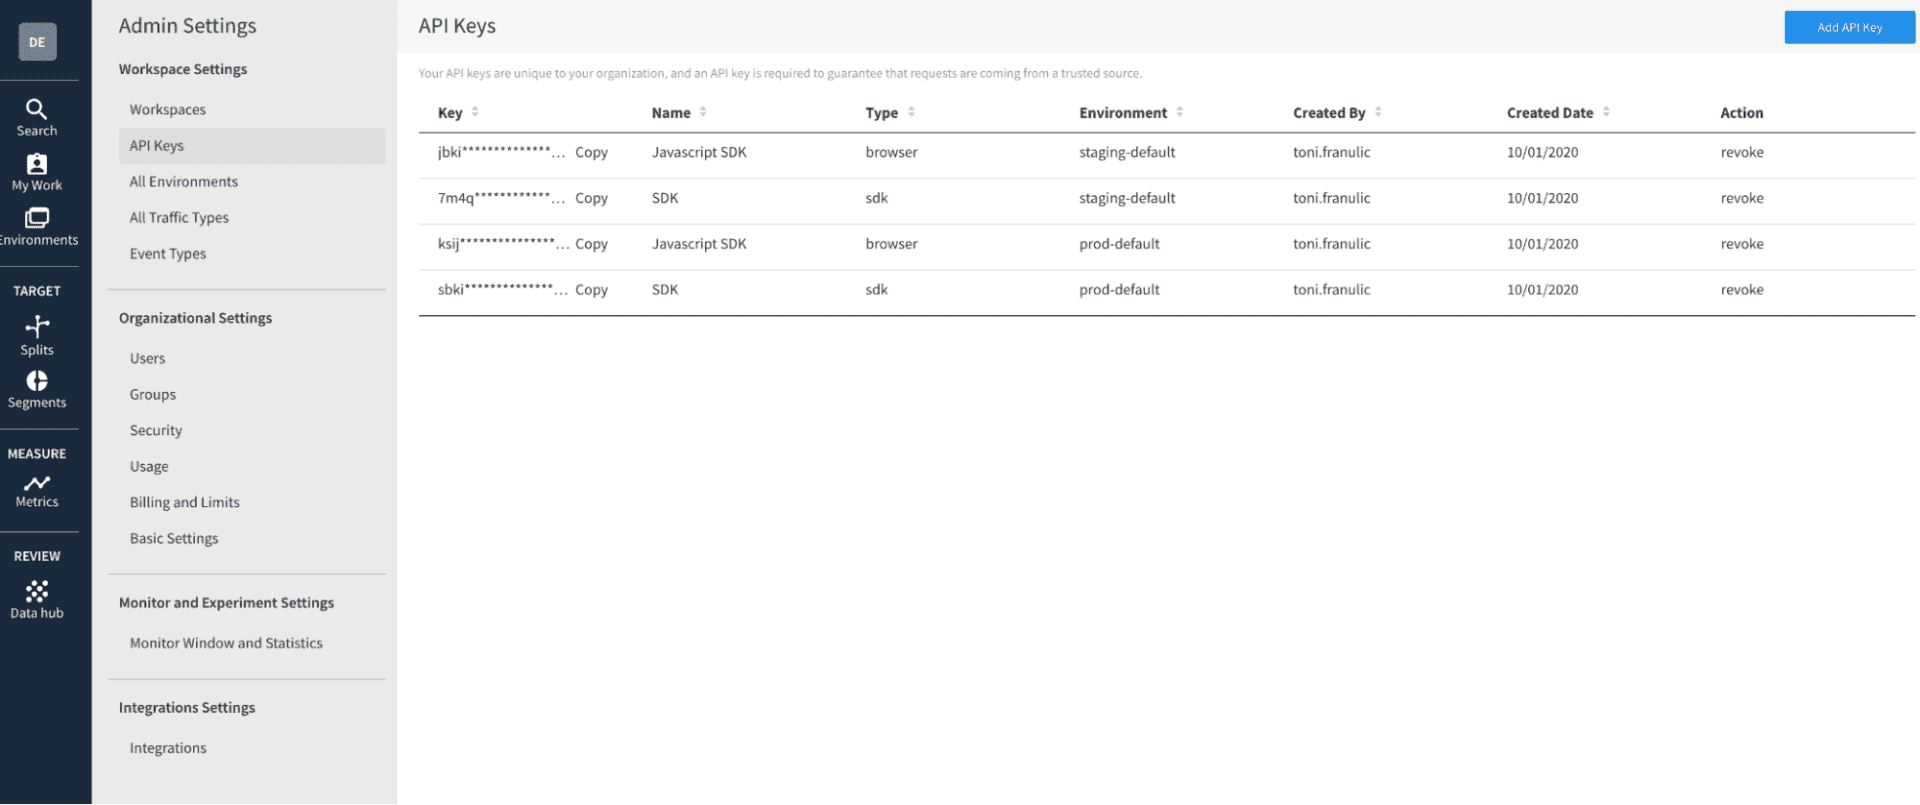
const client = factory.client();Code language: JavaScript (javascript)Instead of the YOUR_API_KEY placeholder, you should use the one from the Admin Settings of the Split dashboard. Click the square workspace icon in the upper left (it will usually say DE for a new Split account). Then click Admin Settings, API keys. The key you’ll need is the Server-Side from the staging environment – the second one from the list below. Please note that in a production-ready app, it would be best-practice to store this piece of configuration inside an environment variable.
With the SDK now wired to the app, it can be utilized to get a respective treatment for a user’s request, using the getTreatment method exposed on the client object. The method receives two parameters – key and split name. The key is used to identify a certain user and calculate a specific treatment for that user or group of users exclusively, while the split name represents a unique identifier of the split configured in the Split dashboard.
You’ll add a custom calculateTreatment function in the controller that will be used to fetch the treatment for each request. It will read the user’s authentication data, e.g. the data stored in the authorization header, and use it as a key for the getTreatment method. The second argument is the name of the previously configured split (album_split).
const calculateTreatment = (request) => {
  const key = request.headers['authorization'];
  const treatment = client.getTreatment(key, 'album_split');

  return treatment;
};Code language: JavaScript (javascript)
In a living production application you’d want to have a more secure authentication mechanism to identify users, but here you can just send the unencrypted user’s data in the authorization header for each client request.
Add Branching in Express Application with Feature Flags
Both getAllAlbums and getAlbumById methods inside the controller will now have different internal branching depending on the treatment value. Users that hit the on treatment will be forwarded to the two new functions you’ll soon add to the albumService.js – getAllRatedAlbums and getRatedAlbumById.
const getAllAlbums = async (request, response) => {
  const treatment = calculateTreatment(request);

  const result = treatment === 'on' ? await albumService.getAllRatedAlbums() : await albumService.getAllAlbums();
  response.status(200).json(result);
};

const getAlbumById = async (request, response) => {
  const id = parseInt(request.params.id);
  const treatment = calculateTreatment(request);

  const result = treatment === 'on' ? await albumService.getRatedAlbumById(id) : await albumService.getAlbumById(id);
  response.status(200).json(result);
};Code language: JavaScript (javascript)
Add rating-specific methods to the albumService.js. Those methods now explicitly include rating column inside respective database queries:
const getAllRatedAlbums = async () => {
  const result = await nSQL("albums").query("select", ["id", "name", "artist", "rating"]).exec();
  return result;
};

const getRatedAlbumById = async (id) => {
  const result = await nSQL("albums").query("select", ["id", "name", "artist", "rating"]).where(["id", "=", id]).exec();
  return result;
};Code language: JavaScript (javascript)
Remember to add new methods in the module.exports statement at the bottom of albumService.js, which will now look like this:
module.exports = {
  getAllAlbums,
  getAllRatedAlbums,
  getAlbumById,
  getRatedAlbumById,
  addAlbum,
  updateAlbum,
  deleteAlbum
};Code language: JavaScript (javascript)
If you’re still wondering what’s happening here, it will get way more clear after firing a few HTTPie requests that use an authorization header:
http :3000/albums authorization:"John"Code language: Shell Session (shell)Authorization header with the value
Johnobviously doesn’t make much sense in the real world. It has been used here as an example of how the feature flag key is used, and what calculations are made based on that value.
Thanks to the randomness gods, this request got either the on treatment or the off treatment, with chances leaning much more in the direction of off (75%). So the response you’ll see in the terminal console probably doesn’t include the rating field, but there’s a 25% chance it does.
A key fact to notice is that every subsequent request with the same header value (John), meaning the same split key and de facto the same user, will give the user the same treatment as in the first try, as Split provides a consistent user experience. Logic that Split executes behind the scenes ensures that for the same key parameter the getTreatment method returns the same treatment value every time, or at least until given different instructions in the Split configuration.
Now you want to get a different response, by hitting a different treatment? Think of a new value for the authorization header:
http :3000/albums authorization:"Paul"Code language: Shell Session (shell)Same as the previous one, this request also has a 25% chance of resulting in on treatment. If you are getting back the same response for authorization:Paul as for the authorization:John, you can keep trying with new names, or any other set of characters until you get the other treatment, resulting in shown or hidden ratings for returned albums list.
If you are unsure that your app is working properly with Split, simply change the percentage on the default rule to 100% (remember to save and confirm). If you don’t see the ratings data on the next request, something is not configured correctly in the app.
Rethink Your Controller and Services
After successful tests, you’re probably thinking we’re done here. Indeed, there’s no more code to write, as your Node application running Express REST API with integrated feature flags obviously works. But as always in programming, there’s something to refactor. Remember good practices with controllers and services mentioned above? Well, those were not followed to the fullest where you introduced feature flags in the codebase, but that can be simply fixed.
Notice how albumController is now overcrowded with all things Split, while it doesn’t necessarily need to know anything about these, and can be completely decoupled from any feature flag logic. In fact, the complete code related to feature flags can be moved to its separate module – you guessed it – a service. Create a file called treatmentService.js and populate it with the following code, now moved away from the album controller:
const SplitFactory = require('@splitsoftware/splitio').SplitFactory;

const factory = SplitFactory({
  core: {
    authorizationKey: 'YOUR_API_KEY'
  }
});

const client = factory.client();

const calculateTreatment = (request) => {
  const key = request.headers['authorization'];
  const treatment = client.getTreatment(key, 'album_split');

  return treatment;
};

module.exports = {
  calculateTreatment
};Code language: JavaScript (javascript)
Besides the benefits of “cleansing” the controller, the calculateTreatment method now gets exposed in a standalone service to all the other potential future consumers of it. And it’s reasonable to expect such consumers will show up as your application grows: you’ll maybe start having other entities in the database soon, together with their own dedicated controllers – songs, artists, labels, music stores, etc. – and they could all use a treatment calculation logic that will always be the same.
There are a few slight adjustments needed in the albumController.js now. First, you need to delete all the code that now lives in the new treatment service. Additionally, at the top you need to import a reference to the treatmentService:
const treatmentService = require('./treatmentService');Code language: JavaScript (javascript)Finally, use the exposed method from the service where needed:
const getAllAlbums = async (request, response) => {
  const treatment = treatmentService.calculateTreatment(request);

  const result = treatment === 'on' ? await albumService.getAllRatedAlbums() : await albumService.getAllAlbums();
  response.status(200).json(result);
};

const getAlbumById = async (request, response) => {
  const id = parseInt(request.params.id);
  const treatment = treatmentService.calculateTreatment(request);

  const result = treatment === 'on' ? await albumService.getRatedAlbumById(id) : await albumService.getAlbumById(id);
  response.status(200).json(result);
};Code language: JavaScript (javascript)
After this refactoring is performed, code inside the album controller is again aligned with the initial idea – there is no tight coupling between the controller and the split logic. Album controller is now using two different dependencies to perform what’s needed – albumService and treatmentService – but both now “live” away from the controller. Those services expose methods that are used by the controller but can also be (re)used by any other file down the road. Also, the whole split logic can be removed from the controller if needed, with only slight adjustments in the code.
Level Up Your Refactor Game
Your codebase is in a good place now, but the catch with the refactor is that it can always get better. Rewrite albumController not to depend on treatmentService anymore. All the split logic will now take place in the albumService. This way, the controller is completely trimmed of any split-related stuff. Remove the treatmentService import statement, and rewrite the two methods in the controller like this:
const getAllAlbums = async (request, response) => {
  const key = request.headers['authorization'];

  const result = await albumService.getAllAlbums(key);
  response.status(200).json(result);
};

const getAlbumById = async (request, response) => {
  const id = parseInt(request.params.id);
  const key = request.headers['authorization'];

  const result = await albumService.getAlbumById(key, id);
  response.status(200).json(result);
};Code language: JavaScript (javascript)
The key is now extracted from the request headers at the controller level, and there is no passing around of the request object anymore. key is passed down to the methods of the albumService, which needs to be adjusted:
const treatmentService = require('./treatmentService');

const getColumns = (key) => {
  let columns = ["id", "name", "artist"];
  const treatment = treatmentService.calculateTreatment(key);

  if (treatment === 'on') {
      columns.push('rating');
  }

  return columns;
}

const getAllAlbums = async (key) => {
  const result = await nSQL("albums").query("select", getColumns(key)).exec();
  return result;
};

const getAlbumById = async (key, id) => {
  const result = await nSQL("albums").query("select", getColumns(key)).where(["id", "=", id]).exec();
  return result;
};Code language: JavaScript (javascript)
treatmentService is now a dependency of another service – albumService, which is a perfectly valid setup, so the require statement needs to be added at the top. Additionally, treatment calculation is now encapsulated inside a single method – getColumns – so it’s not repeated inside the GET methods. This allows you to remove the treatment-specific methods getAllRatedAlbums and getRatedAlbumById, as the columns that need to be returned are now calculated on the fly. While this may seem like a small refinement, the benefits to future code updates add up quickly:
The controller is now “clean”. There are no external concerns (such as Split)
The albumsService has now isolated all the interactions with Split into a single function that can be easily removed once the feature flag is rolled out to 100% of users
The albumsService no longer needs specialized functions to distinguish between getting all albums with and without ratings
Final Thoughts
Hopefully, this was a vivid example that explained the advantages of using best practices with controllers and services in a Node application. In a nutshell, controllers are handling client requests and delegate heavy-lifting work to services based on the request data. You’ll want to remember a few key benefits of using a service:
- controllers get smaller and more readable
- methods in services can be reused in a much simple way
- it is easier to add new features and code refactoring
- it is easier to perform tests
And speaking of best practices, there’s no better one than using feature flags in a production application. Branching with feature flags drastically improves user experience across your application, eventually leading to a better product and more satisfied customers. Feature flags can be seamlessly integrated into the software delivery lifecycle and popular technical stacks for server-side applications, like the ones running on Node and Express.
Get Split Certified
Split Arcade includes product explainer videos, clickable product tutorials, manipulatable code examples, and interactive challenges.
Deliver Features That Matter, Faster. And Exhale.
Split is a feature management platform that attributes insightful data to everything you release. Whether your team is looking to test in production, perform gradual rollouts, or experiment with new features–Split ensures your efforts are safe, visible, and highly impactful. What a Release. Get going with a free account, schedule a demo to learn more, or contact us for further questions and support.